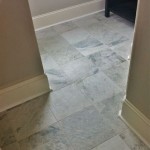
How to Remove Grout from Floor Tiles Without Damaging Them
Removing grout from floor tiles can be a necessary task for various reasons, such as replacing damaged or stained grout, or preparing for a tile replacement. While the process requires careful execution, it can be achieved without damaging the tiles by following the right steps and using the appropriate tools. This article provides a comprehensive guide on how to remove grout from floor tiles effectively and safely.
Essential Tools and Materials
Before starting the grout removal process, gather the necessary tools and materials to ensure a smooth workflow. Having everything readily available will improve efficiency and contribute to a better outcome.
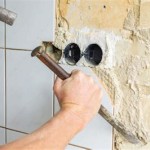
- Grout removal tool: An oscillating multi-tool with a grout removal blade, a grout saw, or a rotary tool with a grout removal bit.
- Safety glasses and dust mask: To protect eyes and lungs from dust and debris.
- Vacuum cleaner with a crevice attachment: To effectively remove dust and grout debris.
- Hammer and chisel (optional): For stubborn grout removal.
- Grout softener (optional): To facilitate easier grout removal.
- Tape: To protect adjacent tiles and surfaces, especially for delicate materials.
- Drop cloths or plastic sheeting: To protect the surrounding floor area.
- Utility knife: For scoring and cleaning grout lines.
Preparing the Work Area
Proper preparation minimizes the risk of damage and ensures a cleaner working environment. Taking these preparatory steps contributes significantly to the success of the grout removal process.
- Clear the area: Remove any furniture, rugs, or objects obstructing access to the tiled floor.
- Clean the tiles: Thoroughly clean the tiles to remove any dirt, grime, or debris that may interfere with the grout removal process.
- Protect adjacent surfaces: Use tape to protect baseboards, cabinets, or any other surfaces near the tiles that could be scratched or damaged during the process.
- Cover the surrounding area: Lay down drop cloths or plastic sheeting to protect the surrounding floor and minimize dust spread.
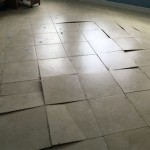
Grout Removal Process
The actual grout removal process requires careful attention and precision. Following the outlined steps will help avoid damage to the tiles.
- Soften the grout (optional): Apply a grout softener according to the manufacturer's instructions. This can make the grout easier to remove, especially for older or hardened grout.
- Score the grout lines: Use a utility knife to carefully score the grout lines. This helps to break the bond between the grout and the tiles, facilitating easier removal.
- Remove the grout: Using the chosen grout removal tool, carefully remove the grout from the joints. For oscillating tools or rotary tools, use a slow and controlled motion. For manual grout saws, apply firm and even pressure. Avoid forcing the tool, as this can damage the tiles.
- Vacuum the debris: Regularly vacuum the grout debris to maintain a clear working area and prevent the dust from spreading.
- Repeat as necessary: Repeat the process for all the grout lines that need to be removed.
Choosing the Right Grout Removal Tool
Selecting the appropriate grout removal tool depends on the type of tile, the grout's hardness, and the user's comfort level. Understanding the advantages and disadvantages of each tool helps in making an informed choice.
- Oscillating multi-tool: Offers good control and precision, ideal for various grout types.
- Grout saw: A manual tool that requires more effort but offers greater control for intricate areas.
- Rotary tool: Powerful but requires careful handling to avoid damaging the tiles.
Tips for Avoiding Tile Damage
Protecting the tiles during grout removal is paramount. Applying these preventative measures minimizes the possibility of scratches or chips.
- Avoid excessive pressure: Applying too much force with the removal tool can cause tile damage. Use a gentle but firm pressure.
- Keep the blade at the correct angle: Maintaining the proper angle prevents scratching the tile surface.
- Work in small sections: This allows for greater control and prevents fatigue, reducing the likelihood of errors.
- Test in an inconspicuous area: Before starting on the main area, test the chosen method and tool on a less visible section to ensure compatibility and adjust technique.
Cleaning Up After Grout Removal
Post-removal cleaning is essential for preparing the tiles for new grout. Proper cleaning ensures a smooth and even finish for the new grout application.
- Vacuum thoroughly: Remove all remaining grout dust and debris from the tile surface and grout lines.
- Wipe down the tiles: Use a damp cloth to clean the tiles and remove any residual dust or haze.
- Allow to dry completely: Ensure the tiles are completely dry before applying new grout.
Safety Precautions
Prioritizing safety throughout the grout removal process protects against potential hazards. Following these safety measures is crucial for a safe and successful project.
- Wear safety glasses: Protect eyes from dust and debris.
- Use a dust mask: Prevent inhalation of dust particles.
- Ensure adequate ventilation: Work in a well-ventilated area to reduce dust concentration.

How To Clean Grout Without Damaging It Method

Grout Haze And Tips To Remove It On Tile Floors Re A Floor Stone Restoration Cleaning Serving Novi Brighton Farmington Hills West Bloomfield Metro Detroit Areas

How To Clean Floor Tile Grout Without Scrubbing Easy Guide

How To Remove Grout Without Destroying Your Tile Choosing And Using Tools With Carmen Ciricillo

Easiest Way To Clean Grout Without Scrubbing Microfiber Whole

How To Clean Grout Tile Cleaning Tips Simply Spotless

How To Remove Grout From Tile

How To Remove Grout From Tile Rubi Blog Usa

How To Remove Grout From Tiles Bunnings

How To Remove Grout Haze Shorts Homerepairtutor
Related Posts