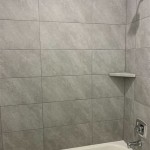
How To Remove Grout From Floor Tiles
Grout removal is a necessary step for various tiling projects, such as replacing cracked or stained grout, repairing damaged tiles, or updating a room's aesthetic. Several methods exist for grout removal, each offering distinct advantages and disadvantages depending on the specific situation. Choosing the right method and utilizing proper techniques can ensure a clean, damage-free result.
Before initiating any grout removal process, one must gather the necessary tools and materials. Common tools include a grout saw, grout rake, oscillating tool with a grout removal blade, utility knife, hammer and chisel, safety glasses, dust mask, and shop vacuum. A grout removal bit for a rotary tool can also be useful for intricate areas. Having the right tools at hand will streamline the removal process and minimize potential tile damage.
The first step in any grout removal process involves preparing the work area. Covering adjacent surfaces with drop cloths or plastic sheeting protects them from debris. Cleaning the tile surface with a suitable tile cleaner removes any dirt or grime that might impede the removal process or interfere with new grout adhesion. Allowing the tiles to dry completely before proceeding is crucial.
A manual grout saw is a common tool for smaller grout removal projects. Positioning the saw blade at a shallow angle to the grout line helps prevent scratching the tile surface. Applying firm, even pressure, the user should run the saw along the grout line to create a groove. Repeating this process several times deepens the groove, gradually removing the grout. This method requires patience and precision but minimizes the risk of tile damage.
A grout rake or scraper can be utilized after softening the grout with a grout remover solution. Following the manufacturer's instructions, one applies the solution to the grout lines and allows it to dwell for the specified time. The rake is then used to scrape out the softened grout. Multiple applications may be necessary for deeply embedded or hardened grout. This method is less physically demanding than using a grout saw but requires careful attention to the grout remover's dwell time to avoid damaging the tiles.
An oscillating tool fitted with a grout removal blade offers a more efficient approach, particularly for larger projects. The oscillating action of the blade effectively breaks up the grout without impacting the surrounding tiles. However, careful control is necessary to prevent accidental contact with the tile surface, which can cause scratches or chips. Using this tool requires appropriate safety precautions, including eye and respiratory protection.
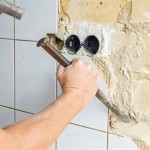
For particularly stubborn grout, a hammer and chisel can be employed. This method requires extreme caution to avoid damaging the tiles. Protecting the tile edges with masking tape can help minimize the risk of chipping. Holding the chisel at a low angle to the grout line and tapping it gently with the hammer gradually removes the grout. This method is generally reserved for small, localized areas or when other methods prove ineffective.
Throughout the grout removal process, regular cleaning is essential. A shop vacuum with a narrow nozzle effectively removes dust and debris from the grout lines, improving visibility and preventing the spread of dust. Periodically wiping the tile surface with a damp cloth also helps maintain a clean work area and prevents grout dust from settling onto the tiles.
After removing the grout, inspecting the tile edges for any damage is crucial. Minor chips or scratches can often be repaired with a tile repair kit. Thoroughly cleaning the tile surface and grout lines ensures proper adhesion of the new grout. Allowing the area to dry completely before applying new grout is essential for optimal results.
Different types of grout exist, each with specific properties and application requirements. Selecting the appropriate grout type depends on factors such as tile type, joint width, and location. Following the manufacturer's instructions for mixing and applying the new grout ensures proper consistency and adhesion. Using appropriate grouting tools, such as a grout float and sponge, facilitates a smooth and even application.
Cleaning up after grouting is vital for maintaining the aesthetic appeal of the tiled surface. Removing excess grout with a damp sponge before it hardens simplifies the cleaning process. After the grout has cured, a final cleaning with a suitable tile cleaner removes any remaining haze or residue. Regular sealing of the grout lines helps protect them from staining and discoloration, prolonging their lifespan.

How To Clean Grout Tile Cleaning Tips Simply Spotless

How To Remove Grout From Tile A Complete Diy Guide Angi

How To Clean Grout Tips For Natural Stone Flooring Granite Gold

Remove Grout From Ceramic Tile Protile Repair Tricks

Remove Grout From Ceramic Tile Protile Repair Tricks

How To Remove And Replace Grout Diy Network

How To Clean Grout On Floor Tile Pro Housekeepers

Grout Haze And Tips To Remove It On Tile Floors Re A Floor Stone Restoration Cleaning Serving Novi Brighton Farmington Hills West Bloomfield Metro Detroit Areas

Dried On Grout Hometalk

Removing Old Grout Diy Home Improvement Forum
Related Posts