How To Remove Grout From Bathroom Tiles
Grout removal is a crucial step in many bathroom renovation projects. Whether replacing damaged tiles, updating the grout color, or combating stubborn mold, knowing how to remove grout effectively is essential. This guide provides a comprehensive overview of the process, outlining the necessary tools, safety precautions, and step-by-step instructions for successful grout removal.
Assessing the Grout: Before beginning, assess the type of grout present. Sanded grout, commonly used for wider joints, requires more robust removal techniques compared to unsanded grout, typically found in narrower joints. Understanding the grout type informs tool selection and the amount of force required.
Gathering the Necessary Tools and Materials: Proper tools are essential for efficient and safe grout removal. Assemble the following items: grout saw, grout rake, oscillating multi-tool with a grout removal blade, hammer and chisel (for stubborn areas), safety glasses, dust mask, gloves, shop vacuum, bucket, sponge, and drop cloths.
Preparing the Work Area: Protecting surrounding surfaces is crucial. Cover adjacent tiles, fixtures, and the floor with drop cloths. Proper ventilation is also important. Open windows and/or use a fan to minimize dust inhalation.
Safety Precautions: Grout removal involves sharp tools and generates dust. Always wear safety glasses and a dust mask. Gloves are recommended to protect hands from abrasion and potential irritants in older grout. When using power tools, adhere to the manufacturer's safety guidelines.
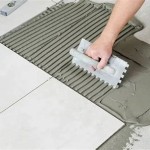
Method 1: Manual Grout Removal: For smaller areas or less stubborn grout, manual removal using a grout saw or rake is often sufficient. Start by inserting the tip of the grout saw into the grout line at a shallow angle. Apply steady pressure and move the saw back and forth along the grout line, deepening the groove with each pass. A grout rake can help remove loosened debris. Exercise caution to avoid scratching the tile surface. For exceptionally hard grout, a hammer and chisel may be necessary, using light taps to chip away the grout. Extreme care must be taken with this method to prevent tile damage.
Method 2: Power Tool Grout Removal: An oscillating multi-tool equipped with a grout removal blade significantly speeds up the process, particularly for larger areas. Ensure the tool is fitted with the correct blade and securely fastened. Hold the tool at a shallow angle and guide it along the grout line, allowing the vibrations to break up the grout. Avoid applying excessive pressure, which could damage the tiles. Work in small sections, clearing debris regularly with a shop vacuum.
Cleaning Up After Grout Removal: Thoroughly clean the area after grout removal to ensure a smooth surface for new grout application. Use a shop vacuum to remove dust and debris from the grout lines and surrounding surfaces. A damp sponge can be used to wipe down the tiles, removing any remaining residue. Allow the area to dry completely before proceeding with new grout application.
Dealing with Stubborn Grout: Some grout, particularly older or epoxy-based grout, may prove particularly resistant to removal. In such cases, a grout softener can be applied to help break down the grout. Follow the manufacturer's instructions carefully for application and dwell time. Alternatively, a rotary tool with a specialized grout removal bit can be used, but this method requires greater precision and control to avoid tile damage. Consult a professional if encountering significant difficulty.
Choosing the Right Removal Method: The optimal grout removal method depends on several factors, including the type of grout, the size of the area, and the tools available. Manual removal is suitable for smaller areas or less stubborn grout. Power tools are more efficient for larger areas or tougher grout but require careful handling to avoid tile damage. Chemical grout softeners can assist with particularly stubborn grout. Assess the specific situation to determine the most appropriate approach.
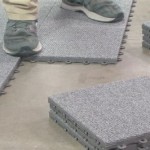
Disposing of Old Grout: Dispose of removed grout debris properly. Small amounts can be placed in household waste, but larger quantities may require disposal at a designated construction waste facility. Check local regulations for specific guidelines.
Tips for Efficient Grout Removal: Several techniques can improve the efficiency and effectiveness of grout removal. Keeping the blade sharp (for manual tools) or using a fresh blade (for power tools) minimizes effort and improves results. Working in manageable sections prevents fatigue and allows for regular debris removal. Maintaining a consistent angle and applying steady pressure (rather than excessive force) reduces the risk of tile damage. Patience and attention to detail are key to successful grout removal.

How To Clean Grout In Your Shower Alpine Carpet Cleaning

How To Clean Mold In Shower Grout Tips And Tricks Certified Care

How To Remove Old Grout

How To Clean Grout Cleaning Stains

How To Regrout Bathroom Tile In 5 Easy Steps True Value

3 Top Secret Tricks For Cleaning With Vinegar Making Lemonade

How To Clean Bathroom Tile And Grout Reviews By Wirecutter

The Ultimate Guide To Cleaning Grout 10 Diy Tile Cleaners Tested Bren Did

How To Clean Grout In Shower Simple S Keep Your Bathroom Tiles Gleaming Express Co

How To Clean Bathroom Tile And Grout Reviews By Wirecutter
Related Posts