How To Remove Floor Tiles
Removing floor tiles can be a challenging task, but with the right tools and techniques, it can be accomplished successfully. Whether you're preparing for a renovation, replacing damaged tiles, or simply wanting a change in decor, knowing how to remove floor tiles efficiently is essential. This article will guide you through the process step-by-step, providing tips and considerations for a smooth and safe removal.
Safety First: Preparing for the Removal
Before embarking on the removal process, prioritize safety.
- Wear protective gear, including safety glasses, gloves, and sturdy footwear. Tile removal can generate dust and debris, and sharp edges can pose a risk.
- Clear the area around the tiles to be removed, ensuring a safe work zone. Remove furniture, rugs, and any other obstacles.
- If necessary, turn off the electricity and water supply to the area where you are working, particularly if you encounter plumbing or electrical wiring beneath the tiles.
- Consider the presence of asbestos. If the tiles were installed before 1980, there is a chance they contain asbestos. In this case, it is crucial to hire a professional for removal, as asbestos is hazardous to health.
Tools and Materials for Tile Removal
The tools and materials required for tile removal will vary depending on the type of tile and the condition of the adhesive. However, some essential items include:
-
Chipping hammer or pry bar:
These tools are used to loosen and pry up the tiles. Choose a chipping hammer with a sharp edge and a pry bar with a solid handle and a flat, sturdy blade. -
Safety glasses:
Protect your eyes from flying debris. -
Gloves:
Protect your hands from cuts and scrapes. -
Bucket and dustpan:
Collect tile debris and dust. -
Utility knife or tile saw:
These tools are used for scoring the grout between tiles, making it easier to remove them. -
Grout removal tool:
This tool helps remove the grout from between tiles. -
Tile removal solution:
This solution helps loosen the adhesive, making it easier to remove the tiles. -
Shop vacuum:
Clean up dust and debris after removal.
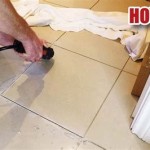
Removing the Tiles
Now, let's move onto the removal process itself:
-
Score the grout:
Use a utility knife or tile saw to score the grout between the tiles. This helps to break the seal between the tiles and the adhesive. -
Loosen the tiles:
Use a chipping hammer or pry bar to loosen the tiles. Work from the edges and gently tap or pry the tiles, working your way towards the center. Be careful not to damage the subfloor. -
Remove the tiles:
Once the tiles are loosened, carefully lift them up. Use a utility knife or tile saw to cut any remaining tiles that are too large to remove in one piece. -
Remove the adhesive:
Once all the tiles are removed, remove the adhesive from the subfloor. Use a chisel and hammer to scrape off the adhesive, or a tile removal solution to soften the adhesive and make it easier to remove. Be sure to clean up any adhesive residue to ensure a smooth surface for new tiles.
Remember, removing tiles can be a messy and time-consuming process. Patience and careful technique are essential for a successful and safe removal. If you are unsure about any aspect of the process, it is always best to consult with a professional.

Tips On How To Remove A Tile Floor

How To Remove A Tile Floor The Only Guide You Ll Need Fh

Remove Floor Tile Effectively With Rubi S Tools And Tips

How To Remove Ceramic Tile And Thinset The Nifty Nester

How To Remove Tile Flooring Yourself With Tips And Tricks All Things Thrifty

How To Remove Tile Floor A Diy Guide

How To Remove Tile Floor A Diy Guide Angi

How To Remove Ceramic And Porcelain Tiles

How To Easily Remove Tile Flooring Tiles Diy Bathroom

3 Easy Ways To Remove Ceramic Tile Wikihow
Related Posts