How to Remove Ceramic Tile From Concrete
Removing ceramic tile from a concrete subfloor is a common task in renovation projects. While the process can be labor-intensive, understanding the proper techniques and employing the right tools can significantly improve efficiency and minimize damage to the underlying concrete. This article provides a comprehensive guide to ceramic tile removal from concrete, outlining the necessary preparations, tools, and step-by-step procedures.
Preparation is Key: Gathering Materials and Ensuring Safety
Before commencing any tile removal project, thorough preparation is crucial. This stage involves gathering the necessary tools and materials and implementing safety measures to protect oneself from potential hazards. Neglecting preparation can lead to delays, injuries, and increased damage to the concrete subfloor.
The required tools generally include:
*Safety Glasses: Essential for protecting the eyes from flying debris during the hammering and chiseling process.
*Work Gloves: Offer protection for hands against abrasions and impacts, preventing blisters and cuts.
*Dust Mask or Respirator: Critical for preventing the inhalation of tile dust, which can contain silica, a known respiratory irritant and carcinogen.
*Hearing Protection: While not always necessary, hearing protection (earplugs or earmuffs) can be beneficial when using power tools or dealing with loud hammering.
*Hammer: A standard claw hammer is suitable for tapping chisels and prying up loose tiles.
*Chisel: Several chisel types may be helpful, including a cold chisel for breaking tiles and a floor scraper chisel for removing thin-set mortar. Choose a chisel with a broad, flat edge for efficient scraping.
*Scraper: A floor scraper with a long handle provides leverage for removing adhesive and thin-set mortar.
*Pry Bar: A pry bar is useful for lifting larger pieces of tile or sections that are stubbornly adhered to the concrete.
*Shop Vacuum: Indispensable for cleaning up dust and debris as you work, maintaining a safer and more manageable workspace.
*Plastic Sheeting: Used to cover and protect nearby surfaces from dust and debris. Sealing off the work area is recommended to prevent dust from spreading throughout the house.
*Painter's Tape: Used to secure plastic sheeting and protect baseboards or other trim from damage.
*Optional: Power Tools: A demolition hammer or rotary hammer with a chisel attachment can significantly expedite the tile removal process, especially for large areas. A floor grinder may be required for removing stubborn thin-set mortar residue.
*Buckets or Trash Bags: For containing and disposing of tile debris.
Before starting, clear the area of furniture and other obstructions. Cover any remaining surfaces with plastic sheeting and secure it with painter’s tape. Ensure adequate ventilation by opening windows and doors, if weather permits. This will help to dissipate dust and improve air quality during the tile removal process.
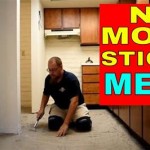
The Removal Process: A Step-by-Step Guide
The tile removal process involves several steps, each requiring careful attention to detail. The approach typically begins with breaking the tiles and continues with removing the adhesive and preparing the concrete subfloor for the next flooring installation.
Step 1: Breaking the Tiles
The initial step is to break the tiles into smaller, more manageable pieces. This makes them easier to lift and reduces the risk of large pieces damaging the concrete subfloor. Wear your safety glasses, dust mask, and gloves. Position the chisel at an angle near the edge of the tile. Strike the chisel firmly with the hammer. Repeat this process at several points across the tile to create cracks. For larger tiles, you may need to break them into multiple smaller pieces.
Step 2: Lifting the Tile Pieces
Once the tiles are broken, use the chisel and hammer or the pry bar to lift the pieces from the concrete. Insert the chisel or pry bar under a broken piece of tile and gently pry it upwards. Work slowly and carefully to avoid damaging the concrete beneath. If a tile is particularly stubborn, try tapping the chisel underneath it from different angles to loosen the adhesive bond. Collect the tile pieces in a bucket or trash bag for disposal.
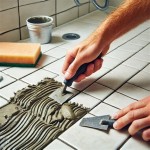
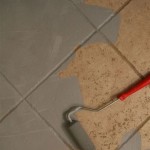
Step 3: Removing Thin-Set Mortar
After removing the tiles, you will likely be left with a layer of thin-set mortar adhered to the concrete. This mortar must be removed to create a smooth, even surface for the new flooring. Use a floor scraper or a chisel to scrape the thin-set mortar from the concrete. Hold the scraper at a shallow angle and apply steady pressure. Work in small sections, overlapping each pass to ensure complete removal. For stubborn areas, a floor grinder with a diamond grinding wheel may be necessary. When using a floor grinder, wear appropriate respiratory protection and eye protection.
Step 4: Cleaning the Concrete Subfloor
Once the thin-set mortar has been removed, thoroughly clean the concrete subfloor. Use a shop vacuum to remove all dust and debris. Inspect the concrete for any cracks or damage. Repair any significant cracks with a concrete patching compound. Allow the patching compound to dry completely before proceeding. If necessary, use a concrete cleaner to remove any remaining residue or stains. Rinse the concrete thoroughly with water and allow it to dry completely before installing the new flooring.
Dealing with Difficult Situations
During the tile removal process, you may encounter situations that require special attention. These can include particularly stubborn tiles, damaged concrete, and asbestos-containing materials.
*Stubborn Tiles: If a tile refuses to budge, try using a heat gun to soften the adhesive. Apply heat to the tile for several minutes, then try prying it up again. Alternatively, use a demolition hammer with a chisel attachment to break the tile into smaller pieces and loosen the adhesive bond. Ensure proper safety precautions when using power tools.
*Damaged Concrete: If you inadvertently damage the concrete subfloor during tile removal, repair the damage with a concrete patching compound. Follow the manufacturer's instructions for application and drying times. For more extensive damage, you may need to consult a professional concrete contractor.
*Asbestos: Older homes may contain asbestos in the tile adhesive or the tile itself. If you suspect that asbestos is present, do not attempt to remove the tile yourself. Contact a qualified asbestos abatement professional to handle the removal safely and legally. Disturbing asbestos-containing materials can release harmful fibers into the air, posing a serious health risk.
Power tools can greatly expedite the removal process, but they also require caution and adherence to safety protocols. When using a demolition hammer or rotary hammer, always wear safety glasses, hearing protection, and a dust mask or respirator. Use appropriate chisel attachments for different tasks, such as breaking tiles and removing thin-set mortar. Maintain a firm grip on the tool and use controlled movements to avoid damaging the concrete subfloor. Be mindful of your surroundings and avoid striking any hidden pipes or electrical wiring.
The success of a tile removal project depends on careful planning, using the right tools and techniques, and addressing any challenges that may arise. By following these guidelines, you can efficiently remove ceramic tile from concrete while minimizing damage and ensuring a safe working environment. Taking the time to prepare properly and working methodically will lead to a smoother and more successful renovation process.

How To Remove Tile From A Concrete Floor

How To Remove Ceramic Tile And Thinset The Nifty Nester

Removing Tile And Thinset From Concrete Sawdust Girl

How To Remove Tile From Concrete Floor Central Florida Dust Free Flooring Demo Removal Llc

How To Remove Floor Tiles From Concrete Our Guide

The Best Way To Remove Thinset From A Cement Foundation House Of Hepworths

How To Remove Tile Floor From Concrete

How To Remove A Tile Floor Complete Step By Guide Apollo

Dust Free Thinset Removal

Guide How To Remove Tile From Concrete Floor Alliance Flooring Directory
Related Posts