Are the grout lines in your shower tile looking grimy and worn out? Regrouting your shower tile is a simple DIY task that can quickly restore the appearance of your shower. Follow these steps to make sure you get the job done right.
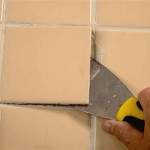
Start by removing the old grout. Use a grout saw or screwdriver to chip away at the old grout, taking care not to damage the tiles. To protect your eyes, wear safety goggles and a dust mask. Once you’ve removed all the old grout, use a damp cloth to wipe away any dust or debris.
Mix your grout according to the manufacturer’s instructions. To begin, use a rubber float to spread the grout into the spaces between the tiles. Make sure to hold the float at an angle and use a back-and-forth motion to get into all the corners and crevices. Wipe away any excess grout with a damp sponge.
Let the grout dry according to the manufacturer’s instructions. Once the grout is completely dry, use a soft cloth to buff away any excess grout. Finally, use a sealer to protect your grout from dirt and moisture. This will help keep your shower tile looking great for years to come.
With a few simple steps, you can easily transform the look of your shower tile. Regrouting your shower tile is a simple DIY task that can quickly restore the appearance of your bathroom and help protect it from water damage. So, the next time your shower tile needs an update, don’t hesitate to give it a quick regrouting.

![]()


/How_to_Regrout_Ceramic_Tile_64434_08-63a0298cea2a47ba985a0a17ed65d278.jpg)

/hand-spreading-grout-on-tiles-with-grout-spreader-80033352-583c5e073df78c6f6a2f22b6.jpg)
Related Posts


