How To Put Tile Over a Concrete Patio
A concrete patio provides a durable and versatile base for various outdoor finishes. Tiling over existing concrete offers a cost-effective way to upgrade the patio's appearance and create an outdoor living space with enhanced aesthetic appeal. This process requires careful preparation and execution to ensure a long-lasting, beautiful result.
Assessment and Preparation: Begin by thoroughly assessing the concrete patio’s condition. Look for cracks, uneven surfaces, or signs of deterioration. Minor cracks can often be repaired with a concrete patching compound, following the manufacturer’s instructions. Larger cracks or structural issues may require professional attention. The concrete surface must be clean and free of any debris, oil, or grease. A pressure washer can be effective for removing dirt and grime. Allow the concrete to dry completely before proceeding.
Determining Slope and Drainage: Proper drainage is crucial to prevent water accumulation under the tiles, which can lead to damage. Ensure the patio slopes away from the house at a rate of approximately 1/4 inch per foot. If the existing slope is inadequate, a concrete leveling compound may be necessary to create the correct pitch.
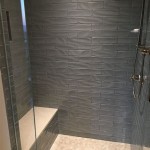
Selecting the Right Tile: Choosing suitable tiles for outdoor use is paramount. Porcelain tiles are generally recommended due to their durability, low water absorption, and resistance to freeze-thaw cycles. Select tiles rated for outdoor use and consider slip resistance, especially in areas prone to moisture. The size and style of the tile will depend on the desired aesthetic and the overall patio design.
Gathering Necessary Materials and Tools: Before starting the tiling process, gather all the necessary materials and tools. This includes the chosen tiles, thin-set mortar specifically designed for outdoor use, grout suitable for exterior applications, a notched trowel, a rubber grout float, a tile cutter or wet saw, spacers, a bucket, a sponge, and safety glasses.
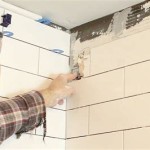
Applying the Thin-Set Mortar: Starting from one corner of the patio, apply a layer of thin-set mortar using the notched trowel. The size of the notches on the trowel will depend on the size of the tiles being used. Consult the tile manufacturer's recommendations for the appropriate trowel size. Spread the mortar evenly over a manageable area, covering enough space for several tiles. Working in small sections prevents the mortar from drying out before the tiles are placed.
Laying the Tiles: Carefully place each tile onto the mortar bed, pressing firmly to ensure good adhesion. Use spacers between tiles to maintain consistent grout lines. Periodically check the tile alignment using a level to ensure a flat and even surface. Remove any excess mortar that squeezes out between the tiles with a damp sponge.
Cutting Tiles: Some tiles will need to be cut to fit around edges or obstacles. A tile cutter or wet saw can be used for this purpose. Measure carefully and mark the tiles before cutting to ensure accurate cuts.
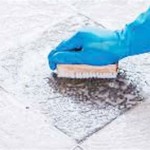
Applying Grout: After the thin-set mortar has cured for at least 24 hours (refer to the manufacturer’s instructions), apply the grout. Mix the grout according to the manufacturer’s directions. Use a rubber grout float to spread the grout over the tile surface, pressing it into the joints to fill them completely. Remove excess grout with a damp sponge before it dries completely. Allow the grout to cure according to the manufacturer’s instructions.
Sealing the Grout: Once the grout has cured, applying a grout sealer is recommended. This helps to protect the grout from staining and moisture penetration, further enhancing the longevity of the tiled patio. Follow the sealer manufacturer's instructions for application and drying times.
Final Cleaning and Inspection: After the sealer has dried, perform a final cleaning of the tiled surface. Inspect the entire patio for any loose tiles or grout issues. Address any necessary repairs promptly to prevent further problems. Regular cleaning and maintenance will help to keep the tiled patio looking its best for years to come. Consider using a mild detergent and water for cleaning, avoiding harsh chemicals that could damage the tile or grout.
Expansion Joints: In larger patio areas, incorporating expansion joints is essential. These joints allow for the natural expansion and contraction of the concrete and tile due to temperature changes, preventing cracking and damage. Consult with a professional for guidance on the placement and spacing of expansion joints.

How To Install Tile Over An Existing Concrete Patio The Rta

Concrete Patio Transformation 7 Steps To Diy A New Outdoor Oasis

Concrete Patio Transformation 7 Steps To Diy A New Outdoor Oasis

Concrete Patio Transformation 7 Steps To Diy A New Outdoor Oasis

Covering Concrete Slab Installation Dektektile Luxury Tile Decking Material

Tiling Over A Ed Concrete Slab Fine Homebuilding
:max_bytes(150000):strip_icc()/can-you-install-tile-directly-on-concrete-1822600-04-458f7bb6c78348c1835cf8054ef36553.jpg?strip=all "How To Install Tile Over Concrete")
How To Install Tile Over Concrete

Concrete Patio Transformation 7 Steps To Diy A New Outdoor Oasis

Outdoor Tile Over Concrete Unique

How To Create Faux Tile Look On Concrete Patio Southern Hospitality
Related Posts