How To Put Floor Tiles In Bathroom
Installing new floor tiles in a bathroom can revitalize the space and increase its aesthetic appeal. The process involves careful planning, precise execution, and adherence to best practices to ensure a durable and visually pleasing result. This article provides a comprehensive guide on how to properly install floor tiles in a bathroom.
Preparation: A Foundation for Success
Before commencing the tiling process, thorough preparation is essential. This stage involves several crucial steps that contribute to a successful installation. Neglecting these steps can lead to issues such as uneven surfaces, poor adhesion, and premature tile failure. The preparation phase includes evaluating the existing floor, gathering necessary tools and materials, and preparing the subfloor.
Evaluating the Existing Floor: Begin by thoroughly inspecting the existing bathroom floor. Identify any existing damage such as cracks, loose tiles, or water damage. If the existing floor is tiled, determine whether it is feasible to tile over it. Tiling over an existing floor is possible if the existing tiles are securely bonded, level, and free from significant damage. However, adding a second layer of tiles can raise the floor height, potentially causing issues with door clearances and plumbing fixtures. Removing the existing floor is generally recommended for optimal results and to ensure a level and stable subfloor.
Gathering Tools and Materials: Assembling all necessary tools and materials before starting the project will streamline the process and prevent unnecessary delays. Essential tools include a tile cutter (manual or wet saw), notched trowel, rubber grout float, sponge, bucket, measuring tape, level, pencil, safety glasses, and work gloves. Materials needed include the chosen floor tiles, thin-set mortar, grout, sealant, and cement backer board or self-leveling compound if required.
Preparing the Subfloor: The subfloor is the foundation upon which the tiles will be installed. It must be clean, level, and structurally sound. Remove any debris, dirt, or adhesive residue from the subfloor. If the subfloor is uneven or damaged, it must be repaired or replaced. For concrete subfloors, use a self-leveling compound to create a smooth and even surface. For wood subfloors, install a cement backer board, ensuring it is securely fastened with screws designed for this purpose. Cement backer board provides a stable and water-resistant base for the tiles.
The Tiling Process: Applying the Tiles
With the preparation complete, the next step is to apply the tiles to the prepared subfloor. This phase requires careful planning and precise application of the thin-set mortar to ensure proper adhesion and alignment. The tiling process involves dry-fitting the tiles, applying the thin-set mortar, and setting the tiles.
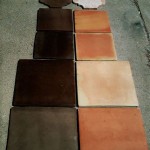
Dry-Fitting the Tiles: Before applying any mortar, dry-fit the tiles to determine the best layout and minimize cuts. Start by finding the center of the room and laying out the tiles along the center lines. This will help ensure a symmetrical and balanced layout. Use tile spacers to maintain consistent grout lines. Note any areas where cuts will be required and plan accordingly.
Applying the Thin-Set Mortar: Thin-set mortar is the adhesive that bonds the tiles to the subfloor. Mix the thin-set mortar according to the manufacturer's instructions, ensuring a smooth and consistent consistency. Using the notched trowel, apply the mortar to a small section of the subfloor, typically no more than a few square feet at a time. Hold the trowel at a 45-degree angle and create consistent ridges in the mortar. The size of the notches on the trowel should be appropriate for the size and type of tile being used.
Setting the Tiles: Carefully place the tiles onto the mortar bed, pressing down firmly and twisting slightly to ensure good contact. Use tile spacers to maintain consistent grout lines. Periodically check the tiles with a level to ensure they are even. If a tile is not level, gently tap it with a rubber mallet to adjust its position. Remove any excess mortar from the tile surfaces with a damp sponge. Allow the thin-set mortar to cure for the recommended time period, typically 24 to 48 hours, before proceeding to the next step.
Grouting and Sealing: Completing the Installation
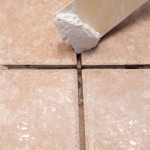
After the thin-set mortar has cured, the next step is to grout the tile joints. Grouting fills the spaces between the tiles, providing a waterproof seal and enhancing the overall appearance of the floor. Following grouting, sealing the grout lines is crucial to prevent staining and water damage. The grouting and sealing process involves removing tile spacers, applying the grout, cleaning the excess grout, and applying the sealant.
Removing Tile Spacers: Before grouting, remove all tile spacers from the tile joints. Ensure that the joints are clean and free from any debris or mortar residue. A utility knife or grout removal tool can be used to carefully remove any hardened mortar.
Applying the Grout: Mix the grout according to the manufacturer's instructions, ensuring a smooth and consistent consistency. Using the rubber grout float, apply the grout to the tile joints, pressing it firmly into the spaces between the tiles. Work in small sections and ensure that all joints are completely filled. Hold the grout float at a 45-degree angle and use sweeping motions to force the grout into the joints.
Cleaning the Excess Grout: Allow the grout to set for a short period, typically 15 to 30 minutes, before cleaning the excess grout from the tile surfaces. Use a damp sponge to wipe the tiles diagonally across the grout lines. Rinse the sponge frequently in clean water. Be careful not to remove too much grout from the joints. After the initial cleaning, allow the grout to cure for the recommended time period, typically 24 to 72 hours, before applying the sealant.
Applying the Sealant: Grout sealant is essential to protect the grout lines from staining, water damage, and mold growth. Apply the sealant according to the manufacturer's instructions, using a sealant applicator or a small brush. Ensure that all grout lines are thoroughly sealed. Allow the sealant to dry completely before using the bathroom. Reapply the sealant periodically, typically every one to two years, to maintain its effectiveness.
Following these steps meticulously will contribute to a professional and lasting bathroom floor tile installation. Attention to detail and adherence to manufacturer instructions are paramount for a successful outcome.

How To Lay Tile Install A Ceramic Floor In The Bathroom Diy

How To Lay Tile In Bathroom House Decorz

How To Lay Tile In A Bathroom 5 Easy Steps Rubi Blog Usa

How To Put Ceramic Tile On Bathroom Floor A Complete Diy Guide City Wall And Tiles

Small Bathroom Tile Upgrade How To

How To Install A Tile Floor In Your Bathroom Dumpsters Com

4 Steps To Perfect Bathroom Floor Tile

Bathroom Floor Tile Layout In 5 Easy Steps Diytileguy

How To Lay Tile Diy Floor Installation Lowe S

Learn How To Layout Bathroom Floor Tile
Related Posts