How To Prepare Cement Board For Tile Installation
Cement board, also known as cement backer board, is a crucial substrate for tile installations, particularly in wet areas such as bathrooms and kitchens. Its water resistance and dimensional stability make it a superior choice compared to traditional drywall or plywood. Proper preparation of cement board is essential to ensure a long-lasting and aesthetically pleasing tile installation. This article provides a comprehensive guide to preparing cement board for tile, covering key steps, tools, and best practices.
The success of any tile project hinges on the substrate's integrity. Cement board offers a stable and durable surface, but neglecting proper preparation can lead to issues like cracked tiles, grout failure, and even water damage. The goal of this preparation is to create a flat, level, and structurally sound surface that will provide a strong bond for the tile adhesive. This involves addressing seams, securing the board to the framing, and ensuring a clean working area.
Key Point 1: Installing Cement Board Correctly
The foundation of a successful tile installation starts with the correct installation of the cement board itself. This process involves several crucial steps that must be followed meticulously.
Cutting the Cement Board: Cement board can be cut using several methods. A utility knife and a straight edge can be used to score the board and then snap it along the scored line. This method is best for straight cuts. For more complex shapes or curves, a cement board saw or a circular saw with a specialized cement board blade is recommended. When using power tools, it is imperative to wear appropriate safety gear, including eye protection and a dust mask, as cement board dust can be harmful.
Fastening the Cement Board: Cement board should be fastened to the studs or joists using cement board screws specifically designed for this purpose. These screws are typically coated to resist corrosion and have a countersinking head to allow the screw to be driven flush with the surface of the board. The screws should be spaced according to the manufacturer's recommendations, typically every 6-8 inches along the edges and every 8-12 inches in the field of the board. Ensure that the screws penetrate at least 1 inch into the framing members. Stagger the joints of the cement board to avoid continuous seams. Avoid overdriving the screws, as this can damage the cement board and weaken the connection. The goal is to have the screw head flush with the surface or slightly below.
Addressing Gaps and Seams: Gaps between sheets of cement board should be minimized. A small gap (approximately 1/8 inch) is acceptable to allow for expansion and contraction. These gaps and all seams should be filled with a thin-set mortar specifically designed for this purpose. Polymer-modified thin-set mortar is generally recommended for its superior bonding properties and flexibility. Apply the thin-set mortar liberally to the gaps and seams, ensuring that it fills the entire space. Immediately embed fiberglass mesh tape into the wet mortar, pressing it firmly into place. The mesh tape provides reinforcement and helps to prevent cracking at the seams. Use a taping knife to smooth the mortar and feather the edges, creating a seamless transition between the cement board sheets.
Checking for Level and Flatness: After the cement board is installed, it is important to check for level and flatness. Use a long level or a straight edge to identify any areas that are uneven or out of plane. Minor imperfections can be corrected with additional thin-set mortar during the tiling process. However, significant deviations may require shimming behind the cement board to bring it into alignment. Identify any high spots and use a grinder or sander to remove excess material. Conversely, low spots can be filled with thin-set mortar to create a level surface.
Proper Installation Practices: Always follow the manufacturer's instructions for the specific cement board product being used. These instructions may include specific recommendations for fastening schedules, screw types, and seam treatment. Ignoring these instructions can void the warranty and compromise the integrity of the installation. When working in wet areas, consider applying a waterproof membrane over the cement board to provide an additional layer of protection against moisture penetration. This is particularly important in shower and tub enclosures.
Key Point 2: Applying Thin-Set Mortar and Mesh Tape
The application of thin-set mortar and mesh tape is a critical step that reinforces the seems and prevents cracking. This portion of the process requires precise technique and the right materials.
Selecting the Right Thin-Set Mortar: The choice of thin-set mortar is crucial for bonding cement board seams and embedding mesh tape. A polymer-modified thin-set mortar is highly recommended due to its enhanced adhesion, flexibility, and water resistance. These properties are essential for accommodating slight movements in the substrate and preventing cracks in the grout lines. Avoid using unmodified thin-set mortar, as it may not provide adequate bonding strength on cement board.
Mixing the Thin-Set Mortar: Follow the manufacturer's instructions precisely when mixing the thin-set mortar. Use a clean bucket and a mixing paddle attached to a drill. Add the powder to the water gradually, stirring constantly to avoid lumps. The consistency of the mortar should be smooth and creamy, similar to peanut butter. Allow the mortar to slake (rest) for the recommended period, typically 5-10 minutes, before remixing it briefly. This allows the polymers to fully activate. Avoid adding too much water, as this can weaken the mortar. A properly mixed mortar will hold its shape on a trowel.
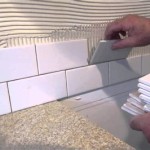
Applying the Thin-Set Mortar: Use a taping knife or a small trowel to apply a liberal amount of thin-set mortar to the seams and gaps between the cement board sheets. Ensure that the mortar fills the entire space, creating a solid and continuous bond. Apply the mortar slightly wider than the width of the mesh tape. The goal is to create a bed of mortar that will fully encase the mesh tape.
Embedding the Mesh Tape: Immediately after applying the thin-set mortar, embed fiberglass mesh tape into the wet mortar. Press the tape firmly into place using a taping knife. Ensure that the tape is centered over the seam and that it is fully embedded in the mortar. Use the taping knife to smooth the mortar and feather the edges, creating a seamless transition between the cement board sheets. Remove any excess mortar from the surface. The tape should be completely covered by the mortar, with no exposed fibers.
Allowing the Mortar to Cure: Allow the thin-set mortar to cure completely according to the manufacturer's instructions. This typically takes 24-48 hours, depending on the temperature and humidity. Avoid walking on or disturbing the surface during the curing process. Prematurely tiling over uncured mortar can lead to adhesion problems and cracking.
Inspection: After the mortar has cured, inspect the seams and gaps to ensure that they are completely filled and that the mesh tape is fully embedded. If any imperfections are found, apply additional thin-set mortar and mesh tape to correct them. The surface should be smooth and free of any sharp edges or protrusions.
Key Point 3: Cleaning and Priming Cement Board
Completing the process requires cleaning the surface and applying primer to promote adhesion. Neglecting these steps can severely compromise the long term health of the tiling.
Removing Debris and Dust: Before proceeding with tiling, it is essential to thoroughly clean the cement board surface. Use a shop vacuum to remove any dust, debris, or loose particles that may have accumulated during the installation process. Pay particular attention to the seams and corners, as these areas tend to trap dust and debris. A clean surface is crucial for ensuring proper adhesion of the tile adhesive.
Washing the Cement Board: After vacuuming, wash the cement board with a damp sponge or cloth to remove any remaining dust or residue. Use clean water and avoid using harsh chemicals or detergents, as these can interfere with the bonding of the tile adhesive. Allow the cement board to dry completely before proceeding to the next step. Avoid creating puddles of water on the surface, as this can saturate the cement board and prolong the drying time.
Priming the Cement Board: Applying a primer to the cement board is an optional step, but it is highly recommended, especially in wet areas. A primer helps to seal the surface of the cement board, reducing its porosity and improving the adhesion of the tile adhesive. Use a primer specifically designed for use with cement board and tile. Follow the manufacturer's instructions for application. Typically, the primer is applied with a brush or roller in a thin, even coat. Allow the primer to dry completely before proceeding to tiling. Priming can also help to prevent the thin-set mortar from drying out too quickly, which can lead to weak bonds.
Choosing the Right Primer: Select a primer that is compatible with both the cement board and the tile adhesive. Some primers are specifically formulated for use with certain types of tile or adhesive. Consult the manufacturer's recommendations to ensure compatibility. Consider using a primer that also offers mold and mildew resistance, particularly in wet areas like bathrooms and showers. This can help to prevent the growth of mold and mildew behind the tile, extending the life of the installation.
Final Inspection: Before beginning the tile installation, perform a final inspection of the prepared cement board surface. Ensure that the surface is clean, dry, and free of any imperfections. Verify that the seams and gaps are properly filled and that the mesh tape is fully embedded. Check for any loose screws or fasteners and tighten them as needed. The cement board should provide a solid, stable, and level surface for the tile installation. This meticulous preparation will contribute significantly to the long-term durability and aesthetic appeal of the finished project.
By diligently following these steps, cement board can be properly prepared for tile installation, ensuring a durable and long-lasting result. This involves meticulous attention to detail, the use of appropriate materials, and adherence to best practices. The time and effort invested in proper preparation will be rewarded with a professional-looking tile installation that will withstand the rigors of daily use for years to come.

How To Install Cement Board On A Floor Diy Family Handyman

How To Install Cement Board For Tile Bower Power

How To Install Cement Board For Tile Projects Diy Family Handyman

Easily Install Cement Board To Prep For Tile Installation

How To Install Hardie Backer Cement Board On Floors James Pros

Durock Cement Board Do S And Dont

How To Install Cement Board For Tile Projects Diy Family Handyman

How To Install A Cement Board For Tiling Beaumont Tiles

How To Install Cement Board The Home Depot

Cement Board Installation On Floors 5 Mistakes To Avoid Diytileguy
Related Posts