How to Place 12x24 Tile
Laying 12x24 tiles requires careful planning and execution to achieve a professional-looking result. Here's a comprehensive guide to help you through the process:
Materials and Tools
Before starting, gather the necessary materials and tools:
- 12x24 tiles
- Thinset mortar
- Notched trowel li>Spacers
- Level
- Grout and grouting tools
- Tile cutter
- Safety glasses
- Knee pads
Surface Preparation
Ensure the surface is clean, level, and free of debris. Remove any existing flooring or tiling. If the surface is uneven, apply self-leveling compound to create a smooth and stable base.
Applying Thinset Mortar
Spread the thinset mortar evenly over the prepared surface using the notched trowel. Hold the trowel at a 45-degree angle and apply the mortar in a single direction. The thickness of the mortar should be consistent with the size of the trowel notches.
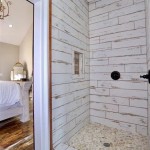
Placing the Tiles
Start by laying the first row of tiles along a chalk line or laser level. Press the tiles firmly into the mortar, leaving spacers between them to ensure equal spacing. Use a level to check for flatness and make adjustments as needed.
Continue laying the tiles, working in rows or sections. Stagger the joints between the tiles to create a more aesthetically pleasing look. If you need to cut tiles to fit, use a tile cutter for precise cuts.
Grouting
Once the tiles are set, allow them to cure for the manufacturer's recommended time. Then, apply grout to the joints using a grout float or trowel. Work the grout into the joints and remove excess with a damp sponge. Let the grout set for 24 hours before sealing it with a grout sealer.
Tips for Success
- Use a high-quality thinset mortar specifically designed for large format tiles.
- Double-check the layout before applying any thinset mortar.
- Handle the tiles with care to avoid chipping or cracking.
- Clean the tiles and grout immediately after application to prevent staining.
- Seal the grout to protect it from moisture and stains.
Conclusion
Laying 12x24 tiles may seem daunting, but with proper preparation and careful execution, you can achieve a stunning and durable tiled surface. By following the steps outlined above and utilizing the tips provided, you'll be well-equipped to embark on this DIY project and transform your space.

Newgate Gray Marble Matte 12 In X 24 Glazed Ceramic Floor And Wall Tile 15 04 Sq Ft Case

Newgate Gray Marble Matte 12 In X 24 Glazed Ceramic Floor And Wall Tile 15 04 Sq Ft Case

Newgate Gray Marble Matte 12 In X 24 Glazed Ceramic Floor And Wall Tile 15 04 Sq Ft Case

Kitchen Mini Makeover With Affordable Tiled Diy Marble Countertops And Aged Copper Light Fixture Remodelaholic

Newgate Gray Marble Matte 12 In X 24 Glazed Ceramic Floor And Wall Tile 15 04 Sq Ft Case

Kitchen Mini Makeover With Affordable Tiled Diy Marble Countertops And Aged Copper Light Fixture Remodelaholic

Msi Mix River Rock 12 In X Textured Marble Floor And Wall Mosaic Tile 1 Sq Ft Each Peb Mixrvr The Home Depot

Elon Tile Stone Marble 12 X 24 Mystic Gray Honed Flooring Get Floors

Da Vinci Faux Tin Ceiling Tile Drop In 24 X 215 Idea Library

Installing A Shower Seat In Your Bathroom Complete Guide
Related Posts