How To Lay Wall Tiles In Bathroom: A Comprehensive Guide
Laying wall tiles in a bathroom is a significant home improvement project that can dramatically enhance the aesthetic appeal and functionality of the space. Successful tile installation requires careful planning, preparation, and execution. This article provides a comprehensive guide to the process, outlining the necessary tools, materials, and techniques to achieve a professional-looking result.
Before embarking on this project, it's crucial to assess the existing bathroom walls. Ensure they are structurally sound, clean, and free from moisture. Any existing damage, such as cracks or holes, should be repaired before proceeding. This foundational step is critical for the longevity and stability of the finished tile installation.
Preparation: Essential Steps Before Tiling
Proper preparation is paramount to a successful tiling project. This phase involves gathering the right tools and materials, preparing the wall surface, and carefully planning the tile layout.
The necessary tools and materials include: tiles (the quantity should be calculated with a margin for cuts and breakage), tile adhesive (suitable for bathroom environments and the type of tile being used), grout, tile cutter (manual "score-and-snap" cutter or wet saw), notched trowel (the notch size depends on the tile size), rubber grout float, sponges, buckets, measuring tape, level, pencil, safety glasses, gloves, and a mixing paddle (if using powdered adhesive).
The wall surface must be prepared to ensure proper adhesion of the tiles. This usually involves cleaning the walls thoroughly with a detergent solution to remove any dirt, grease, or soap scum. If the walls are painted, they must be roughened up with sandpaper or a wire brush to create a better bonding surface. In some cases, particularly on non-porous surfaces like gloss paint or existing tiles, a primer specifically designed for tiling may be necessary. This primer will create a textured surface that promotes adhesion. Allow the primer to dry completely according to the manufacturer's instructions before proceeding.
Planning the tile layout is a crucial step to avoid awkward cuts and create a visually appealing design. Begin by determining the focal point of the wall, such as the center of the shower area or above the sink. Use a level and measuring tape to draw vertical and horizontal guidelines on the wall, starting from this focal point. Dry-lay the tiles along these guidelines to visualize the layout and identify any potential issues with alignment or cut requirements. Pay particular attention to the corners and edges, where cuts are often required. It is advisable to aim for symmetrical cuts on opposite sides of the wall to maintain a balanced aesthetic. Note: If the floor is not level, start the first row of tile above the floor using a ledger board (see below). This board will be removed when the tiles are set and the final row is installed.
To support the first row of tiles and ensure a level starting point, especially if the floor is uneven, attach a ledger board (a straight piece of wood) to the wall. The ledger board should be positioned at the height where the bottom edge of the first row of tiles will be located. Use a level to ensure the ledger board is perfectly horizontal. This will provide a stable base for the first row of tiles and prevent them from slipping downwards while the adhesive sets.
Applying the Adhesive and Setting the Tiles
With the wall surface prepared and the layout planned, the next step is to apply the tile adhesive and begin setting the tiles.
Mix the tile adhesive according to the manufacturer's instructions. If using powdered adhesive, add water gradually while mixing with a mixing paddle attached to a drill. Ensure the adhesive is thoroughly mixed and free from lumps. The consistency should be similar to that of peanut butter.
Using the notched trowel, apply a layer of adhesive to the wall in small sections, typically about 2-3 square feet at a time. Hold the trowel at a 45-degree angle and create ridges in the adhesive. The size of the notches on the trowel will determine the thickness of the adhesive layer. The notch size should be appropriate for the size and type of tile being used. Larger tiles generally require larger notches.
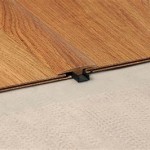
Press each tile firmly into the adhesive with a slight twisting motion. This ensures good contact between the tile and the adhesive. Use tile spacers to maintain consistent grout lines between the tiles. The size of the spacers will determine the width of the grout lines. Regularly check the tiles with a level to ensure they are perfectly vertical and horizontal. Make any necessary adjustments while the adhesive is still wet.
Cutting tiles is an inevitable part of any tiling project. A manual tile cutter, also known as a "score-and-snap" cutter, is suitable for straight cuts on smaller tiles. For larger tiles or more complex cuts, a wet saw is recommended. When using a manual cutter, score the tile along the desired cut line and then snap the tile along the score line. When using a wet saw, guide the tile slowly and steadily through the blade, allowing the water to cool the blade and prevent chipping. Always wear safety glasses when cutting tiles.
Continue applying adhesive and setting tiles, working in small sections at a time. Periodically clean off any excess adhesive from the tile surfaces with a damp sponge. Allow the adhesive to dry completely according to the manufacturer's instructions before proceeding to the grouting stage, typically at least 24 hours.
Grouting and Final Cleaning
After the adhesive has fully cured, the next step is to grout the tiles. This process fills the gaps between the tiles, providing a waterproof seal and enhancing the overall appearance of the tiled surface.
Remove the tile spacers from the grout lines. Mix the grout according to the manufacturer's instructions. The consistency of the grout should be similar to that of toothpaste. Using a rubber grout float, apply the grout to the tile surface, pressing it firmly into the grout lines. Work in small sections at a time, using the float to spread the grout evenly and remove any excess.
After the grout has been applied, wait for approximately 15-30 minutes to allow it to set slightly. Then, use a damp sponge to remove the excess grout from the tile surfaces. Rinse the sponge frequently in clean water. Wring out the sponge thoroughly to avoid over-wetting the grout lines. This is a crucial step to prevent the grout from being washed out of the joints.
After the initial sponge cleaning, allow the grout to cure for at least 24 hours. Once the grout has fully cured, a haze may remain on the tile surfaces. This haze can be removed with a grout haze remover, available at most tile supply stores. Follow the manufacturer's instructions for the grout haze remover carefully.
Finally, inspect the tiled surface for any imperfections, such as uneven grout lines or chipped tiles. Touch up any areas as needed. Apply a grout sealer to the grout lines to protect them from moisture and stains. This sealer will help to prolong the life of the grout and make it easier to clean. The bathroom is now tiled and is ready for use.

Part 1 How To Install Tile On Shower Tub Wall Step By

How To Lay Bathroom Wall Tiles

Excellent Work In Bathroom Wall And Floor Tile Installation Process Easy Fastest Construction

How To Tile Shower Bathtub Walls The Ultimate Guide Handyman Startup

How To Lay Out Tile At Home With Ashley

The Complete Guide To Installing Tile On Shower Or Bathtub Walls

How To Lay Tile In A Bathroom 5 Easy Steps Rubi Blog Usa

Tiling A Walk In Shower Chapter 6 Wall Tile Installation Jlc

How To Install L And Stick Tiles On A Wall My Uncommon Slice Of Suburbia

Lay Shower Tile Like An Expert Crazy Good Pro Tips
Related Posts