How To Lay Vinyl Plank Flooring Over Ceramic Tile
Vinyl plank flooring presents a convenient and aesthetically pleasing alternative to replacing existing ceramic tile. Instead of enduring the disruptive and often expensive process of tile removal, homeowners can often install vinyl plank directly over the existing surface. This approach saves time, labor, and potentially significant costs. However, successful installation hinges on careful preparation and adherence to recommended techniques. This article will provide a detailed guide on how to lay vinyl plank flooring over ceramic tile, ensuring a durable and visually appealing outcome.
Assessing the Suitability of the Existing Ceramic Tile Floor
Before commencing any installation, a thorough assessment of the existing ceramic tile floor is paramount. Several factors determine whether laying vinyl plank directly over ceramic tile is a viable option. Ignoring these factors can lead to installation failures, including uneven surfaces, plank separation, and premature wear. The evaluation should focus on the following key elements:
Tile Condition: The primary concern is the overall condition of the ceramic tile. Inspect each tile individually for cracks, chips, or other damage. Any loose or severely damaged tiles must be addressed before proceeding. Loose tiles require re-adhering to the subfloor, while significantly damaged tiles may need repair or replacement. Attempting to install vinyl plank over unstable tiles compromises the integrity of the entire floor.
Levelness: A perfectly level surface is crucial for a successful vinyl plank installation. Use a long level (at least six feet) to check for significant dips, humps, or unevenness across the entire tiled area. Minor variations are generally manageable, but significant undulations can create noticeable imperfections and affect the lifespan of the vinyl plank. Addressing levelness issues often involves the application of a leveling compound.
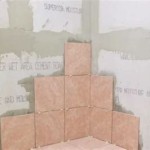
Grout Lines: The depth and width of the grout lines between the tiles also play a significant role. Deep or excessively wide grout lines can telegraph through the vinyl plank, creating a visible grid pattern. While some grout lines may be acceptable, deeper lines typically require filling with a cement-based patching compound to create a smooth, uniform surface. Consider the texture of the vinyl plank being used; thicker, more textured planks are less susceptible to telegraphing.
Moisture: Ensure the ceramic tile floor is free from moisture. Excess moisture can compromise the adhesive of the vinyl plank and lead to mold or mildew growth underneath. Conduct a moisture test to verify the subfloor's dryness. Consult a professional if moisture problems are detected; addressing moisture issues is critical for a long-lasting installation.
Preparing the Ceramic Tile Floor
Once the ceramic tile floor has been deemed suitable, the next step involves thorough preparation. This stage is crucial for ensuring proper adhesion and a smooth, professional finish. Neglecting preparation can result in a subpar installation and potential future problems.
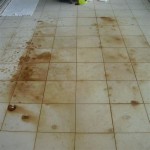
Cleaning: Begin by thoroughly cleaning the ceramic tile floor. Remove all dirt, dust, debris, and any existing wax or sealant. Use a strong cleaner specifically designed for tile and grout, followed by a thorough rinse with clean water. Allow the floor to dry completely before proceeding to the next step. A clean surface promotes optimal adhesion of subsequent materials.
Repairing: Address any repaired or replaced tiles, ensuring they are securely bonded to the subfloor and flush with the surrounding tiles. Use a high-quality thin-set mortar for re-adhering loose tiles. Allow the mortar to cure completely according to the manufacturer's instructions before proceeding.
Leveling: If significant unevenness exists, apply a self-leveling compound to create a smooth, level surface. Follow the manufacturer's instructions carefully, paying close attention to the mixing ratios and application techniques. Typically, a primer is applied before the self-leveling compound. Allow the compound to cure completely before proceeding; this may take several days depending on the product and environmental conditions. Proper leveling is a critical step for achieving a professional, long-lasting result.
Filling Grout Lines: If the grout lines are deep or wide, fill them with a cement-based patching compound. Apply the compound with a trowel, pressing it firmly into the grout lines to ensure complete filling. Scrape off any excess compound with a putty knife, creating a smooth, even surface with the surrounding tile. Allow the patching compound to dry completely and then sand it lightly to create a perfectly smooth transition. This step minimizes the risk of grout lines telegraphing through the vinyl plank.
Sanding: Lightly sand the entire surface of the ceramic tile floor to create a slightly roughened texture. This improves the adhesion of the vinyl plank adhesive or the grip of the interlocking mechanism, depending on the type of vinyl plank being used. Use a fine-grit sandpaper and avoid excessive sanding, which could damage the ceramic tile. Vacuum the floor thoroughly after sanding to remove any dust particles.
Installing the Vinyl Plank Flooring
With the ceramic tile floor properly prepared, the installation of the vinyl plank flooring can commence. The specific installation method will depend on the type of vinyl plank being used – either glue-down or click-lock (also known as floating) installation. It is crucial to follow the manufacturer's instructions for the specific product being installed.
Acclimation: Allow the vinyl plank flooring to acclimate to the room's environment for at least 48 hours before installation. This allows the planks to adjust to the temperature and humidity levels, minimizing expansion and contraction after installation. Store the planks horizontally in the room where they will be installed.
Planning the Layout: Before beginning installation, plan the layout of the vinyl planks. Determine the direction in which the planks will be laid and consider the placement of seams. Aim for a balanced layout with seams staggered randomly to avoid a uniform appearance. Avoid placing narrow strips of plank near walls, as this can look aesthetically unappealing. A dry run, laying out the planks without adhesive or locking them together, is recommended to visualize the final layout.
Glue-Down Installation: For glue-down vinyl plank, apply the adhesive according to the manufacturer's instructions using a trowel with the recommended notch size. Work in small sections to prevent the adhesive from drying before the planks are installed. Carefully position each plank over the adhesive, pressing it firmly into place. Use a roller to ensure full contact between the plank and the adhesive. Clean up any excess adhesive immediately with a damp cloth. Maintain consistent pressure and alignment for a professional finish.
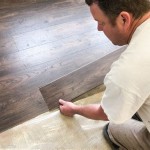
Click-Lock Installation: For click-lock vinyl plank, begin by installing the first row of planks along a straight edge, typically a wall. Ensure the planks are aligned properly and that the locking mechanisms are engaged correctly. Use a tapping block and a soft-faced hammer to gently tap the planks together, ensuring a tight, seamless connection. Continue installing the planks row by row, staggering the seams as planned. Trim any excess plank material at the edges of the room using a utility knife or a flooring cutter. Leave a small expansion gap around the perimeter of the room to allow for natural expansion and contraction.
Cutting Planks: Accurately cutting vinyl planks is critical for achieving a professional finish. Use a utility knife with a sharp blade and a straightedge to score the plank along the desired cut line. Then, snap the plank along the scored line. For more complex cuts, such as those around pipes or doorways, use a jigsaw or a coping saw. Always wear safety glasses when cutting vinyl planks.
Finishing Touches: Once the vinyl plank flooring is installed, install baseboards or quarter-round molding around the perimeter of the room to cover the expansion gap and create a finished look. Install transition strips where the vinyl plank flooring meets other flooring types, such as carpet or tile. Clean the floor thoroughly with a damp mop to remove any dust or debris.
Post-Installation Care: Following the manufacturer's recommendations for cleaning and maintenance is essential to ensure the longevity and appearance of the vinyl plank flooring. Use a pH-neutral cleaner specifically designed for vinyl floors. Avoid using abrasive cleaners or harsh chemicals, which can damage the surface. Place mats at entryways to trap dirt and debris. Use felt pads under furniture legs to prevent scratches and dents.
Key Considerations for Specific Situations
While the general steps outlined above apply to most installations, several specific situations require additional consideration. Addressing these situations properly is crucial for achieving a successful outcome.
Radiant Heat: If the ceramic tile floor contains radiant heat, ensure that the vinyl plank flooring is compatible with radiant heat systems. Some vinyl plank products are specifically designed for use with radiant heat, while others are not. Consult the manufacturer's instructions to determine the suitability of the product. Proper installation and temperature control are essential to prevent damage to the vinyl plank flooring.
Uneven Subfloors: If the ceramic tile floor has significant unevenness that cannot be adequately addressed with a self-leveling compound, consider installing an underlayment before installing the vinyl plank. An underlayment can help to smooth out minor imperfections and provide additional cushioning and sound insulation. Choose an underlayment that is specifically designed for use with vinyl plank flooring.
High-Traffic Areas: In high-traffic areas, such as hallways or entryways, consider using a more durable vinyl plank product with a thicker wear layer. A thicker wear layer provides greater resistance to scratches, dents, and wear. Regular maintenance, including sweeping and mopping, is also essential to maintain the appearance of the flooring in high-traffic areas.

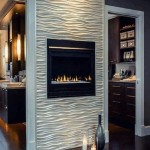
New Vinyl Plank Flooring Over Tile Table And Hearth

New Vinyl Plank Flooring Over Tile Table And Hearth

New Vinyl Plank Flooring Over Tile Table And Hearth

Vinyl Plank Wood Directly Over Tile

New Vinyl Plank Flooring Over Tile Table And Hearth

Lvt Flooring Over Existing Tile The Easy Way Vinyl Floor Installation Diy

New Vinyl Plank Flooring Over Tile Table And Hearth

Laying Gerflor Vinyl Plank Boards Over Existing Ceramic Tiles

New Vinyl Plank Flooring Over Tile Table And Hearth

How To Install Luxury Vinyl Plank Over Tile Flooring
Related Posts