How To Lay Outdoor Porcelain Tiles On Concrete
Laying porcelain tiles outdoors on a concrete surface offers an aesthetically pleasing and durable finish. This process, while achievable for the DIY enthusiast, requires careful preparation and execution to ensure longevity and prevent future issues.
1. Preparing the Concrete Surface
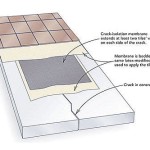
Proper surface preparation is paramount to a successful tile installation. The concrete must be clean, level, and free of any substances that could interfere with adhesion. Begin by thoroughly cleaning the concrete surface. A pressure washer is highly recommended for removing dirt, grime, and loose debris. Address any oil or grease stains with a specialized degreaser, following the manufacturer's instructions. Repair any cracks or imperfections with a suitable concrete patching compound, ensuring a smooth and even surface. Allow the patched areas to dry completely before proceeding.
2. Assessing and Addressing Drainage
Proper drainage is crucial to prevent water accumulation under the tiles, which can lead to cracking, shifting, and staining. The concrete surface should have a slight slope (approximately 1/4 inch per foot) to facilitate water runoff. If the existing slope is insufficient, consider adding a sloping layer of mortar before laying the tiles. Ensure that the drainage system, including gutters and downspouts, is functioning correctly and directs water away from the tiled area.
3. Choosing the Right Materials
Selecting appropriate materials is critical for a durable and weather-resistant tile installation. Opt for porcelain tiles specifically designed for outdoor use. These tiles are more dense and less porous than standard ceramic tiles, making them more resistant to freeze-thaw cycles and moisture absorption. Choose a high-quality, polymer-modified thin-set mortar specifically formulated for outdoor porcelain tile installations. This type of mortar offers enhanced bonding and flexibility, accommodating slight movements in the concrete substrate. A weather-resistant grout is also essential for filling the joints between the tiles, preventing water infiltration and weed growth.
4. Priming the Concrete Surface
Priming the concrete surface enhances adhesion between the concrete and the thin-set mortar. Use a concrete primer specifically designed for use with tile installations. Apply the primer evenly with a roller or brush, following the manufacturer's instructions. Allow the primer to dry completely before proceeding with the tile installation. This step is particularly important for porous concrete surfaces, as it helps prevent the concrete from absorbing moisture from the thin-set mortar, ensuring a strong bond.
5. Laying the Porcelain Tiles
Begin laying the tiles from a corner or a straight edge, using spacers to maintain consistent grout lines. Apply the thin-set mortar to the concrete surface using a notched trowel, ensuring even coverage within a manageable working area. Firmly press each tile into the mortar, using a twisting motion to ensure full contact. Periodically check the tile alignment and levelness using a level. Remove any excess mortar from the grout lines immediately.
6. Grouting the Tiles
After the thin-set mortar has cured for at least 24 hours, begin grouting the tiles. Mix the grout according to the manufacturer's instructions. Apply the grout to the joints using a grout float, working it diagonally across the tiles to ensure complete filling. Remove excess grout with a damp sponge, being careful not to remove grout from the joints. Allow the grout to haze over slightly, then buff the tiles with a clean, dry cloth to remove any remaining residue. Seal the grout lines after they have fully cured (typically 72 hours) with a grout sealer to enhance water resistance and prevent staining.
7. Post-Installation Care
Allow the grout and tile to cure completely before subjecting the area to heavy traffic or furniture. Regularly clean the tiled surface with a mild detergent and water to maintain its appearance and prevent the buildup of dirt and grime. Avoid using harsh chemicals or abrasive cleaners, which can damage the tile and grout. Inspect the grout lines periodically and reapply sealer as needed to maintain water resistance.

Can You Lay Outdoor Tiles Over Concrete Premier Porcelain
%202022-1.jpg?strip=all "How To Lay Porcelain Patio Paving Pavestone Natural Stone For Gardens And Driveways")
How To Lay Porcelain Patio Paving Pavestone Natural Stone For Gardens And Driveways

Porcelain Ceramic And Vitrified Paving Pavingexpert

Acton Timber Brown Porcelain Paving

The Ultimate Guide To Porcelain Paving Slabs Awbs

How To Lay Porcelain Tiles Outside The Paving Experts

Laying Porcelain On A Concrete Bed Guide

How To Lay A Porcelain Patio

Why You Shouldn T Fix External Porcelain Tiles Into A Wet Bed Htw Ltd

How To Install Porcelain Outdoor Floor Tiles In Your Garden Royale Stones Blog
Related Posts