How To Lay Ceramic Tile On Concrete Slab
Laying ceramic tile on a concrete slab provides a durable, aesthetically pleasing, and easy-to-maintain flooring solution for both residential and commercial spaces. However, successful tile installation hinges on meticulous preparation, proper material selection, and adherence to established best practices. This article provides a comprehensive guide to navigating the process of laying ceramic tile on concrete slabs, ensuring a long-lasting and visually appealing result.
Preparing the Concrete Slab
The concrete slab serves as the foundation for the tile installation, and its condition directly affects the integrity and longevity of the finished floor. Thorough preparation is paramount to ensure proper adhesion and prevent future issues such as cracking or tile detachment. This process involves several key steps, each contributing to a stable and supportive subsurface.
Inspection: The initial step involves a comprehensive visual inspection of the concrete slab. Look for cracks, unevenness, stains, paint, or any other imperfections that may compromise the bond between the tile and the concrete. Pay close attention to areas where moisture may be present, such as near doorways or along exterior walls. Using a straightedge is important to determine if the surface is level.
Cleaning: The concrete slab must be thoroughly cleaned to remove any dirt, dust, debris, grease, or existing coatings that could interfere with the adhesion of the mortar. Start by sweeping or vacuuming the entire surface. For stubborn stains or grease, use a suitable concrete cleaner designed for this purpose, following the manufacturer's instructions. Rinse the area thoroughly with clean water and allow it to dry completely before proceeding. Oil-based substances will require a degreaser to effectively remove them.
Repairing Cracks and Imperfections: Small cracks less than 1/8 inch wide can often be filled with a concrete crack filler or patching compound. Larger cracks, especially those exhibiting movement, may require more extensive repair, potentially involving concrete patching or even professional consultation to address underlying structural issues. Use a concrete chisel and hammer to remove any loose or crumbling concrete around the crack before applying the filler. Ensure the filler is compatible with the type of concrete and the mortar you will be using.
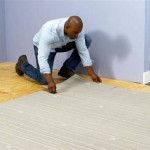
Leveling the Slab: Unevenness in the concrete slab can lead to cracked tiles and an unprofessional appearance. Use a self-leveling compound to create a smooth, level surface. Self-leveling compounds are cement-based mixtures that flow easily and self-correct minor variations in the slab's surface. Prepare the compound according to the manufacturer's instructions and pour it evenly across the floor. Use a gauge rake to help distribute the compound and remove any air bubbles. Allow the self-leveling compound to cure completely before proceeding with the tile installation.
Moisture Testing: Elevated moisture levels in the concrete slab can cause tile failures. Before tiling, conduct a moisture test to determine the moisture vapor emission rate (MVER) or the relative humidity (RH) within the slab. Several methods exist, including calcium chloride tests (MVER) and in-situ RH probes. Follow the manufacturer's instructions for the chosen test method and compare the results to the mortar manufacturer's recommendations. If the moisture levels exceed the acceptable limits, a moisture mitigation system may be required before installing the tile.
Applying Primer: Applying a concrete primer increases the adhesion between the mortar and the concrete surface. Select a primer specifically designed for use with tile mortar and follow the manufacturer's instructions for application. Typically, the primer is applied with a roller or brush and allowed to dry completely before proceeding with the mortar application. Primer ensures the thin-set mortar bonds correctly.
Selecting Mortar, Tile, and Tools
The choice of mortar, tile, and tools is crucial for a successful tile installation. Selecting the right materials ensures proper adhesion, durability, and aesthetics. This section will cover the key considerations for selecting these essential components.
Choosing the Right Mortar: Thin-set mortar is the adhesive used to bond the tile to the concrete slab. Select a mortar specifically formulated for use with ceramic tile and concrete substrates. Consider the size and type of tile being used, as well as any specific requirements for moisture resistance or flexibility. Modified thin-set mortars, which contain polymers that enhance adhesion and flexibility, are generally recommended for concrete slabs. Always refer to the manufacturer's instructions for mixing and application guidelines.
Selecting Ceramic Tile: Ceramic tile is available in a wide variety of sizes, shapes, colors, and patterns. Choose a tile that is appropriate for the intended use of the space. For high-traffic areas, select a durable tile with a high PEI (Porcelain Enamel Institute) rating. Consider the slip resistance of the tile, especially in wet areas. Ensure you purchase sufficient tile to cover the entire area, accounting for cuts and breakage. It is always wise to buy a little extra, in case of future repairs.
Essential Tools and Equipment: A smooth and efficient tiling process requires the correct tools. These include:
*
Notched Trowel:
The size and shape of the notches determine the amount of mortar applied. Select a trowel with notches that are appropriate for the size and type of tile being used. *Tile Cutter:
A tile cutter is essential for making clean, precise cuts. A snap cutter is suitable for straight cuts, while a wet saw is recommended for more complex shapes and cuts. *Grout Float:
A grout float is used to apply grout evenly into the tile joints. *Grout Sponge:
A grout sponge is used to clean excess grout from the tile surface. *Rubber Mallet:
A rubber mallet is used to gently tap the tiles into place and ensure proper adhesion to the mortar. *Level:
A level is essential for ensuring that the tiles are installed level and even. *Measuring Tape:
Used for marking and measuring. *Buckets and Mixing Tools:
Needed for mixing mortar and grout. *Safety Glasses and Gloves:
Protection is paramount when working with mortar, grout, and tile. *Tile Spacers:
Ensure consistent grout lines.The Tile Installation Process
With the concrete slab properly prepared and the necessary materials selected, the next step involves the actual tile installation. This requires careful planning, precise application of mortar, and meticulous placement of the tiles. Consistent grout lines are critical for the final result.
Layout and Planning: Before applying any mortar, it is crucial to plan the layout of the tile. Start by finding the center of the room and drawing perpendicular lines that intersect at the center point. These lines will serve as guidelines for laying the first row of tiles. Consider the placement of full tiles and cuts, aiming for symmetrical patterns and minimizing the number of small cuts. A dry layout, placing the tiles without mortar, will help visualize the final result and identify any potential issues.
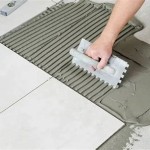
Applying the Mortar: Mix the thin-set mortar according to the manufacturer's instructions. Apply the mortar to the concrete slab using the notched trowel, holding the trowel at a 45-degree angle. Apply only enough mortar to cover a small area that can be tiled within a reasonable timeframe, typically 15-20 minutes, before the mortar begins to skin over. Use the flat side of the trowel to spread the mortar evenly, then use the notched side to create ridges that will provide a good bond with the tile.
Setting the Tiles: Carefully place the first tile onto the mortar, aligning it with the layout lines. Press the tile firmly into the mortar with a slight twisting motion to ensure good contact. Use tile spacers to maintain consistent grout lines between the tiles. Continue laying the tiles, working outwards from the center point. Use a rubber mallet to gently tap each tile into place, ensuring that it is level and flush with the adjacent tiles. Regularly check the level of the tiles with a level to ensure a level surface. Remove any excess mortar from the surface of the tiles as you go along.
Cutting Tiles: Use a tile cutter or wet saw to cut tiles to fit around walls, corners, and other obstructions. Measure the area to be covered and mark the tile accordingly. When using a tile cutter, score the tile along the marked line and then snap the tile along the scored line. When using a wet saw, carefully guide the tile through the blade, following the marked line. Always wear safety glasses when cutting tile.
Curing the Mortar: Allow the mortar to cure completely before proceeding with grouting. The curing time will vary depending on the type of mortar and the environmental conditions. Refer to the manufacturer's instructions for the recommended curing time. Avoid walking on the tiles during the curing period to prevent disturbing the bond.
Grouting: Once the mortar has cured, remove the tile spacers and prepare the grout according to the manufacturer's instructions. Apply the grout to the tile joints using a grout float, working the grout into all the joints. Remove excess grout from the tile surface with the grout float, holding it at a 45-degree angle. After allowing the grout to set for a short period (as specified by the manufacturer), use a damp grout sponge to clean the remaining grout residue from the tile surface. Rinse the sponge frequently with clean water. Allow the grout to cure completely before sealing. Sealing protects the grout from stains and discoloration.
Sealing and Cleaning: Once the grout has cured, apply a grout sealer to protect the grout from stains and discoloration. Follow the manufacturer's instructions for application. Clean the tile surface with a mild detergent and water. Avoid using harsh cleaning agents that could damage the tile or grout. Regularly sweep or vacuum the tile floor to remove dirt and debris.

Tiling Over A Ed Concrete Slab Fine Homebuilding
:max_bytes(150000):strip_icc()/can-you-install-tile-directly-on-concrete-1822600-04-458f7bb6c78348c1835cf8054ef36553.jpg?strip=all "How To Install Tile Over Concrete")
How To Install Tile Over Concrete

How To Tile Onto Concrete Floors Porcelain Super

How To Install Ceramic Tiles On Concrete Floor Tile Installation

How To Lay Tile On Concrete With Pictures Wikihow

How To Lay Floor Tiles On Concrete Stonesuper

How To Install Ceramic Tiles On Concrete Floor Tile Installation

How To Lay Floor Tiles On Concrete Welcome The Rubi Tools Blog

Sound Dampening Ceramic Tile Over A Concrete Floor Fine Homebuilding
:max_bytes(150000):strip_icc()/can-you-install-tile-directly-on-concrete-1822600-01-8a89ceab1a274fb8ac81890ab7fc6b1b.jpg?strip=all "How To Install Tile Over Concrete")
How To Install Tile Over Concrete
Related Posts