How To Lay Ceramic Tile In Kitchen Sinks
Laying ceramic tile in a kitchen sink is a specialized project distinct from typical tiling applications like floors or backsplashes. A kitchen sink presents unique challenges due to its curvature, constant exposure to water, and potential for physical impact from dishes and utensils. Consequently, meticulous preparation, careful material selection, and precise installation techniques are crucial for a successful and long-lasting result. This article outlines a comprehensive process for tiling a kitchen sink, covering essential steps from initial assessment to final grouting.
Before embarking on the tiling process, assess the existing sink material and its condition. Ceramic, porcelain, or stainless steel sinks can all be tiled; however, some materials require specific bonding agents or preparation methods. If the existing sink surface is damaged, chipped, or significantly uneven, repairs or even complete replacement might be necessary before tiling. Consider the overall aesthetic of the kitchen and choose tiles that complement the existing design. Smaller tiles are generally recommended for curved surfaces, as they conform better to the contours of the sink bowl.
Key Point 1: Preparation and Material Selection
The initial phase of tiling a kitchen sink involves thorough preparation and careful selection of the appropriate materials. This stage significantly influences the final appearance, durability, and longevity of the tiled surface.
First, the existing sink must be meticulously cleaned. Remove any grease, debris, or soap scum using a degreasing cleaner and a scrub brush. Rinse thoroughly and allow the sink to dry completely. Sanding the surface with medium-grit sandpaper (approximately 80-120 grit) is often recommended to create a textured surface that will promote better adhesion of the tiling adhesive. After sanding, remove all dust particles with a vacuum cleaner and a tack cloth.
Priming the sink surface is a critical step to ensure proper bonding. Apply a bonding primer designed for non-porous surfaces. This primer creates a chemical bridge between the existing sink material and the tile adhesive. Follow the manufacturer's instructions regarding application thickness and drying time. Allow the primer to fully cure before proceeding with the tiling process.
Selecting the right tile adhesive is paramount. A waterproof, flexible thin-set mortar is essential for kitchen sinks. This type of mortar can withstand constant exposure to water and temperature fluctuations. Epoxy-based mortars offer superior water resistance and bond strength but are typically more expensive and require more skill to apply. Consider the size and type of tile being used when selecting the mortar; larger tiles often require a thicker mortar bed.
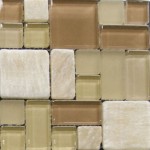
Choosing the appropriate tile size and material is also crucial. Ceramic or porcelain tiles are common choices due to their durability, water resistance, and availability in various colors and styles. Mosaic tiles, typically smaller than 2 inches square, are particularly well-suited for curved surfaces. Ensure the tiles are rated for wet environments and are resistant to chemicals and scratches.
Gather all necessary tools and materials before starting the tiling process. These include: measuring tape, tile cutter (wet saw or manual cutter), notched trowel (size appropriate for the tile size), rubber grout float, grout sponge, utility knife, level, safety glasses, gloves, and a dust mask. Having all tools readily available will streamline the process and minimize interruptions.
Key Point 2: Tile Installation Techniques
Once the sink is properly prepared and the necessary materials are gathered, the next step involves the precise installation of the ceramic tiles. This requires careful planning and execution to ensure a visually appealing and structurally sound tiled surface.
Begin by dry-fitting the tiles on the sink surface to determine the optimal layout and spacing. This step is essential for identifying any potential issues, such as uneven surfaces or complex curves. Adjust the tile arrangement as needed to minimize cuts and maintain a consistent pattern. Mark the center point of the sink basin to serve as a reference point for aligning the tiles.
Using the notched trowel, apply a thin, even layer of the selected thin-set mortar to a small section of the sink surface. The notch size should be appropriate for the tile size; consult the mortar manufacturer's recommendations. Apply the mortar with a consistent pressure and angle to ensure uniform coverage.
Carefully press each tile into the mortar, using a slight twisting motion to ensure proper adhesion. Maintain consistent spacing between tiles using tile spacers. The size of the spacers will depend on the desired grout joint width. Use a level to ensure that the tiles are flush with each other and that the surface is even. For tiles that require cutting, use a wet saw or manual tile cutter to achieve precise cuts. Wear safety glasses when cutting tiles.
When tiling around the drain opening, use a utility knife to carefully trim the tiles to fit. Consider using a diamond-tipped hole saw for creating perfectly round cutouts. Ensure that the edges of the tiles around the drain are smooth and flush with the drain flange.
Continue applying tiles in small sections, working from the center outwards. Regularly check the alignment and spacing of the tiles to ensure a uniform and aesthetically pleasing appearance. Allow the mortar to cure completely according to the manufacturer's instructions before proceeding to the next step, typically 24-48 hours.
Key Point 3: Grouting and Sealing
After the mortar has fully cured, the next stage involves applying grout to fill the gaps between the tiles and sealing the grout to protect it from water and stains. This step completes the tiling process and significantly contributes to the overall durability and appearance of the tiled sink.
Remove the tile spacers and clean any excess mortar from the tile surfaces using a utility knife or a grout removal tool. Ensure that the grout joints are free of debris and loose particles. Dampen the tile surfaces with a sponge before applying the grout.
Mix the grout according to the manufacturer's instructions. Use a rubber grout float to apply the grout to the tile joints, working at a 45-degree angle to force the grout into the gaps. Remove excess grout from the tile surfaces as you work.
Allow the grout to set for approximately 15-30 minutes, or as directed by the manufacturer. Then, use a damp grout sponge to clean the excess grout from the tile surfaces. Rinse the sponge frequently and use a light, circular motion to avoid removing grout from the joints. Repeat this process until the tile surfaces are clean and free of grout haze.
After the grout has fully cured, typically 24-72 hours, apply a grout sealer to protect the grout from water, stains, and mildew. Apply the sealer according to the manufacturer's instructions, using a small brush or applicator. Allow the sealer to penetrate the grout thoroughly before wiping away any excess sealer from the tile surfaces.
Inspect the tiled sink for any imperfections or inconsistencies. Touch up any areas as needed with additional grout or sealer. Allow the sealer to fully cure before using the sink. Avoid using harsh chemicals or abrasive cleaners on the tiled surface. Clean the sink regularly with a mild soap and water solution.
Proper ventilation is essential throughout the tiling process. Open windows and use a fan to circulate air and remove any fumes from the adhesives, mortars, and sealers. Wear appropriate personal protective equipment, including safety glasses, gloves, and a dust mask, to protect yourself from exposure to potentially harmful chemicals and materials. Dispose of waste materials properly according to local regulations.

Kitchen Tile Basics Installing Around A Sink

How To Install A Tile Counter Top

Installing Tile Countertops Backsplash Family Handyman

Adding Floor Tiles Under Your Kitchen Sink Home Staging In Bloomington Illinois

Diy Kitchen Sink Backsplash On The Upcycle

Installing A Tile Countertop Ibuildit Ca

Installing A Tile Countertop Ibuildit Ca

Installing A Tile Countertop Ibuildit Ca

Herringbone Floor Tile In My Kitchen The Inspired Room

Pro Tips For Choosing And Installing The Perfect Backsplash Tile Rubi Blog Usa
Related Posts