How To Lay Ceramic Tile In Kitchen Floor And Decor
Laying ceramic tile in a kitchen floor is a significant home improvement project that can dramatically enhance the space's aesthetic appeal and functionality. Ceramic tile is durable, water-resistant, and relatively easy to maintain, making it a popular choice for kitchens. This article provides a comprehensive guide to the process, covering preparation, installation, and finishing touches.
Planning and Preparation
The first step involves meticulous planning and preparation. This stage is crucial for ensuring a successful and long-lasting tile installation. Proper planning encompasses accurate measurements, material selection, and substrate preparation.
Measuring the Area: Begin by accurately measuring the dimensions of the kitchen floor. It is best to measure in feet and inches, then convert to square feet to determine the total area. Add approximately 10-15% to this total to account for cuts, waste, and potential breakage. This overage is particularly important when working with intricate patterns or oddly shaped rooms.
Tile Selection: Choosing the right tile is essential. Consider the following factors:
- Tile size: Larger tiles can make a small kitchen appear more spacious, while smaller tiles can add intricate detail.
- Tile material: Ceramic tile comes in various types, including glazed and unglazed. Glazed tiles are more resistant to stains and moisture, making them ideal for kitchens. Porcelain tile, a type of ceramic, is even more durable and water-resistant.
- Tile color and pattern: Select a color and pattern that complements the kitchen's overall decor. Consider the existing cabinetry, countertops, and wall color.
- Slip resistance: Kitchens are prone to spills, so choose tiles with a suitable slip-resistance rating to prevent accidents. Look for tiles with a Dynamic Coefficient of Friction (DCOF) rating of 0.6 or higher.
Material Procurement: Once the tile is chosen, procure all necessary materials. This includes:
- Ceramic tiles (with the calculated overage)
- Thin-set mortar: Choose a mortar specifically designed for ceramic tile. Consider the specific requirements of the selected tile.
- Grout: Select a grout color that complements the tile. Epoxy grout is more stain-resistant than cement-based grout.
- Tile sealer: Apply a sealer to the grout lines to protect them from stains and moisture.
- Backer board (if needed): If the subfloor is not suitable for tile installation, backer board provides a stable and waterproof surface.
Tool Acquisition: Gather the necessary tools:
- Tile saw: For cutting tiles to fit around corners and edges. A wet saw is recommended for ceramic tile.
- Notched trowel: To apply the thin-set mortar evenly. The notch size depends on the tile size.
- Grout float: To apply grout into the tile joints.
- Grout sponge: To clean excess grout from the tile surface.
- Rubber mallet: To gently tap tiles into place.
- Level: To ensure the tiles are level and even.
- Measuring tape: For accurate measurements.
- Pencil: For marking tiles.
- Safety glasses and gloves: To protect eyes and hands.
Subfloor Preparation: A stable and level subfloor is essential for a successful tile installation.
- Clean the subfloor: Remove any debris, dirt, grease, or old adhesive.
- Inspect the subfloor: Check for any damage, such as cracks or rot. Repair any damage before proceeding.
- Level the subfloor: Use self-leveling compound to create a smooth and level surface.
- Install backer board (if needed): If the subfloor is wood or otherwise unsuitable, install cement backer board to provide a stable and waterproof base for the tile. Secure the backer board with screws designed for this purpose.
Tile Installation
With the planning and preparation complete, the actual tile installation can begin. This involves laying the tiles, ensuring proper alignment and spacing, and allowing the mortar to cure properly.
Dry Layout: Before applying any mortar, perform a dry layout of the tiles. This allows visualizing the tile pattern, identifying any potential problems, and making necessary adjustments before the mortar is applied. Start at the center of the room and work outwards. Use tile spacers to maintain consistent grout lines. This step also highlights any unusual cuts that might be required.
Applying Thin-Set Mortar: Mix the thin-set mortar according to the manufacturer's instructions. Use a notched trowel to apply the mortar to the subfloor, spreading it evenly and creating ridges. The size of the trowel notch depends on the tile size. Apply mortar in small sections, working in manageable areas to prevent the mortar from drying out before the tiles are placed.
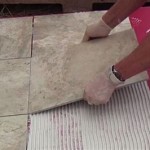
Setting the Tiles: Carefully place each tile onto the mortar bed, pressing it firmly into place. Use a rubber mallet to gently tap the tile to ensure it is fully embedded in the mortar. Use tile spacers to maintain consistent grout lines. Check the level of each tile with a level to ensure it is even with the surrounding tiles. Remove any excess mortar from the tile surface with a damp sponge.
Cutting Tiles: When necessary, use a tile saw to cut tiles to fit around corners, edges, and fixtures. Measure accurately and mark the cutting line on the tile. Use a wet saw for precise cuts and to prevent the tile from chipping. Wear safety glasses to protect your eyes from debris. After cutting, smooth the edges of the tile with a tile file or sandpaper.
Curing Time: Allow the thin-set mortar to cure completely according to the manufacturer's instructions. This typically takes 24-48 hours. Avoid walking on the tiles during this time to prevent them from shifting.
Grouting and Sealing
Once the mortar has cured, the next step is to apply grout to fill the spaces between the tiles. Grouting provides a finished look, seals the tile edges, and prevents water infiltration. Proper sealing of the grout lines is crucial for preventing stains and moisture damage.
Grouting: Mix the grout according to the manufacturer's instructions. Use a grout float to apply the grout to the tile joints, working diagonally across the tiles to ensure the joints are completely filled. Remove any excess grout from the tile surface with the grout float. Allow the grout to set for the recommended time, usually 15-30 minutes.
Cleaning: After the grout has set, use a damp grout sponge to clean the excess grout from the tile surface. Rinse the sponge frequently and wring it out thoroughly to avoid spreading the grout. Multiple passes may be necessary to remove all the excess grout. Allow the grout to cure completely according to the manufacturer's instructions.
Sealing: Once the grout has cured, apply a grout sealer to protect the grout lines from stains and moisture. Use a brush or applicator to apply the sealer to the grout lines, following the manufacturer's instructions. Allow the sealer to dry completely before using the floor. Regular resealing of the grout lines is recommended to maintain their protection.
Final Cleaning: After the sealer has dried, perform a final cleaning of the tile floor to remove any remaining grout haze or residue. Use a mild detergent and water to clean the tiles. Avoid using abrasive cleaners, as they can damage the tile surface. Dry the floor thoroughly with a clean cloth.
Decor Considerations
Integrating the newly tiled kitchen floor into the overall decor requires careful consideration of color palettes, textures, and design elements. The floor serves as a foundational element, influencing the selection of other decorative features.
Color Coordination: The tile color should complement the existing kitchen cabinetry, countertops, and backsplash. Neutral tones offer versatility, while bolder colors can create a focal point. Consider using a color wheel to identify complementary colors that enhance the visual appeal of the space.
Texture and Pattern: The texture and pattern of the tile can add depth and visual interest to the kitchen. Textured tiles can provide a non-slip surface and add a tactile element. Intricate patterns can create a unique and personalized look, while simple patterns offer a clean and modern aesthetic.
Lighting: Lighting plays a crucial role in showcasing the tile floor. Natural light enhances the colors and textures of the tile, while artificial lighting can be used to create specific moods and effects. Consider using under-cabinet lighting to highlight the tile floor and add ambiance to the kitchen.
Accessories: Kitchen accessories, such as rugs, mats, and runners, can add warmth and comfort to the tile floor. Choose accessories that complement the tile color and pattern, and that are durable and easy to clean. Consider using rugs or mats in high-traffic areas to protect the tile floor from wear and tear.
Floor Transitions: Carefully plan the transitions between the tile floor and adjacent flooring materials, such as hardwood or carpet. Use transition strips to create a smooth and seamless transition, and to prevent tripping hazards. Choose transition strips that complement the tile color and style.

Best Tile For Kitchen Floor How To Make The Right Choice Welcome Rubi Tools Blog

Top 5 Kitchen Layout Ideas And Tile Designs For Perfection

Ceramic Tile Kitchen Floor Pros Cons And Best Designs Stone Depot

Kitchen Floor Tile Ideas 2025 Marble Systems

Ceramic Tile Kitchen Floor Pros Cons And Best Designs Stone Depot

Kitchen Tiles Flooring Backsplash Floor Decor

Kitchen Floor Tiles Ceramic Vinyl More The Tile
:max_bytes(150000):strip_icc()/small-kitchen-ideas-mix-and-match-1021-99fbfaafe683423aa2af7d711d334e44-62f953ad7d5f4788995ecc3d72732509.jpeg?strip=all "24 Beautiful Kitchen Floor Tile Ideas")
24 Beautiful Kitchen Floor Tile Ideas

Kitchen Floor Tile Ideas 2025 Marble Systems
:max_bytes(150000):strip_icc()/small-kitchen-ideas-sophia-at-home-ce212a5ab80e4c53b6f8dccc9ae70b59-5ca6f96cd0cb40959d368be4c3708094.jpeg?strip=all "30 Gorgeous Kitchen Floor Tile Ideas")
30 Gorgeous Kitchen Floor Tile Ideas
Related Posts