How to Lay Ceramic Tile in a Kitchen Floor: A Comprehensive Guide
Laying ceramic tile on a kitchen floor is a significant home improvement project that can dramatically enhance the aesthetics and functionality of the space. This article provides a detailed guide to the process, covering everything from preparation to grouting, ensuring a durable and visually appealing result. Careful planning and execution are essential for achieving a professional-looking tile floor.
Before commencing the installation, a thorough assessment of the subfloor is paramount. The subfloor provides the foundation for the tile, and its condition will directly impact the longevity and stability of the finished floor. A level, clean, and structurally sound subfloor is crucial for preventing cracks and unevenness in the tile surface.
Key Point 1: Subfloor Preparation
The initial step involves removing any existing flooring material, such as linoleum, vinyl, or old tile. This may require the use of a scraper, pry bar, or specialized floor removal tools. It's essential to wear appropriate safety gear, including gloves and eye protection, during this process, as debris and sharp objects can be encountered. Once the old flooring is removed, the subfloor needs to be thoroughly cleaned. This involves sweeping, vacuuming, and potentially scrubbing to remove any residual adhesive, dirt, or debris.
After cleaning, the subfloor must be inspected for any imperfections. This includes checking for cracks, unevenness, or areas that are not level. Minor cracks can be repaired with a concrete patching compound. Larger cracks or significant unevenness may require more extensive repairs, such as applying a self-leveling compound. Self-leveling compound is a pourable mixture that spreads and hardens to create a perfectly level surface. It is crucial to follow the manufacturer's instructions carefully when applying self-leveling compound to ensure proper curing and adhesion.
For wood subfloors, checking for loose or damaged boards is essential. Loose boards should be re-secured with screws, and damaged boards should be replaced entirely. The subfloor should also be checked for moisture content. Excess moisture can cause the tile adhesive to fail and lead to mold growth. A moisture meter can be used to measure the moisture content of the wood. If the moisture content is too high, steps must be taken to address the source of the moisture and allow the subfloor to dry completely before proceeding.
In some cases, it may be necessary to install a layer of cement backer board over the existing subfloor. Cement backer board provides a stable, waterproof surface that is ideal for tile installation. It is especially recommended for areas prone to moisture, such as kitchens and bathrooms. The backer board should be attached to the subfloor with thin-set mortar and screws specifically designed for cement board installation. The seams between the boards should be taped and mudded with cement board joint compound to create a smooth, seamless surface.
Key Point 2: Tile Layout and Cutting
Before applying any thin-set mortar, proper planning and layout are essential. This involves determining the optimal placement of tiles to minimize cuts and create a visually appealing pattern. Start by finding the center of the room. This can be done by measuring the length and width of the room and marking the midpoints. Then, snap chalk lines connecting the midpoints of opposite walls to create a cross at the center of the room. The intersection of these chalk lines will serve as the starting point for the tile layout.
Dry-lay the tiles along the chalk lines to get a sense of the overall layout. If the layout results in small slivers of tile along the edges of the room, it may be necessary to adjust the starting point to achieve a more balanced look. Adjusting the starting point involves shifting the chalk lines slightly to ensure that the tiles along the edges are at least half-tile width. This will create a more aesthetically pleasing and professional-looking finish.
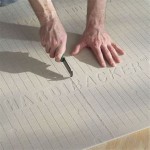
Once the layout is finalized, carefully measure and mark the tiles that need to be cut. A tile cutter or wet saw can be used to make the cuts. A tile cutter is a manual tool ideal for straight cuts. A wet saw is a power tool that uses a diamond blade and water to make precise cuts, including curves and angles. When using a tile cutter, score the tile firmly and then apply pressure to snap it along the score line. When using a wet saw, guide the tile slowly and steadily through the blade, allowing the water to cool the blade and minimize chipping. Always wear safety glasses when cutting tile.
For intricate cuts around pipes, corners, or other obstacles, a tile nipper can be used. A tile nipper is a hand tool with jaws that can be used to nibble away small pieces of tile. This tool is especially useful for creating curved or irregular cuts. Alternatively, a hole saw attachment for a drill can be used to create circular holes in the tile.
After cutting all the necessary tiles, arrange them in the order they will be installed. This will help ensure a smooth and efficient installation process. It is also a good idea to label the cut tiles to avoid confusion during installation.
Key Point 3: Tile Installation and Grouting
With the subfloor prepared and the tiles cut, the next step is to apply the thin-set mortar. Thin-set mortar is a cement-based adhesive used to bond the tiles to the subfloor. Choose a thin-set mortar specifically designed for ceramic tile and follow the manufacturer's instructions for mixing. Use a notched trowel to apply the thin-set mortar to the subfloor, holding the trowel at a 45-degree angle. The size of the notches on the trowel will determine the thickness of the mortar bed. Ensure that the notches are consistent to create a uniform bond. Only apply thin-set mortar to a small area at a time, as it can dry out quickly.
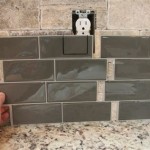
Place the tiles onto the thin-set mortar, pressing down firmly and twisting slightly to ensure good adhesion. Use tile spacers to maintain consistent spacing between the tiles. The size of the spacers will depend on the desired grout line width. Regularly check the level of the tiles with a level, and make adjustments as needed. If a tile is too high, gently tap it down with a rubber mallet. If a tile is too low, add more thin-set mortar underneath it.
Continue laying the tiles, working your way across the room. Periodically wipe away any excess thin-set mortar that squeezes up between the tiles. Once all the tiles are laid, allow the thin-set mortar to cure completely, according to the manufacturer's instructions. This typically takes 24 to 48 hours.
After the thin-set mortar has cured, it is time to grout the tiles. Grout is a cement-based mixture used to fill the spaces between the tiles. Choose a grout color that complements the tile. Mix the grout according to the manufacturer's instructions. Apply the grout to the tile surface using a grout float, working it into the grout lines at a 45-degree angle. Remove any excess grout from the tile surface with the grout float. Wait for the grout to set up slightly, and then use a damp sponge to clean the tile surface, removing any remaining grout residue. Rinse the sponge frequently to avoid smearing the grout. Allow the grout to cure completely, according to the manufacturer's instructions. This typically takes 24 to 72 hours.
Finally, seal the grout lines with a grout sealer. Grout sealer will help protect the grout from stains and moisture. Apply the grout sealer according to the manufacturer's instructions. Wipe away any excess sealer from the tile surface.
The newly tiled kitchen floor requires proper maintenance to retain its aesthetic appeal and durability. Regular cleaning with a mild detergent and water is sufficient for most spills and stains. Avoid using abrasive cleaners, as they can damage the tile and grout. For stubborn stains, a specialized tile cleaner may be necessary. Promptly address any spills or leaks to prevent staining and water damage.
By carefully following these steps, one can achieve a beautiful and durable ceramic tile floor in the kitchen. Consistent adherence to the recommended procedures guarantees a professional outcome, augmenting both the visual charm and practicality of the cooking space.

Tips For Installing A Kitchen Vinyl Tile Floor Merrypad

How To Tile A Kitchen Floor Step By Guide For Beginners

Complete Guide On How To Install Ceramic Floor Tiles Rubi Blog Usa

How To Install A Tile Floor The Home Depot

Complete Guide On How To Install Ceramic Floor Tiles Rubi Blog Usa

How To Install A Tile Floor The Home Depot

Installing Great Ceramic Tile Flooring For The Kitchen Is Something Every Woman In House Loves

How To Lay Tile Diy Floor Installation Lowe S

Workers Construct And Install Ceramic Tiles For Kitchen Floors Professionally Accurately

Complete Guide On How To Install Ceramic Floor Tiles Rubi Blog Usa
Related Posts