How To Lay Bathroom Floor Tile On Concrete
Laying bathroom floor tile on concrete requires careful preparation, the right tools, and a systematic approach. A properly installed tile floor can enhance the aesthetics and functionality of a bathroom. This article provides a comprehensive guide on how to complete this project, ensuring a durable and visually appealing result. Success depends on adherence to best practices and attention to detail throughout each phase.
Preparing the Concrete Subfloor
The first and arguably most crucial step is preparing the concrete subfloor. A flawed subfloor can lead to tile cracking, grout failure, and an overall unsatisfactory outcome. This stage involves cleaning, leveling, and assessing the concrete slab for any existing damage or potential issues.
Begin by thoroughly cleaning the concrete surface. Remove any existing debris, dirt, dust, paint, adhesive residue, or wax. A shop vacuum is useful for removing loose particles. For stubborn residues, use a scraper and appropriate chemical cleaners specifically designed for concrete. Follow the manufacturer's instructions on the cleaners carefully, ensuring adequate ventilation and personal protective equipment.
Once the surface is clean, inspect for cracks and imperfections. Small hairline cracks may not pose a significant problem, but larger cracks or uneven surfaces must be addressed. Use a concrete crack filler or patching compound to repair any cracks. Allow the filler to dry completely according to the manufacturer's directions. For significant unevenness, consider using a self-leveling concrete compound. This will create a perfectly flat and even surface for tile installation.
Apply a concrete primer to the clean and repaired surface. Primer promotes adhesion between the concrete and the thin-set mortar, which is essential for a long-lasting tile installation. Choose a primer specifically designed for tile installation on concrete. Apply it evenly with a paint roller or brush, following the manufacturer's instructions regarding drying time. A properly primed subfloor will significantly improve the bond and prevent future problems.
Before proceeding, verify the flatness of the floor using a long level. Move the level across the floor in multiple directions to identify any high or low spots. Minor imperfections can be addressed with additional thin-set mortar during tile installation, but significant variations should be corrected with self-leveling compound before you proceed. Take the time to ensure the subfloor is as level and even as possible. This will prevent problems down the line and contribute to a professional-looking finished floor.
Choosing the Right Materials and Tools
Selecting the appropriate materials and tools is vital for a successful tile installation. Using substandard materials or incorrect tools can lead to difficulties during the installation process and ultimately compromise the quality of the finished floor.
Select the tile based on the bathroom's aesthetic and functional requirements. Porcelain, ceramic, and natural stone tiles are all suitable options. Porcelain tiles are particularly popular for bathrooms due to their water resistance and durability. Consider the size, shape, and color of the tiles to achieve the desired look. It's recommended to purchase approximately 10% more tiles than needed to account for cuts and potential breakage.
Choose a high-quality thin-set mortar specifically designed for the type of tile you've selected and the concrete substrate. Thin-set mortar is the adhesive that bonds the tile to the subfloor. Read the product label to ensure it's suitable for wet environments and the tile material you are using. Polymer-modified thin-set mortar offers enhanced adhesion and flexibility, making it a good choice for bathroom floors. It is important to mix the thin-set according to the manufacturer's instructions, achieving the correct consistency for optimal bonding.
Select grout that complements the tile and is suitable for wet environments. Epoxy grout is a water-resistant and stain-resistant option that is ideal for bathrooms. Cement-based grout is another common choice, but it requires regular sealing to prevent water penetration. Choose a grout color that complements the tile and the overall bathroom design. Remember to seal the grout after installation to prevent stains and water damage. A proper grout application is essential for a watertight and durable floor.
Gather the necessary tools before beginning the installation. These include: a notched trowel (size depends on the tile size), a tile cutter or wet saw, a rubber mallet, a level, a measuring tape, a pencil, a sponge, buckets, safety glasses, knee pads, and gloves. A notched trowel correctly sized for the tile ensures a consistent application of thin-set mortar. A wet saw is recommended for cutting tiles, especially porcelain and natural stone. Knee pads will provide comfort while working on the floor and safety glasses protect your eyes while cutting the tile. Having all the right tools at hand will streamline the installation process and contribute to a professional finish.
The Tile Laying Process
The tile laying process involves careful planning, precise application of thin-set mortar, and accurate tile placement. This phase requires patience and attention to detail to ensure a level and aesthetically pleasing floor.
Start by planning the layout of the tiles. Find the center of the room and create a reference line. Dry-lay the tiles along this line to visualize the layout and make any necessary adjustments to avoid small cuts along the walls. Maintaining symmetry is essential for a visually appealing result. Consider the placement of fixtures and any obstacles when planning the layout.
Mix the thin-set mortar according to the manufacturer's instructions. Add water gradually to the powder while mixing with a drill and mixing paddle. Ensure the mixture is smooth and free of lumps. Allow the thin-set to slake (rest) for a few minutes before using it. Only mix enough thin-set to use within a reasonable timeframe, as it will begin to dry out. Follow the manufacturer's instructions closely to achieve the correct consistency and working time.
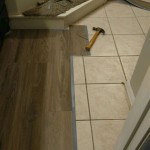
Apply the thin-set mortar to a small section of the subfloor using the notched trowel. Hold the trowel at a 45-degree angle and create ridges in the mortar. The size of the notch on the trowel should correspond to the size of the tile being installed. Press each tile firmly into the thin-set mortar with a slight twisting motion. Use tile spacers to maintain consistent grout lines. Ensure the tiles are level by using a level and tapping them gently with a rubber mallet. Remove any excess thin-set mortar from the surface of the tiles with a damp sponge.
Continue laying tiles row by row, ensuring each tile is properly aligned and spaced. Use the wet saw or tile cutter to cut tiles to fit around walls, pipes, and other obstacles. Dry-fit the cut tiles before applying thin-set to ensure a proper fit. Take your time and double-check the alignment of each tile. Wipe away any thin-set that gets onto the tile surface immediately with a damp sponge.
Allow the thin-set mortar to cure completely according to the manufacturer's instructions, typically 24-48 hours, before walking on the tiles or proceeding with grouting. Premature traffic can disrupt the tiles and compromise the bond. Once the thin-set is cured, remove the tile spacers and prepare for the grouting phase.
Grouting and Sealing
Grouting fills the spaces between the tiles, creating a clean and watertight surface. Sealing the grout helps to prevent stains and water damage, extending the life of the floor.
Mix the grout according to the manufacturer's instructions. Apply the grout to the tile surface using a grout float. Spread the grout diagonally across the tile surface, forcing it into the grout lines. Remove excess grout from the tile surface with the grout float held at a 45-degree angle. Work in small sections to prevent the grout from drying out.
After the grout has set for the recommended time (usually 15-30 minutes), use a damp sponge to clean the tile surface. Rinse the sponge frequently and wring it out thoroughly. Be careful not to remove too much grout from the grout lines. This process may require multiple passes to remove all the grout haze from the tile surface. Allow the grout to cure completely, typically 24-72 hours, before sealing.
Apply a grout sealer to protect the grout from stains and water damage. Use a grout brush or applicator to apply the sealer evenly to the grout lines. Allow the sealer to penetrate the grout for the recommended time, then wipe away any excess sealer from the tile surface. Apply a second coat of sealer for added protection. Regular cleaning and maintenance will help to keep the grout looking its best. Reapply grout sealer every 1-2 years, or as needed.
After the grout sealer has dried completely, clean the tile surface one last time with a mild detergent and water. This will remove any remaining residue and leave the floor looking clean and polished. Inspect the floor for any imperfections and make any necessary touch-ups. A well-grouted and sealed tile floor will provide years of beauty and functionality.

How To Lay Tile Install A Ceramic Floor In The Bathroom Diy
:max_bytes(150000):strip_icc()/can-you-install-tile-directly-on-concrete-1822600-04-458f7bb6c78348c1835cf8054ef36553.jpg?strip=all "How To Install Tile Over Concrete")
How To Install Tile Over Concrete

How To Lay Bathroom Tile 5 Easy Steps Rubi Blog Usa

How I Lay Tile On A Concrete Floor Part 1 Mike Haduck

How To Install Large Format Tile On Concrete 7 Quick Tips

How To Layout And Install Large Format Tile On Concrete

How To Tile A Small Bathroom Floor Basement Tips

How To Install A Tile Floor The Home Depot

How To Lay Tile On Concrete Floor Large Format Installation In Entryway

How To Lay Ceramic Tile Over Concrete Ron Hazelton
Related Posts