How to Install Vinyl Sheet Flooring Over Ceramic Tile
Installing new flooring can dramatically transform a room. While removing existing ceramic tile is a common approach, it can be a messy and time-consuming project. Laying vinyl sheet flooring directly over ceramic tile offers an alternative, often faster and cleaner installation method. However, proper preparation and technique are essential to achieve a smooth, durable, and aesthetically pleasing result. This article details the steps required to successfully install vinyl sheet flooring over existing ceramic tile, focusing on critical aspects of surface preparation, subfloor enhancements, adhesive application, and the installation process itself.
Key Point 1: Assessing and Preparing the Existing Ceramic Tile Surface
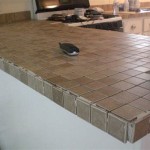
The success of installing vinyl sheet flooring over ceramic tile hinges heavily on the condition of the existing tile and the quality of the preparation. A thorough assessment is the first step. It is critical to determine if the existing ceramic tile is firmly bonded to the subfloor and is relatively level. Any loose, cracked, or damaged tiles must be addressed before proceeding. These issues, if left unaddressed, will inevitably telegraph through the vinyl sheet flooring, creating unevenness and potential damage.
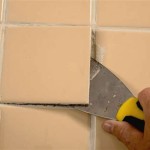
Begin by visually inspecting the entire tiled surface. Look for cracks in the tiles themselves, along the grout lines, and around the perimeter of the room. Pay particular attention to areas that experience high foot traffic or are exposed to moisture. Use a rubber mallet to lightly tap each tile. A hollow sound indicates that the tile has become detached from the subfloor. These loose tiles must be removed and the resulting voids filled with a suitable patching compound.
After identifying and addressing any loose or damaged tiles, the next step is to ensure the existing tile surface is clean and free of any contaminants that could interfere with the vinyl flooring adhesive. This includes dirt, dust, grease, wax, and any old adhesive residue. Begin by thoroughly sweeping or vacuuming the entire area. Then, use a suitable tile cleaner and a scrub brush to remove any stubborn dirt or grime. Rinse the surface thoroughly with clean water and allow it to dry completely. This may take several hours or even overnight, depending on the humidity levels and the porosity of the grout and tile.
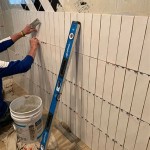
Once the surface is clean and dry, it is necessary to address the grout lines. Grout lines, being recessed, create an uneven surface that will be visible through the vinyl sheet flooring. To mitigate this, a self-leveling underlayment or a thin-set mortar layer can be applied to create a smooth, continuous surface. This process fills in the grout lines and any minor imperfections in the tile, providing a uniform base for the vinyl flooring. The choice between self-leveling underlayment and thin-set mortar depends on the depth and extent of the grout lines and the overall levelness of the existing tile surface.
If using a self-leveling underlayment, follow the manufacturer's instructions carefully regarding mixing and application. Ensure the underlayment is properly primed to bond to the existing tile. Pour the underlayment evenly over the tiled surface, allowing it to self-level. Use a gauge rake or trowel to spread the material and eliminate any air bubbles. Allow the underlayment to cure completely according to the manufacturer's specifications before proceeding. This can take anywhere from 24 to 72 hours, depending on the product and environmental conditions.
If using thin-set mortar, apply a thin, even coat over the entire tiled surface, carefully filling in the grout lines. Use a wide trowel with a notched edge to ensure uniform coverage. Allow the thin-set mortar to dry completely before proceeding. This usually takes 24 to 48 hours, depending on the temperature and humidity levels. After the thin-set mortar has dried, lightly sand the surface to remove any imperfections and ensure a smooth, even base for the vinyl sheet flooring.
Finally, before installing the vinyl sheet flooring, thoroughly vacuum the prepared surface to remove any dust or debris generated during the preparation process. A clean, smooth, and level surface is paramount for a successful and long-lasting vinyl flooring installation.
Key Point 2: Selecting Appropriate Materials and Tools
Choosing the right materials and tools is crucial for a professional-looking and durable vinyl sheet flooring installation. Poorly selected materials or inadequate tools can lead to installation difficulties, subpar results, and premature failure of the flooring.
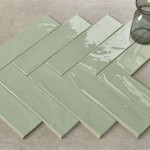
The first consideration is, of course, the vinyl sheet flooring itself. Select a product that is suitable for the intended use and location. Consider factors such as foot traffic, moisture exposure, and aesthetic preferences. Vinyl sheet flooring comes in various thicknesses and wear layers. A thicker wear layer is recommended for high-traffic areas to provide greater durability and resistance to scratches and scuffs. Also, consider the pattern and color of the vinyl flooring to ensure it complements the existing décor of the room.
Next is the adhesive. Selecting the correct adhesive is critical for ensuring a strong and lasting bond between the vinyl sheet flooring and the prepared tile surface. Consult the vinyl flooring manufacturer's recommendations for the appropriate adhesive type. Generally, a premium grade, moisture-resistant vinyl flooring adhesive is recommended for installations over ceramic tile. Ensure the adhesive is compatible with both the vinyl flooring and the underlayment or thin-set mortar used to prepare the surface. Read the adhesive product data sheet carefully to understand its working time, curing time, and application instructions.
In addition to the vinyl flooring and adhesive, other essential materials include a suitable primer for the underlayment (if used), a seam sealer (if necessary, depending on the size and layout of the room), and transition strips to create a smooth transition between the vinyl flooring and adjacent flooring surfaces. Ensure all materials are of high quality and are specifically designed for vinyl flooring installations.
The necessary tools for the installation include a utility knife with sharp blades, a measuring tape, a straightedge or ruler, a notched trowel (of the type recommended by the adhesive manufacturer), a seam roller, a floor roller or heavy weight, a vacuum cleaner, a pencil or marker, and safety glasses and gloves. Avoid using dull blades in the utility knife, as they can tear or damage the vinyl flooring. A seam roller is used to ensure a tight bond between the seams of the vinyl flooring, while a floor roller or heavy weight helps to compress the vinyl flooring and ensure proper adhesion to the subfloor.
Having all the necessary materials and tools readily available before starting the installation process will help to ensure a smooth and efficient workflow and minimize potential delays or problems. Proper preparation in this regard is as important as any other stage in the project.
Key Point 3: Laying and Adhering the Vinyl Sheet Flooring
With the surface properly prepared and the necessary materials and tools assembled, the next step is to lay and adhere the vinyl sheet flooring. This process requires careful planning, precise cutting, and proper adhesive application to achieve a seamless and professional-looking result.
Begin by unrolling the vinyl sheet flooring in the room and allowing it to acclimate to the room temperature for at least 24 hours. This helps to prevent expansion or contraction of the flooring after installation. Position the vinyl flooring so that it overlaps the walls by a few inches on all sides. This will allow for precise trimming later on.
Using a measuring tape and a straightedge, carefully measure and mark the areas where the vinyl flooring needs to be cut. Use a sharp utility knife to make precise cuts, following the marked lines. Be sure to use a fresh blade for each cut to ensure a clean and smooth edge. Take your time and double-check your measurements before cutting to avoid mistakes. It's always better to err on the side of cutting the vinyl flooring slightly larger than necessary, as it can always be trimmed down later. For complex shapes or corners, consider using a template to ensure accurate cuts.
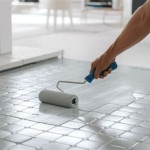
Once the vinyl flooring has been cut to the desired size and shape, fold back half of the sheet, exposing the prepared tile surface. Using a notched trowel, apply the vinyl flooring adhesive evenly over the exposed surface, following the adhesive manufacturer's instructions. Ensure the adhesive is applied in a uniform thickness and coverage to provide a strong and consistent bond. Work in small sections to prevent the adhesive from drying out before the vinyl flooring is laid. After applying the adhesive, carefully fold the vinyl flooring back into place, smoothing it out with your hands or a floor roller to remove any air bubbles and ensure proper contact with the adhesive.
Repeat the process for the other half of the vinyl sheet flooring. Fold back the remaining half, apply the adhesive, and carefully fold the vinyl flooring back into place, smoothing it out as you go. Pay particularly close attention to the seams, ensuring they are tightly butted together and properly aligned. Use a seam roller to press the seams firmly together, creating a seamless and water-resistant joint. If required to seal the seams, apply seam sealer as instructed by the manufacturer.
After the vinyl flooring has been laid and adhered to the subfloor, use a floor roller or heavy weight to compress the entire surface, ensuring proper contact with the adhesive. Roll the entire floor in both directions multiple times to remove any remaining air bubbles and ensure a strong bond. Allow the adhesive to cure completely according to the manufacturer's specifications. This can take anywhere from 24 to 72 hours, depending on the product and environmental conditions. Avoid walking on the newly installed vinyl flooring during the curing process.
Once the adhesive has cured, trim the excess vinyl flooring along the walls using a sharp utility knife. Use a straightedge to guide the knife and ensure a clean, straight cut. Install transition strips at doorways and other areas where the vinyl flooring meets adjacent flooring surfaces. These transition strips provide a smooth and safe transition between the different flooring types and help to protect the edges of the vinyl flooring from damage.
Finally, clean the newly installed vinyl sheet flooring with a damp mop and a mild detergent. Avoid using harsh chemicals or abrasive cleaners, as they can damage the surface of the vinyl flooring. With proper installation and maintenance, vinyl sheet flooring installed over ceramic tile can provide a durable, attractive, and long-lasting flooring solution.

How To Lay Vinyl Flooring Sheet Over Tiles

Should You Install Vinyl Floor Over Tile

New Vinyl Plank Flooring Over Tile Table And Hearth

Lvt Flooring Over Existing Tile The Easy Way Vinyl Floor Installation Diy

How To Lay Tile Over An Existing Vinyl Floor Today S Homeowner

New Vinyl Plank Flooring Over Tile Table And Hearth

Lvt Flooring Over Existing Tile The Easy Way Vinyl Floor Installation Diy

How To Install Sheet Vinyl Floor Decor Adventures

New Vinyl Plank Flooring Over Tile Table And Hearth

Vinyl Tile Installation A Comprehensive Guide Gc Flooring Pros
Related Posts