How To Install Vinyl Plank Flooring Over Asbestos Tile
Installing new flooring can significantly enhance the appearance and value of a home. Many homeowners choose vinyl plank flooring for its durability, ease of maintenance, and aesthetic appeal. If the existing floor includes asbestos tile, however, the installation process requires careful consideration and adherence to safety guidelines. This article provides a comprehensive guide on how to install vinyl plank flooring over existing asbestos tile, focusing on safety protocols and best practices.
The presence of asbestos in older flooring materials, particularly tiles installed before the 1980s, presents a potential health hazard. Asbestos fibers, when released into the air and inhaled, can lead to serious respiratory illnesses, including asbestosis, lung cancer, and mesothelioma. Tearing out asbestos tile is generally discouraged unless performed by licensed professionals, as this process invariably disturbs the asbestos, releasing it into the environment. Encapsulating the asbestos tile by installing new flooring over it is often considered a safer and more cost-effective alternative, providing a barrier that prevents the release of asbestos fibers.
Before commencing any work, it's imperative to determine whether the existing flooring actually contains asbestos. A professional asbestos testing service can analyze samples of the tile to accurately confirm its composition. This step is crucial in determining the appropriate course of action and ensuring compliance with local regulations. Assuming that the flooring does contain asbestos, the following step-by-step guide outlines the process of installing vinyl plank flooring over it safely and effectively.
Key Point 1: Preparation and Safety Equipment
Proper preparation is paramount to a successful and safe installation. This includes not only preparing the subfloor but also ensuring that all necessary safety equipment is readily available and used correctly.
Before beginning, gather the following safety equipment:
Respirator:
A properly fitted respirator with HEPA filters is essential to prevent the inhalation of asbestos fibers, even though the goal is to avoid disturbing the existing tile. A half-face or full-face respirator is recommended.Disposable Coveralls:
These provide a protective barrier between clothing and potential asbestos contamination. Ensure the coveralls have a hood and elastic cuffs.Gloves:
Disposable gloves, preferably nitrile or latex, will protect the hands from contact with any potential asbestos debris.Safety Glasses:
Eye protection is crucial to prevent asbestos fibers from entering the eyes.Duct Tape:
Used to seal the edges of the work area and secure seams in the disposable coveralls.Plastic Sheeting:
Heavy-duty plastic sheeting is used to create a barrier around the work area, preventing asbestos fibers from spreading to other parts of the home.HEPA Vacuum:
A vacuum equipped with a HEPA filter is necessary for cleaning up any potential asbestos debris. Regular vacuums will not capture asbestos fibers and may actually spread them.Spray Bottle with Water:
A spray bottle filled with water can be used to lightly mist the asbestos tiles, helping to suppress any potential dust.
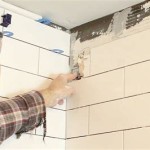
With the safety equipment assembled, the next step is to prepare the work area. Clear the room of all furniture and belongings. Tightly seal off the room by covering doorways and vents with plastic sheeting, securing it with duct tape. This ensures that any potential asbestos fibers remain contained within the work area. If possible, open a window for ventilation, but position it in a way that doesn’t create drafts that could spread airborne particles. Ensure adequate lighting is available for the entire work area.
Carefully inspect the existing asbestos tile floor. Document and photograph any damaged, cracked, or loose tiles. These areas require special attention to prevent further disturbance of the asbestos material. Addressing these issues before installing the vinyl plank flooring is critical for ensuring a stable and safe subfloor.
For any damaged or loose asbestos tiles, carefully apply a thin layer of encapsulating sealant or an asbestos abatement compound specifically designed for adhering loose tiles. Allow the compound to dry completely according to the manufacturer's instructions. This step is crucial for stabilizing the existing floor and preventing the release of asbestos fibers during the installation process.
Key Point 2: Subfloor Preparation and Leveling
The success of any flooring installation hinges on a properly prepared subfloor. In the case of installing vinyl plank flooring over asbestos tile, this is even more critical. The existing asbestos tile must be stable, level, and free from any significant imperfections to ensure the new flooring lays flat and performs as intended.
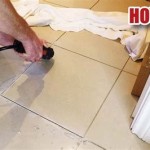
After addressing any damaged or loose tiles, thoroughly clean the entire floor surface with a HEPA vacuum. This removes any loose debris, dust, or dirt that could interfere with the adhesion of the vinyl plank flooring or any underlayment. Multiple passes with the HEPA vacuum are recommended to ensure a thoroughly clean surface.
Next, assess the levelness of the floor. Use a long level (at least 6 feet) to identify any dips, humps, or uneven areas. Significant variations in the subfloor can lead to problems with the vinyl plank flooring, such as buckling, cracking, or uneven wear. Minor imperfections can be addressed with a self-leveling compound.
Self-leveling compound is a cement-based mixture that, when poured onto the floor, spreads and levels itself, creating a smooth and even surface. Before applying the self-leveling compound, carefully read and follow the manufacturer's instructions regarding mixing ratios, application techniques, and drying times. It’s often necessary to prime the existing asbestos tile with a bonding agent to ensure proper adhesion of the self-leveling compound.
Pour the self-leveling compound onto the floor, starting in the deepest areas and working outward. Use a gauge rake or trowel to spread the compound evenly and ensure it covers all uneven areas. Allow the self-leveling compound to dry completely according to the manufacturer's instructions, which may take several hours or even days, depending on the product and environmental conditions. After the self-leveling compound has dried, inspect the floor again to ensure it is smooth and level. If necessary, lightly sand any minor imperfections to create a perfectly smooth surface.
An alternative to self-leveling compound is the use of plywood underlayment. This involves installing a layer of thin plywood (typically ¼ inch or thicker) over the existing asbestos tile to create a new, level subfloor. The plywood is fastened to the existing floor using construction adhesive and screws. However, it's critical to avoid penetrating the asbestos tile with screws, as this will release asbestos fibers. Instead, focus on adhering the plywood to the underlying subfloor, if possible, or using adhesive to create a strong bond with the asbestos tile itself. If screwing is absolutely necessary, pre-drill pilot holes and use screws that are just long enough to penetrate the plywood without reaching the asbestos tile. Carefully seal the screw holes with caulk or sealant to prevent any potential fiber release.
Consider installing an underlayment membrane. This adds another layer of protection and provides cushioning. Underlayment also helps with sound absorption and insulation. Ensure that the underlayment is appropriate for use with vinyl plank flooring and that it does not contain any materials that would react negatively with the asbestos tile.
Key Point 3: Installing the Vinyl Plank Flooring
With the subfloor properly prepared and leveled, the final step is to install the vinyl plank flooring. Careful installation is crucial for ensuring a durable, aesthetically pleasing, and safe flooring solution.
Before beginning the installation, acclimate the vinyl plank flooring to the room for at least 48 hours. This allows the planks to adjust to the temperature and humidity of the environment, preventing expansion or contraction issues after installation. Store the planks in the room where they will be installed, laying them flat on the floor.
Most vinyl plank flooring products feature a click-lock system, which allows the planks to be easily joined together without the need for adhesive. Start the installation along one wall, leaving a small expansion gap (typically ¼ inch) between the planks and the wall. Use spacers to maintain this gap throughout the installation.
Align the first row of planks and click them together according to the manufacturer's instructions. Use a rubber mallet to gently tap the planks into place, ensuring a tight and secure connection. Continue installing subsequent rows, staggering the seams between the planks for a more aesthetically pleasing look. Use a utility knife or a specialized flooring cutter to cut planks to fit around obstacles, such as pipes or doorways.
Some vinyl plank flooring products may require the use of adhesive, particularly in areas with high moisture or heavy traffic. If adhesive is required, apply it to the subfloor according to the manufacturer's instructions, using a notched trowel to ensure even coverage. Lay the planks onto the adhesive and press them firmly into place.
Once the vinyl plank flooring is completely installed, remove the spacers along the walls and install baseboards or quarter-round molding to cover the expansion gap. This provides a finished look and helps to protect the edges of the flooring.
After the installation, thoroughly clean the entire area with the HEPA vacuum. Dispose of all disposable safety equipment, including coveralls, gloves, and respirator filters, in sealed plastic bags according to local regulations for asbestos-containing waste. Wipe down all surfaces in the work area with a damp cloth to remove any remaining dust or debris.
Regularly inspect the vinyl plank flooring for any damage or wear. Promptly repair any damaged areas to prevent the potential release of asbestos fibers from the underlying tile. Avoid using abrasive cleaners or harsh chemicals that could damage the vinyl plank flooring or compromise its protective barrier.
By following these steps and adhering to all safety precautions, homeowners can successfully install vinyl plank flooring over asbestos tile, creating a beautiful and safe flooring solution. It is always advisable to consult with a qualified professional for guidance and assistance, especially if you have any concerns about working with asbestos-containing materials.

Installing Hardwood Over Asbestos Tiles Homeadvisor

What Flooring Should I Use Over Old Asbestos Tiles

Can I Put A New Floor Over Asbestos Tiles Branch Environmental

Flooring That Can Be Installed Over Asbestos Tile

The Truth About Asbestos In Vinyl Flooring

How To Waterproof A Basement

Average Cost Of Vinyl Flooring Installation In 2024 Forbes Home

A Beginner S Guide To Installing Vinyl Plank Flooring Dumpsters Com

How To Install Vinyl Plank Flooring The Home Depot

Let S Play A Game Called Are These Asbestos Tiles That I Just Removed Addicted 2 Decorating
Related Posts