How To Install Tile Wall In Shower: A Comprehensive Guide
Installing tile on a shower wall is a substantial home improvement project that, when completed correctly, can dramatically enhance the aesthetic appeal and functionality of a bathroom. It also provides a water-resistant barrier, protecting the underlying structure from moisture damage. Success hinges on meticulous planning, careful preparation, and precise execution. This guide provides a comprehensive overview of the process, from gathering necessary materials to grouting and sealing the finished surface.
Key Point 1: Preparation and Planning
Thorough preparation is the cornerstone of a successful tile installation. This phase encompasses assessing the existing substrate, gathering the necessary tools and materials, and setting a well-defined layout. Rushing through this stage can lead to costly errors and an unsatisfactory final product.
Substrate Assessment: The substrate, which is the surface upon which the tile will be installed, must be structurally sound, clean, and properly prepared. In most shower installations, the substrate will be cement board, also known as backer board. Cement board is specifically designed for wet environments, offering superior water resistance compared to drywall. Inspect the existing substrate for cracks, loose areas, or signs of water damage. If any damage is present, it must be repaired or replaced prior to installing tile. Ensure the cement board is securely fastened to the wall studs with cement board screws.
Material Acquisition: Compiling a comprehensive list of materials before beginning the project is crucial. This list should include: * Tiles: Choose tiles that are suitable for wet environments. Porcelain or ceramic tiles are typically recommended due to their water resistance and durability. Calculate the required number of tiles, adding an extra 10-15% for cuts and breakage. * Thin-set Mortar: Thin-set mortar, specifically formulated for shower applications, is used to adhere the tiles to the substrate. Select a mortar that is compatible with the type of tile being used. * Grout: Grout fills the spaces between the tiles, creating a water-resistant seal. Choose a grout that is resistant to mold and mildew. Epoxy grout is a premium option offering superior stain resistance and durability. * Sealant: A high-quality sealant is necessary to seal the perimeter of the tiled area, preventing water from penetrating behind the tiles. * Cement Board Screws: Used to secure the cement board to the studs. * Cement Board Tape: Alkali-resistant mesh tape for sealing cement board seams. * Waterproofing Membrane: Liquid-applied or sheet membrane to waterproof corners and seams. * Spacers: Tile spacers maintain uniform grout lines, ensuring a professional appearance. * Cleaners: Tile and grout cleaners to remove excess mortar and grout.
Tool Inventory: Gathering the necessary tools before starting the project streamlines the installation process. Essential tools include: * Tile Saw: A wet saw is recommended for cutting tiles accurately and safely. Manual tile cutters can be used for smaller projects or simpler cuts. * Notched Trowel: A notched trowel is used to apply thin-set mortar evenly. The size of the notches depends on the size of the tiles being used. * Grout Float: A grout float is used to apply and compact grout into the grout lines. * Grout Sponge: A grout sponge is used to clean excess grout from the tile surface. * Level: A level is essential for ensuring that the tiles are installed straight and plumb. * Measuring Tape: For accurate measurements and layout. * Pencil: For marking cuts and layout lines. * Utility Knife: For scoring tiles or cutting waterproofing membrane. * Buckets: For mixing mortar and grout. * Mixing Paddle and Drill: For thoroughly mixing mortar and grout. * Safety Glasses: Protecting eyes from debris is critical. * Gloves: Protecting hands from mortar and grout irritation.
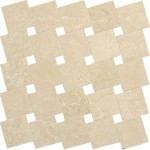
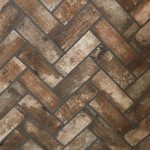
Layout Planning: Planning the tile layout before applying any mortar is important. This involves determining the starting point, the placement of full tiles, and the location of cuts. Ensure the layout minimizes small cuts and maximizes the use of whole tiles. A balanced and symmetrical layout is visually appealing. Begin by finding the center point of the wall and working outwards. Consider the location of shower fixtures and plan the tile layout accordingly.
Key Point 2: Installation Process
With the preparation complete, the actual tile installation can begin. This involves applying thin-set mortar, setting the tiles, and ensuring proper alignment. Careful attention to detail is essential for achieving a professional-looking and durable tile wall.
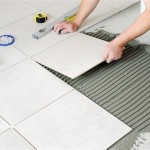
Applying Thin-Set Mortar: Use the notched trowel to apply a thin, even layer of thin-set mortar to the substrate. Hold the trowel at a 45-degree angle and create ridges in the mortar. The depth of the ridges depends on the size of the tiles. Do not apply mortar to a large area at once, as it can dry out before the tiles are set. Work in small sections, typically no larger than what can be tiled in 15-20 minutes. Properly mixed mortar will have a peanut butter-like consistency. Avoid adding too much water, as this can weaken the mortar and affect its adhesion.
Setting the Tiles: Press each tile firmly into the mortar, ensuring good contact. Use a slight twisting motion to help the tile adhere properly. Place tile spacers between the tiles to maintain uniform grout lines. Use a level to check that the tiles are plumb and level. Make any necessary adjustments before the mortar sets. Remove any excess mortar from the tile surface with a damp sponge. Pay attention to the alignment of the tiles, ensuring that the grout lines are straight and consistent. For large tiles, back-buttering, or applying thin-set to the back of the tile, improves adhesion and prevents voids.
Cutting Tiles: Use a wet saw to cut tiles to fit around fixtures, corners, and edges. Measure accurately and mark the tile with a pencil before cutting. Follow the manufacturer's instructions for operating the wet saw safely. For small cuts or intricate shapes, a tile nipper can be used. Always wear safety glasses when cutting tiles to protect eyes from debris.
Waterproofing Corners and Seams: Before tiling corners and seams, apply a waterproofing membrane according to the manufacturer's instructions. This membrane creates a waterproof barrier, protecting the substrate from moisture. Liquid-applied membranes are typically applied with a brush or roller. Sheet membranes are self-adhesive and are applied by pressing them onto the substrate. Ensure the membrane is properly sealed around pipes and fixtures. Allow the membrane to dry completely before tiling.
Allowing the Mortar to Cure: Allow the thin-set mortar to cure for the recommended time, typically 24-48 hours, before proceeding to the next step. This allows the mortar to fully harden and provides a strong bond between the tiles and the substrate. Avoid walking on or disturbing the tiles during the curing process.
Key Point 3: Grouting and Sealing
Grouting and sealing are critical steps in completing the tile installation. Grout fills the spaces between the tiles, creating a water-resistant seal and enhancing the aesthetic appearance of the tiled surface. Sealing protects the grout and tile from stains and moisture damage.
Applying Grout: Remove the tile spacers before applying grout. Mix the grout according to the manufacturer's instructions. Apply the grout to the tile surface using a grout float, pressing it firmly into the grout lines. Work diagonally across the tiles to ensure that the grout lines are completely filled. Remove excess grout from the tile surface with the grout float. Avoid using too much pressure, as this can remove grout from the grout lines.
Cleaning Excess Grout: After the grout has partially set, use a damp grout sponge to clean excess grout from the tile surface. Rinse the sponge frequently in clean water. Be careful not to remove too much grout from the grout lines. A haze may form on the tile surface as the grout dries. This haze can be removed with a grout haze remover or a mild acidic cleaner, following the manufacturer's instructions.
Sealing the Grout: Once the grout has fully cured, typically after 72 hours, apply a grout sealer to protect it from stains and moisture damage. Apply the sealer according to the manufacturer's instructions. Some sealers are applied with a brush or sponge, while others are sprayed on. Allow the sealer to dry completely before using the shower. Regularly reseal the grout to maintain its water resistance and prevent staining.
Caulking and Sealing Perimeter: Apply a bead of mildew-resistant caulk around the perimeter of the tiled area, where the tile meets the shower pan or tub. Also, caulk around pipes and fixtures to create a watertight seal. Smooth the caulk with a wet finger or a caulk smoothing tool. Remove any excess caulk with a damp cloth. Allow the caulk to dry completely before using the shower. Choose a caulk that matches the color of the grout for a seamless appearance.
Proper ventilation is important during and after the tiling process. Open windows or use a fan to circulate air and help the mortar, grout, and sealant dry properly. Following these steps carefully will result in a professionally installed, durable, and aesthetically pleasing tile wall in the shower.

Part 1 How To Install Tile On Shower Tub Wall Step By

How To Install A Shower Tile Wall Bathroom

How To Install A Shower Tile Wall Bathroom

The Complete Guide To Installing Tile On Shower Or Bathtub Walls

Diy Bathroom Wall Tile And Tiling Guide For Beginners

How To Tile A Bathroom Shower Walls Floor Materials 100 Pics Pro Tips

Shower Tile Installation Step By Four Generations One Roof

A Diy Shower Tile Step By

How To Install Tile In A Bathroom Shower

How To Diy A Bathroom Wall And Enclose Shower
Related Posts