How To Install Shower Tile Walls: A Comprehensive Guide
Installing shower tile walls enhances aesthetics and provides a durable, water-resistant surface. This project requires meticulous preparation and execution for optimal results. This guide provides a comprehensive overview of the process, encompassing essential materials, tools, and step-by-step instructions for a successful shower tile installation.
Planning and Preparation: Laying the Foundation for Success
Prior to commencing any physical work, thorough planning is crucial. This phase involves accurately measuring the shower area to determine the quantity of tile required. It also includes selecting the appropriate type of tile based on aesthetic preferences, budget constraints, and functional requirements such as slip resistance and water absorption. Porcelain and ceramic tiles are common choices for shower walls due to their durability and water resistance. Glass and stone tiles offer unique aesthetics but may require specialized installation techniques and sealing.
Furthermore, the substrate's condition must be assessed. The substrate refers to the surface upon which the tile will be installed. Acceptable substrates for shower walls include cement board, also known as backer board, and waterproof gypsum board. It is imperative to ensure that the substrate is structurally sound, level, and free from any contaminants such as dust, grease, or mildew. Any existing damage, such as cracks or holes, should be repaired before proceeding. Applying a waterproofing membrane, such as a liquid waterproofing or sheet membrane, over the substrate is critical in preventing water penetration behind the tile, which can lead to mold growth and structural damage.
Gathering all necessary tools and materials before starting ensures a smooth and efficient workflow. Essential tools include a tile saw (wet saw recommended for precise cuts), a notched trowel, a level, a measuring tape, a pencil, a rubber mallet, tile spacers, a sponge, and grout float. Materials include the chosen tile, thin-set mortar, grout, waterproofing membrane (if applicable), sealant, and safety glasses and gloves. Adequate lighting within the shower area is also essential for accurate tile placement and inspection.
Substrate Preparation: Ensuring a Solid Foundation
The success of the tile installation hinges on proper substrate preparation. The existing shower walls must be inspected for any signs of damage or instability. Loose or crumbling drywall should be replaced with cement board. Cement board is specifically designed for wet environments and provides a stable, water-resistant substrate for tile installation. It is crucial to use screws designed for cement board to secure it to the wall studs, ensuring proper adhesion and preventing corrosion.
Once the cement board is installed, the seams between the boards should be taped with fiberglass mesh tape and coated with thin-set mortar. This process creates a seamless transition between the boards and prevents water from penetrating through the joints. Allow the thin-set mortar to dry completely before proceeding. A waterproofing membrane is then applied to the entire cement board surface. This membrane acts as a barrier, preventing water from seeping into the wall cavity. Liquid waterproofing membranes are typically applied in multiple coats, following the manufacturer's instructions regarding drying time and coverage.
Prior to applying the waterproofing membrane, ensure the substrate is clean and free of dust and debris. Use a brush or vacuum to remove any loose particles. Some manufacturers recommend priming the cement board before applying the waterproofing membrane to enhance adhesion. The waterproofing membrane should extend beyond the shower area, particularly in areas prone to splashing, such as around the showerhead and faucet. Pay close attention to corners and seams, as these are vulnerable areas for water penetration. Reinforcing these areas with additional waterproofing material, such as reinforcing fabric embedded in the waterproofing membrane, is highly recommended.
Tile Installation: The Art of Precise Placement
Before applying the tile, dry-fitting the tile layout is recommended. This involves arranging the tiles on the floor to visualize the final pattern and identify any potential issues with tile placement or alignment. This step allows for adjustments to be made before the tiles are permanently adhered to the wall. Start at the least conspicuous corner of the shower area. This allows for any less-than-perfect cuts or adjustments to be hidden in areas that are less visible.
Prepare the thin-set mortar according to the manufacturer's instructions. The consistency should be similar to peanut butter, allowing the mortar to hold its shape without being too runny. Apply the thin-set mortar to the wall using a notched trowel. The size of the notches on the trowel will depend on the size of the tile. Consult the tile manufacturer's recommendations for the appropriate trowel size. Hold the trowel at a 45-degree angle and create even ridges in the mortar. These ridges will provide a larger surface area for the tile to adhere to.
Press the tile firmly into the thin-set mortar with a slight twisting motion. This ensures proper adhesion and eliminates air pockets. Use tile spacers to maintain consistent grout lines between the tiles. The size of the spacers will determine the width of the grout lines. Regularly check the tiles with a level to ensure they are aligned horizontally and vertically. Use a rubber mallet to gently tap the tiles into place if necessary. Clean any excess thin-set mortar from the tile surface with a damp sponge. Work in small sections, applying only enough thin-set mortar to set a few rows of tiles at a time. This prevents the mortar from drying out before the tiles are in place.
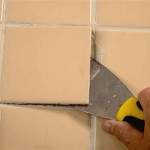
Cutting tiles to fit around corners, pipes, and fixtures is often necessary. A wet saw is the ideal tool for making precise cuts in tile. For smaller cuts, a tile nipper may be used. Always wear safety glasses when cutting tile to protect your eyes from debris. When cutting around pipes or fixtures, measure the diameter of the pipe or fixture and transfer the measurement to the tile. Use a hole saw or tile nipper to create the opening. Ensure the opening is slightly larger than the pipe or fixture to allow for expansion and contraction.
Grouting and Sealing: Protecting Your Investment
After allowing the thin-set mortar to cure completely, typically for 24-48 hours, remove the tile spacers. Use a grout removal tool or utility knife to carefully remove any excess thin-set mortar that may have squeezed between the tiles. Ensure the grout lines are clean and free of debris before applying the grout.
Mix the grout according to the manufacturer's instructions. The consistency should be similar to a thick paste. Apply the grout to the tile surface using a grout float. Hold the float at a 45-degree angle and spread the grout diagonally across the tile surface, forcing the grout into the grout lines. Work in small sections, ensuring all grout lines are completely filled. Remove excess grout from the tile surface with the grout float held at a 90-degree angle. Wipe the tile surface with a damp sponge to remove any remaining grout residue. Rinse the sponge frequently in clean water. Be careful not to remove too much grout from the grout lines.
After allowing the grout to dry slightly, typically for 15-30 minutes, use a grout sponge and clean water to refine the grout lines. This process, known as "grout haze removal," involves gently wiping the tile surface to remove any remaining grout film. Rinse the sponge frequently in clean water. Allow the grout to cure completely according to the manufacturer's instructions, typically for 72 hours. Once the grout is fully cured, apply a sealant to the grout lines. The sealant will help protect the grout from water damage and staining. Apply the sealant according to the manufacturer's instructions, typically with a small brush or applicator. Allow the sealant to dry completely before using the shower.
Final Touches and Inspection: Ensuring Longevity
After the sealant has dried, inspect the entire shower area for any imperfections or issues. Check for any loose tiles, cracked grout lines, or areas where the sealant is missing. Address any problems immediately to prevent further damage. Recaulk any seams where the tile meets the shower pan, tub, or adjacent walls. Use a high-quality caulk specifically designed for wet environments. Apply the caulk evenly and smoothly, using a caulk gun and a smoothing tool.
Clean the tile surface with a mild detergent and water to remove any remaining grout haze or sealant residue. Avoid using harsh chemicals or abrasive cleaners, as these can damage the tile or grout. Regularly clean the shower area to prevent the buildup of soap scum and mildew. Proper ventilation is crucial to prevent moisture buildup. Ensure the shower area is well-ventilated by opening a window or using a bathroom fan after each use.
Regular inspection and maintenance are essential for prolonging the life of the shower tile walls. Check for any signs of water damage, such as discoloration or mold growth. Address any leaks immediately to prevent further damage. Periodically reseal the grout lines to maintain their water-resistant properties. With proper installation and maintenance, shower tile walls can provide a beautiful and durable surface for many years to come.

Part 1 How To Install Tile On Shower Tub Wall Step By

How To Install A Shower Tile Wall Bathroom

19 Pro Tips On Shower Tile Installation

How To Install A Shower Tile Wall Bathroom

The Complete Guide To Installing Tile On Shower Or Bathtub Walls

19 Pro Tips On Shower Tile Installation

Shower Tile Installation Step By Four Generations One Roof

How To Tile A Bathroom Shower Walls Floor Materials 100 Pics Pro Tips

A Diy Shower Tile Step By

Diy Bathroom Wall Tile And Tiling Guide For Beginners
Related Posts