How To Install Mosaic Tile On Shower Wall
Installing mosaic tile on a shower wall can transform a bathroom, adding a touch of elegance and visual interest. While it requires careful planning and execution, the result is a durable and aesthetically pleasing surface. This article provides a detailed guide on the process, covering everything from preparation to grouting.
Key Point 1: Preparation and Planning
The foundation of a successful mosaic tile installation lies in thorough preparation. This stage involves assessing the existing wall, gathering the necessary tools and materials, and planning the layout of the mosaic.
Surface Assessment: The first step is to inspect the shower wall. It must be structurally sound, clean, and completely waterproof. Check for any signs of water damage, mold, or mildew. Repair any cracks or imperfections before proceeding. If the existing surface is painted or covered in wallpaper, remove it entirely. The wall must be smooth and free of any debris that could interfere with the adhesion of the thin-set mortar.
Waterproofing: Shower walls are constantly exposed to moisture, making proper waterproofing crucial. Even if the existing wall is tile, it’s advisable to apply a waterproofing membrane over it. This membrane creates a protective barrier that prevents water from penetrating the wall and causing damage behind the tile. Liquid waterproofing membranes, like Redgard or Hydro Ban, are commonly used. Apply two coats, following the manufacturer's instructions, allowing adequate drying time between coats.
Gathering Tools and Materials: Ensure all necessary tools and materials are readily available before starting the project. Essential tools include a notched trowel (the specific size depends on the mosaic tile size), a mixing bucket, a drill with a mixing paddle, a sponge, a level, a tape measure, a tile cutter (wet saw is recommended for mosaic), safety glasses, gloves, a pencil, and a rubber grout float. Materials needed encompass mosaic tile sheets, thin-set mortar (choose a type suitable for wet environments), grout, grout sealer, waterproofing membrane, sealant for corners and edges, and cleaning supplies.
Layout Planning: Proper layout planning is essential for achieving a visually appealing and balanced result. Measure the shower walls and determine the center point. Consider the size of the mosaic tile sheets and how they will fit on the wall. Avoid narrow strips of tile at the edges, as they can look awkward. Adjust the layout slightly, if necessary, to ensure symmetrical placement. Dry-fit the mosaic tile sheets on the floor or a large surface to visualize the final appearance. Take photos of the layout for reference during installation. Mark reference lines on the wall using a level and pencil to guide the placement of the first row of tile sheets. These lines act as a visual guide to ensure the tiles are installed straight and evenly.
Acclimation: Allow the mosaic tiles to acclimate to the bathroom's temperature and humidity for at least 24 hours before installation. This helps prevent expansion and contraction issues after the tiles are installed.
Key Point 2: Installation Process
The installation process involves applying the thin-set mortar, setting the mosaic tile sheets, and ensuring proper alignment. This requires patience and attention to detail to achieve a professional finish.
Mixing the Thin-Set Mortar: Follow the manufacturer's instructions for mixing the thin-set mortar. Use a drill with a mixing paddle to create a smooth, consistent mixture. Avoid adding too much water, as this can weaken the mortar. The ideal consistency is similar to that of peanut butter, allowing it to hold its shape on the trowel. Mix only the amount of mortar that can be used within the working time specified by the manufacturer.
Applying the Thin-Set Mortar: Using the notched trowel, apply a thin layer of thin-set mortar to a small section of the wall. Hold the trowel at a 45-degree angle and create even ridges in the mortar. The direction of the ridges can be consistent or varied depending on the tile size, but ensure uniform depth. Avoid applying mortar to a large area at once, as it can dry out before the tiles are set. Typically, work in areas of about 2 feet by 2 feet at a time.
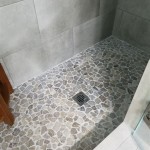
Setting the Mosaic Tile Sheets: Carefully place the mosaic tile sheets onto the thin-set mortar, aligning them with the reference lines. Press firmly and evenly on each sheet to ensure good contact with the mortar. Use a rubber grout float or a wooden beating block and a rubber mallet to gently tap the tiles into place, ensuring they are level and flush with each other. Avoid excessive force, as this can damage the tiles. Maintain consistent spacing between the tile sheets to allow for grout lines. The spacing should match the spacing between the individual tiles within the sheets. Use tile spacers, if needed, to maintain consistent grout lines.
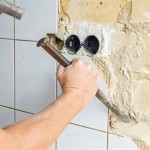
Cutting the Tiles: Use a wet saw to cut the mosaic tile sheets to fit around corners, edges, and plumbing fixtures. Mark the cutting lines accurately with a pencil. When cutting individual tiles from the sheet, use tile nippers carefully to avoid damaging adjacent tiles. Smooth the cut edges with a rubbing stone or sandpaper to remove any sharp edges.
Checking Alignment: Periodically check the alignment of the tile sheets using a level and a straight edge. Make any necessary adjustments before the mortar sets completely. Remove any excess mortar from the tile surface with a damp sponge. Be careful not to disturb the alignment of the tiles. Allow the thin-set mortar to cure completely, following the manufacturer's instructions. This usually takes 24 to 72 hours.
Key Point 3: Grouting and Sealing
Grouting fills the spaces between the tiles, providing a waterproof seal and enhancing the overall appearance. Sealing protects the grout from stains and moisture damage.
Preparing for Grouting: Once the thin-set mortar has cured, remove any tile spacers and clean the grout lines. Use a utility knife or grout removal tool to scrape away any excess thin-set mortar that may be protruding into the grout lines. Vacuum the tile surface to remove any dust or debris. Lightly dampen the tile surface with a sponge before applying the grout. Avoid saturating the tiles, as this can affect the grout's adhesion.
Mixing the Grout: Follow the manufacturer's instructions for mixing the grout. Choose a grout color that complements the mosaic tile. Mix the grout to a smooth, creamy consistency. Avoid adding too much water, as this can weaken the grout and cause it to crack. Mix only the amount of grout that can be used within the working time specified by the manufacturer.
Applying the Grout: Apply the grout to the tile surface using a rubber grout float. Hold the float at a 45-degree angle and spread the grout diagonally across the tiles, forcing it into the grout lines. Work in small sections at a time. Ensure that all the grout lines are completely filled. Use the edge of the grout float to remove excess grout from the tile surface. Hold the float at a 90-degree angle and scrape it diagonally across the tiles.
Cleaning the Grout: After allowing the grout to set for the recommended time (usually 15-30 minutes), begin cleaning the tile surface with a damp sponge. Rinse the sponge frequently in clean water. Wipe the tiles in a circular motion to remove grout haze. Avoid using too much water, as this can wash out the grout from the grout lines. Change the water frequently to prevent the grout haze from redepositing on the tiles.
Final Cleaning and Polishing: After the initial cleaning, allow the grout to dry completely for at least 24 hours. Use a soft cloth to polish the tile surface and remove any remaining grout haze. Inspect the grout lines for any imperfections and touch up as needed. Apply a grout sealer to protect the grout from stains and moisture damage. Follow the manufacturer's instructions for applying the sealer. Allow the sealer to dry completely before using the shower.
Caulking: Apply a bead of sealant along the corners where the shower walls meet and where the walls meet the shower floor. This creates a waterproof seal that prevents water from penetrating these vulnerable areas. Choose a sealant color that matches the grout color. Apply the sealant smoothly and evenly using a caulking gun. Smooth the sealant bead with a wet finger or a caulking tool. Remove any excess sealant with a damp cloth.
By following these detailed steps, installing mosaic tile on a shower wall can be a successful and rewarding project, enhancing the beauty and durability of the bathroom.

How To Install Mosaic Tiling Tutorial Four Generations One Roof Blog

7 Best Tips To Cut And Install Marble Mosaic Tile Easy Guide For Beginners Abbotts At Home

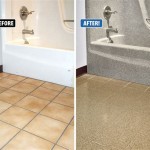
How Tile Mosaics Can Transform Your Bathroom

7 Best Tips To Cut And Install Marble Mosaic Tile Easy Guide For Beginners Abbotts At Home

How To Install Mosaic Tiling Tutorial Four Generations One Roof Blog

7 Best Tips To Cut And Install Marble Mosaic Tile Easy Guide For Beginners Abbotts At Home

How To Install Mosaic Tiling Tutorial Four Generations One Roof Blog

Installing Glass Tile With Mesh Backing Jlc

How To Install A Mosaic Tile Border

7 Best Tips To Cut And Install Marble Mosaic Tile Easy Guide For Beginners Abbotts At Home
Related Posts