How to Install Mosaic Tile in a Shower Niche
Installing a shower niche provides a convenient and aesthetically pleasing storage solution within the shower enclosure. Incorporating mosaic tile into the niche elevates its design, offering a touch of elegance and personalization. This article provides a comprehensive guide on how to install mosaic tile in a shower niche, covering essential preparation, installation, and grouting techniques. Adhering to these steps ensures a durable, waterproof, and visually appealing result.
Key Concept 1: Preparation is Paramount
Successful mosaic tile installation hinges on meticulous preparation. This stage involves assessing the existing niche structure, ensuring its integrity and cleanliness, and gathering necessary tools and materials. Inadequate preparation can lead to adhesion issues, waterproofing failures, and an overall substandard outcome.
The first step is to inspect the shower niche. Pre-fabricated niches are commonly available, but custom-built niches may also be encountered. Verify that the niche is structurally sound. Examine the corners and edges for any cracks, gaps, or inconsistencies. Any structural issues should be addressed before proceeding. This may involve reinforcing the niche with additional framing, applying a patching compound, or, in severe cases, rebuilding the niche entirely. Regardless of the type of niche existing, it should be square, plumb, and level.
Once the structural integrity is confirmed, the niche must be thoroughly cleaned. Remove any debris, loose particles, or existing coatings. Use a scraper or putty knife to remove any stubborn residue. Vacuum the niche to eliminate any remaining dust and debris. This ensures optimal adhesion of the waterproofing membrane and subsequent tile installation.
Next, apply a waterproofing membrane to the interior of the niche. This is a crucial step for preventing water damage and mold growth. Several waterproofing options are available, including liquid membranes, sheet membranes, and waterproofing fabrics. Regardless of the chosen method, follow the manufacturer's instructions carefully. Apply the waterproofing membrane evenly, ensuring that all surfaces, including corners and edges, are completely covered. Pay particular attention to seams and transitions, where water intrusion is most likely to occur. Allow the waterproofing membrane to cure completely before moving on to the next step. Consult the product specifications for the recommended curing time, which can vary depending on the type of membrane used.
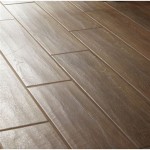
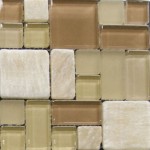
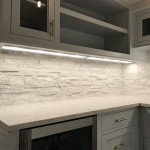
Choosing the right mosaic tile is critical. Consider the size, material, and aesthetic of the tile in relation to the overall bathroom design. Mosaic tile comes in various materials, including glass, ceramic, porcelain, and stone. Glass mosaic tiles offer a vibrant and reflective surface, while ceramic and porcelain tiles provide durability and water resistance. Stone mosaic tiles offer a natural and textured look. Select a tile that is appropriate for wet environments and complements the existing shower design. Consider the size of the individual tiles; smaller tiles generally conform better to curved surfaces or intricate niche designs. Ensure adequate quantity is procured, accounting for potential waste from cuts.
Gather all necessary tools and materials before beginning the installation process. Essential tools include a notched trowel (the specific notch size depends on the tile size and manufacturer recommendations), a tile cutter or wet saw, a rubber grout float, a sponge, a bucket, a level, a measuring tape, a pencil, safety glasses, and gloves. Materials include thin-set mortar (modified thin-set mortar is recommended for bonding to waterproof membranes), grout (choose a sanded or unsanded grout based on the tile joint width), and sealant. Having all necessary items readily available minimizes interruptions during the installation process.
Key Concept 2: Mosaic Tile Installation Techniques
Proper mosaic tile installation involves applying thin-set mortar, setting the tile sheets, and ensuring proper alignment. This phase requires precision and patience to achieve a professional and aesthetically pleasing result.
Mix the thin-set mortar according to the manufacturer's instructions. Add the powder to the water gradually, mixing continuously with a drill and mixing paddle until a smooth, creamy consistency is achieved. Avoid adding too much water, as this can weaken the mortar and affect adhesion. Allow the mortar to slake for the recommended time (typically 5-10 minutes) before using.
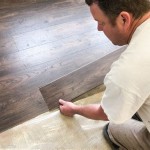
Apply the thin-set mortar to the back of the niche, using the notched trowel at a 45-degree angle to create ridges. The size of the notches should correspond to the tile size and the manufacturer's recommendations. Apply enough mortar to cover the entire surface, but avoid applying too much, which can cause the tile to slide down the wall. Work in small sections to prevent the mortar from drying out before the tile is set. Ensure even mortar distribution and consistent ridge height. This promotes uniform tile bonding and minimizes hollow spots beneath the tiles.
Carefully position the mosaic tile sheets onto the mortar-covered surface. Press the tiles firmly into the mortar, using a rubber grout float or a rolling pin to ensure full contact. Work from the center of the niche outwards to avoid trapping air bubbles. Periodically check the level of the tiles with a level to ensure that they are flush and even. Adjust the tiles as needed to maintain proper alignment. Pay close attention to the corners and edges of the niche, ensuring that the tiles are properly aligned and that there are no gaps or overlaps.
If the mosaic tile sheets need to be cut to fit the niche, use a wet saw or a tile cutter. Measure the required size accurately and mark the cutting line on the tile sheet. Use a wet saw to cut the tile sheet along the marked line. For small cuts or intricate shapes, a tile nipper may be used. Wear safety glasses and gloves when cutting tiles to protect yourself from flying debris.
Once all the mosaic tile sheets are installed, allow the thin-set mortar to cure completely before proceeding to the next step. Consult the manufacturer's instructions for the recommended curing time, which is typically 24-48 hours. During this time, avoid disturbing the tiles or applying any weight to them.
Key Concept 3: Grouting and Sealing for Durability
Grouting fills the spaces between the tiles, creating a waterproof and aesthetically pleasing finish. Sealing protects the grout and tiles from stains and water damage, ensuring long-term durability.
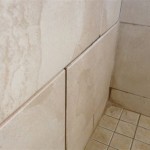
Remove any spacers or debris from between the tiles before grouting. Clean the tile surface with a damp sponge to remove any excess thin-set mortar or dust. Ensure the grout lines are clean and free of any obstructions.
Mix the grout according to the manufacturer's instructions. Add the powder to the water gradually, mixing continuously until a smooth, uniform consistency is achieved. Avoid adding too much water, as this can weaken the grout and affect its color and durability. Choose a grout color that complements the mosaic tile and the overall bathroom design. For narrow grout lines, use unsanded grout; for wider grout lines, use sanded grout.
Apply the grout to the tile surface using a rubber grout float. Work the grout into the grout lines, pressing firmly to ensure that they are completely filled. Hold the grout float at a 45-degree angle to the tile surface and move it diagonally across the grout lines. Remove any excess grout from the tile surface with the grout float. Work in small sections to prevent the grout from drying out before it can be cleaned.
After the grout has had a chance to set up slightly (typically 15-30 minutes), use a damp sponge to clean the tile surface. Wring out the sponge frequently and rinse it in clean water. Use a circular motion to remove the excess grout from the tile surface. Avoid pressing too hard, as this can remove grout from the grout lines. Change the water frequently to prevent streaking.
Allow the grout to cure completely according to the manufacturer's instructions. This typically takes 24-72 hours. During this time, avoid using the shower or exposing the grout to water.
Once the grout is fully cured, apply a grout sealant to protect it from stains and water damage. Use a brush or a grout sealant applicator to apply the sealant to the grout lines. Allow the sealant to penetrate the grout for the recommended time, and then wipe off any excess with a clean cloth. Reapply the sealant every 6-12 months, or as needed, to maintain its effectiveness.
Finally, inspect the finished shower niche for any imperfections or areas that need touch-up. Address any issues promptly to ensure a long-lasting and aesthetically pleasing result. This includes addressing any cracking grout, caulking, or applying any additional sealant ensuring the niche is watertight.

How To Build A Shower Niche Easy 7 Step Diy Tutorial

How To Tile Bathroom Shower Wall Niche

How To Tile Shower Niche With Pebble Stone Quartz Base

Making Sheets Of Mosaics Square The Floor Elf

How To Build A Better Shower Niche Fine Homebuilding

How I Install A Wall To Tile Niche In Shower Using Mosaic

How To Build A Shower Niche Easy 7 Step Diy Tutorial

How To Tile A Shower Niche Tips For Pros Rubi Blog Usa

How To Put A Shelf In Shower Niche Art Tile Renovation

Tiling A Shower Niche Step By
Related Posts