How to Install Mosaic Tile in a Shower: A Comprehensive Guide
Installing mosaic tile in a shower can significantly enhance its aesthetic appeal, transforming a utilitarian space into a visually stunning feature of the bathroom. While mosaic tile offers a unique and intricate design element, the installation process requires careful planning, precise execution, and a thorough understanding of tiling techniques. This article provides a detailed guide to installing mosaic tile in a shower, covering every step from preparation to finishing.
I. Planning and Preparation: The Foundation for Success
Proper preparation is arguably the most critical phase of any tiling project, ensuring a durable and aesthetically pleasing result. For shower installations, the focus shifts to waterproofing and creating a stable surface for the mosaic tile to adhere to. The following steps outline the essential preparations:
1. Assessing the Existing Shower Structure: Before commencing any work, a thorough inspection of the existing shower structure is paramount. Examine the walls and floor for signs of moisture damage, cracks, or uneven surfaces. Address any structural issues before proceeding further, as attempting to tile over damaged substrate will compromise the integrity of the installation.
2. Waterproofing: Shower installations necessitate robust waterproofing to prevent water penetration behind the tiles, which can lead to mold growth, structural damage, and costly repairs. Select a suitable waterproofing membrane based on the substrate material (e.g., cement board, drywall treated with a waterproofing primer) and follow the manufacturer's instructions meticulously. Common waterproofing options include liquid membranes, sheet membranes, and cementitious coatings. Apply the waterproofing membrane to all shower surfaces, including walls, floor, and any niches or benches. Pay particular attention to corners and edges, where water is most likely to infiltrate.
3. Substrate Preparation: The substrate must be clean, level, and structurally sound. Remove any loose debris, paint, or adhesive residue from the surface. If the substrate is uneven, apply a self-leveling compound to create a flat and consistent plane. Ensure the substrate is compatible with the chosen tile adhesive. For cement board, a thin layer of modified thin-set mortar is often applied before the waterproofing membrane to fill any seams or imperfections.
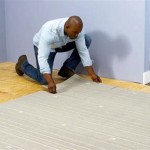
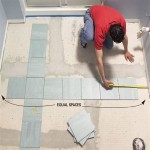
4. Layout Planning: Planning the layout of the mosaic sheets before installation is crucial for achieving a visually appealing and balanced design. Measure the shower walls and floor to determine the tile coverage area. Consider the placement of grout lines and their impact on the overall aesthetic. Dry-lay the mosaic sheets on the floor to visualize the pattern and make any necessary adjustments. Determine the starting point for the tiling, typically at the most visible wall or the center of the shower floor. Use a level and a straight edge to mark reference lines to guide the tile placement. This ensures that the tiles are installed straight and evenly spaced.
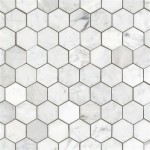
5. Material Selection and Quantity Calculation: Select mosaic tiles that are suitable for shower applications. Glass, ceramic, porcelain, and natural stone mosaics are popular choices, each offering different aesthetic qualities and performance characteristics. Consider the tile size, shape, and color to complement the overall bathroom design. Calculate the required tile quantity, adding 10-15% for waste due to cuts and breakage. Choose a high-quality modified thin-set mortar specifically designed for use with mosaic tiles and the substrate material. Select a grout that is resistant to mold and mildew, and suitable for wet environments. Gather all necessary tools, including a notched trowel, grout float, sponge, tile saw, level, measuring tape, and safety glasses.
II. Mosaic Tile Installation: Precision and Technique
The installation phase demands precision and patience. Working meticulously ensures a professional finish and maximizes the longevity of the tiled shower.
1. Applying Thin-Set Mortar: Using the notched trowel, apply a thin and even layer of modified thin-set mortar to a small section of the prepared substrate, typically no more than the area that can be covered with tiles in 15-20 minutes. The notch size of the trowel will depend on the size and type of mosaic tile. Press the mosaic sheets firmly into the mortar, ensuring full contact between the tile and the adhesive. Use a rubber grout float or a wooden beating block to gently tap the tiles into place, ensuring that they are level and aligned. Avoid applying excessive pressure, which can cause the tiles to shift or crack.
2. Ensuring Consistent Spacing: Maintaining consistent spacing between the mosaic sheets is critical for achieving a uniform grout line appearance. Most mosaic sheets are pre-spaced on a mesh backing, but adjustments may be necessary to ensure proper alignment. Use tile spacers if needed to maintain consistent spacing between the sheets. Check the alignment of the tiles with a level and a straight edge as you work. Make any necessary adjustments before the mortar sets. For areas where full sheets do not fit, use a wet tile saw to cut the mosaic sheets to the required size and shape. Wear safety glasses when using a tile saw.
3. Cutting and Shaping Mosaic Tiles: Cutting mosaic tile requires a wet tile saw with a diamond blade. When cutting individual tiles, exercise caution to avoid chipping or cracking. For intricate cuts around pipes or fixtures, use a tile nipper to gradually shape the tiles. Smooth the cut edges with a diamond polishing pad to prevent sharp edges. When installing mosaic tiles around curved surfaces, such as a shower pan, it may be necessary to make small cuts to the individual tiles to conform to the curve. This requires patience and a steady hand.
4. Maintaining a Level Surface: Regular checks with a level are essential to ensure that the tile surface remains flat and even. Any unevenness in the substrate or mortar application can result in a lippage, where one tile protrudes higher than its adjacent tiles. Use a rubber mallet and a beating block to gently adjust the height of individual tiles as needed. Remove any excess mortar from the grout lines before it hardens, using a utility knife or a grout removal tool. This will make the grouting process easier and ensure a cleaner grout line appearance.
5. Addressing Niche and Bench Installations: Installing mosaic tile in shower niches and benches requires extra attention to detail. Ensure that the niche and bench surfaces are properly waterproofed and sloped for drainage. Cut the mosaic tiles to fit the niche and bench surfaces, paying close attention to the corners and edges. Use a tile edging profile to create a clean and professional finish along the edges of the niche and bench. Seal the tile edging profile with silicone caulk to prevent water infiltration.
III. Grouting and Sealing: Protecting and Enhancing
Grouting fills the gaps between the tiles, providing a watertight seal and enhancing the overall aesthetic of the installation. Sealing the grout protects it from stains, moisture, and mildew growth.
1. Grout Application: Allow the thin-set mortar to cure completely, typically for 24-48 hours, before applying grout. Follow the manufacturer's instructions for mixing the grout to the correct consistency. Apply the grout to the tile surface using a grout float, working diagonally across the tiles to ensure that the grout fills all the grout lines. Use the edge of the grout float to remove excess grout from the tile surface. Work in small sections to prevent the grout from drying before it can be cleaned.
2. Grout Cleaning and Shaping: After the grout has set for approximately 15-30 minutes, use a damp sponge to clean the excess grout from the tile surface. Rinse the sponge frequently in clean water. Be careful not to remove too much grout from the grout lines. Use a grout shaping tool or a finger to smooth and shape the grout lines. This will create a consistent and professional grout line appearance. Allow the grout to cure completely, typically for 24-72 hours, before sealing. Follow the manufacturer's instructions for the grout curing time.
3. Sealing the Grout: Apply a grout sealer to protect the grout from stains, moisture, and mildew growth. Follow the manufacturer's instructions for applying the sealer. Use a small brush or applicator to apply the sealer to the grout lines. Wipe off any excess sealer from the tile surface with a clean cloth. Allow the sealer to dry completely before using the shower. Regular cleaning and maintenance will help to prolong the life of the grout and keep the shower looking its best.
4. Caulking: Apply a bead of silicone caulk along the seams where the tile meets other surfaces, such as the shower pan, walls, and fixtures. This will create a watertight seal and prevent water infiltration. Choose a caulk that is specifically designed for wet environments and is resistant to mold and mildew. Smooth the caulk with a wet finger or a caulking tool to create a clean and professional appearance. Allow the caulk to fully cure before using the shower.
5. Final Inspection and Clean-Up: After the grout and caulk have fully cured, inspect the shower for any imperfections. Touch up any areas where the grout or caulk is missing or damaged. Clean the tile surface with a mild detergent and water to remove any remaining residue. Buff the tiles with a clean, dry cloth to restore their shine. Ensure that all drains are clear of debris. A properly installed and maintained mosaic tile shower will provide years of enjoyment and enhance the beauty of the bathroom.

How To Install A Mosaic Tile On Shower Floor

Shower Pan Tile Installation How To Set A Drain And Floor With Mosaic

How To Lay Mosaic Tiles In A Shower Diy Projects

Mosaic Tile Installation In Shower By Man Mike

How To Install A Mosaic Tile On Shower Floor

Easy Quick Way To Install Mosaic Tile On A Shower Floor

How To Install Mosaic Tiles Like A Pro Step By Guide Tiletoria

How To Build A Shower Niche Easy 7 Step Diy Tutorial

Step By Guide How To Install Mosaic Tile What Bb Built

Step By Guide How To Install Mosaic Tile What Bb Built
Related Posts