How to Install Hardie Board for Floor Tile
Hardie board is a cement-based backer board that is perfect for installing floor tiles over concrete or wood. It is strong, durable, and moisture-resistant, making it an excellent choice for high-traffic areas such as kitchens, bathrooms, and mudrooms.
The Hardie board should be installed according to the manufacturer's instructions and local building codes. And it is significant to ensure optimal performance and longevity of your floor tile installation. In this guide, I will walk you through the essential steps of installing Hardie board for floor tile, like preparing the subfloor, cutting and installing the Hardie board, and applying the tile.
Materials:
Here are the materials you will need for this project:
- HardieBacker 1/4-inch cement board
- Thin-set mortar mix
- Notched trowel
- Backer board screws
- Drill/driver
- Safety glasses
- Fine-grit sandpaper
- Tape measure
- Level
- Caulk gun
- Caulk
Step 1: Prepare the Subfloor
The first step is to prepare the subfloor. The subfloor should be clean, level, and dry. If the subfloor is not level, you may need to level it using self-leveling compound. Once the subfloor is prepared, you can start installing the Hardie board.
Step 2: Cut the Hardie Board
The next step is to cut the Hardie board to size. Measure the area where you will be installing the Hardie board and transfer the measurements to the board. Score the Hardie board along the cut lines using a utility knife and snap it to break it. You can also use a circular saw to cut the Hardie board.
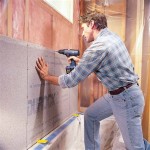
Step 3: Install the Hardie Board
Once the Hardie board is cut to size, you can begin installing it over the subfloor. Spread a layer of thin-set mortar mix over the subfloor using a notched trowel. Set the Hardie board in the mortar and press it down firmly. Screw the Hardie board into the subfloor using backer board screws. Space the screws 6 to 8 inches apart.
Step 4: Tape the Joints
Once the Hardie board is installed, you need to tape the joints. Apply a layer of thin-set mortar mix over the joints and embed mesh tape into the mortar. Smooth the mortar over the tape and let it dry completely.
Step 5: Thinset and Install Tile
Once the Hardie board is installed and the joints are taped, you can start installing the tile. Spread a layer of thin-set mortar over the Hardie board using a notched trowel. Set the tiles into the mortar and press them down firmly. Use a level to ensure that the tiles are level. Space the tiles evenly using tile spacers.
Step 6: Grout the Tiles
Once the tiles are installed, you need to grout the joints. Mix the grout according to the manufacturer's instructions and apply it to the joints using a grout float. Press the grout into the joints and remove excess grout from the surface of the tiles. Let the grout dry completely.
Step 7: Seal the Grout
Once the grout is dry, you need to seal it. Apply a grout sealer to the grout using a brush or sponge. Let the sealer dry completely.
Additional Tips:
- Wear safety glasses when cutting and installing the Hardie board.
- Use a dust mask when sanding the Hardie board.
- Allow the thin-set mortar to dry completely before grouting the tiles.
- Seal the grout regularly to protect it from stains and moisture.
Installing Hardie board for floor tile is easy as these simple steps. Following the steps thoroughly and taking precautions to ensure it is installed correctly. You will enjoy a beautiful and durable tile floor for many years to come.

How To Install Hardie Backer Cement Board On Floors James Pros

How To Install Hardie Board For Floor Tile

How To Install Cement Backer Board For Floor Tile Installation The Home Depot

How To Install Cement Board On A Floor Diy Family Handyman

Install 1 4 Hardie Backer Board In Bathroom Remodel Diy Boomers

Easily Install Cement Board To Prep For Tile Installation

How To Install Tile Backer Board

How To Install Cement Board In 3 Easy Ways Q1 2025 Infographic

Floor Tile Part 1 Installing Cement Backer Board Handy Mandy

Hardie Backer Boards Everything You Need To Know Walls And Floors
Related Posts