How to Install Glass Tile Backsplash on Drywall
Glass tile backsplashes can add a touch of elegance and sophistication to any kitchen or bathroom. They are durable, easy to clean, and come in a wide variety of colors, patterns, and finishes. Installing a glass tile backsplash on drywall is a relatively straightforward project that can be completed by most homeowners with some basic DIY skills and the right tools.
1. Preparing the Drywall
Before you begin installing the tiles, you need to prepare the drywall surface. This involves cleaning the surface, ensuring it is smooth and even, and applying a waterproof membrane.
Start by cleaning the drywall with a damp cloth to remove any dirt or debris. Next, use a drywall compound to fill any cracks or holes. Allow the compound to dry completely before sanding it smooth. If you are installing the tiles in a wet area such as a bathroom, you will need to apply a waterproof membrane. This can be done using a product like RedGard, which is a liquid-applied, moisture-resistant membrane.
2. Installing the Backer Board
Once the drywall is prepared, you can install the backer board. This is a thin, rigid panel that provides a solid base for the tiles. Backer board is specifically designed to be moisture-resistant and makes for a more durable installation.
Use construction adhesive and screws to attach the backer board to the drywall. Make sure the board is level and flush with the wall. Allow the adhesive to cure completely before continuing.
3. Setting the Tiles
Now comes the exciting part: setting the tiles. You will need to choose a mortar specifically designed for glass tiles. Apply a thin layer of mortar to the backer board, using a notched trowel to create ridges that will help the tiles adhere.
Begin laying the tiles from the bottom up, working your way across the wall. Start in a corner and ensure the tiles are level. Spread the mortar evenly and press the tiles firmly into place. You can use spacers to maintain consistent grout lines.
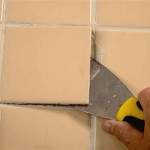
If you are using glass tiles with a mosaic sheet backing, you can install these in sections. Use a utility knife to cut the sheet to size if needed. Apply mortar to the backside of the sheet and press it into place on the wall.
4. Grouting the Tiles
Once the mortar has cured, you can grout the tiles. Choose a grout color that complements the tiles and use a grout specifically designed for glass tiles. This type of grout is formulated to be stain-resistant and easy to clean.
For best results, use a grout float to apply the grout into the spaces between the tiles. Wipe away any excess grout with a damp sponge. Allow the grout to dry completely before sealing it.
5. Sealing the Grout
The final step is sealing the grout. This helps protect the grout from stains and water damage. Apply a sealant specifically designed for grout and allow it to dry completely before using the backsplash. It is recommended to seal the grout periodically, especially in high-traffic areas.
6. Finishing Touches
Once the grout is sealed, you can clean up any excess mortar or grout with a damp cloth. You are now ready to enjoy your newly installed glass tile backsplash.

How To Install A Glass Tile Backsplash Armchair Builder Blog Build Renovate Repair Your Own Home Save Money As An Owner

How To Install Glass Mosaic Tile Backsplash Part 1 Prepping The Walls

Can You Put Glass Backsplash On Drywall Cbd

How To Install Tile Backsplash Fixthisbuildthat

How To Install Kitchen Backsplash Tile Four Generations One Roof

How To Install A Tile Backsplash Part 1 Buildipedia Diy

How To Install A Tile Backsplash Arizona

How To Install Subway Tile Installing Backsplash For The First Time Crafted Work

How To Install Tile On Wavy Walls A Erfly House

How To Install Subway Tile Installing Backsplash For The First Time Crafted Work
Related Posts