How to Install Glass Tile Backsplash
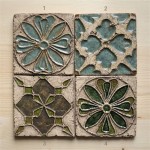
A glass tile backsplash can add a touch of elegance and sophistication to any kitchen or bathroom. It's a relatively easy project to tackle, even for DIY enthusiasts with limited experience. With careful planning and the right tools, you can successfully install a glass tile backsplash yourself and achieve a professional finish.
1. Preparation is Key:
Before you begin, it's crucial to prepare the surface and gather your supplies. This ensures a smooth and successful installation.
1.1. Surface Preparation:
Start by ensuring the backsplash area is clean and free of debris. Any existing wallpaper, paint, or loose tiles must be removed. Ensure the surface is smooth and even. If necessary, use drywall compound to fill in any cracks or imperfections. Allow the compound to dry completely before proceeding.
1.2. Measure and Mark:
Measure the area you want to cover with tiles and make accurate markings on the wall. This will help you determine the number of tiles you'll need and how they will be arranged. Consider the grout lines and any cut tiles you may require.
1.3. Gather your Supplies:
Before you start, gather all the necessary materials. This includes:
- Glass tiles
- Thin-set mortar
- Grout
- Tile spacers
- Notched trowel
- Grout float
- Sponge
- Bucket
- Level
- Measuring tape
- Pencil
- Safety gear (gloves, goggles)
2. Installing The Tiles:
Once the preparation is complete, you can move on to installing the tiles. Accuracy and patience are key to a successful installation.
2.1. Mixing the Mortar:
Follow the manufacturer's instructions for mixing the thin-set mortar. You'll need a consistency similar to peanut butter. Apply the mortar to the wall using a notched trowel, creating a smooth layer.
2.2. Laying the Tiles:
Starting from the bottom and working your way up, carefully press the tiles into the mortar. Use a level to ensure they are straight and plumb. Place tile spacers between the tiles to maintain consistent grout lines.
2.3. Cutting Tiles:
For corners and edges, you'll need to cut tiles to fit using a tile cutter or wet saw. Ensure you make accurate measurements before cutting to achieve a neat and tidy finish.
3. Grouting and Finishing:
After the mortar has dried thoroughly, you can apply grout to fill the gaps between the tiles. Properly grouting adds a polished final touch to your backsplash installation.
3.1. Applying Grout:
Use a grout float to apply the grout to the spaces between the tiles. Work diagonally to ensure the grout fills the gaps completely. Wipe away excess grout with a damp sponge.
3.2. Cleaning and Sealing:
Allow the grout to dry completely before cleaning the tiles. Use a damp sponge to wipe away any remaining grout residue. Once dry, consider applying a sealant to the grout to protect it from stains and moisture.
Installing a glass tile backsplash can be a rewarding project, adding a touch of beauty and value to your home. By following these steps and taking your time, you can achieve a professional finish and enjoy an impressive and functional backsplash.

How To Install A Glass Tile Backsplash Real Diy Tips

How To Install Subway Tile Installing Backsplash For The First Time Crafted Work

How To Install A Kitchen Backsplash The Best And Easiest Tutorial

How To Install Subway Tile Installing Backsplash For The First Time Crafted Work

How To Install A Kitchen Backsplash Step By Guide

How To Install A Glass Tile Backsplash Armchair Builder Blog Build Renovate Repair Your Own Home Save Money As An Owner

How To Install A Tile Backsplash Part 1 Buildipedia Diy

Tips For A Successful Diy Metal Mosaic Backsplash Install

Installing A Paper Faced Mosaic Tile Backsplash

How To Install Subway Tile Installing Backsplash For The First Time Crafted Work
Related Posts