How To Install Floor Tiles In Bathroom
Installing new floor tiles in a bathroom can dramatically improve its aesthetic appeal and increase the value of a home. Although it might seem like a daunting task, with careful planning, the right tools, and a systematic approach, a determined homeowner can successfully install bathroom floor tiles. This article provides a comprehensive guide to navigating the process, from preparation to grouting, ensuring a professional-looking finish.
Preparation: The Foundation for Success
Proper preparation is crucial for a successful tile installation. Neglecting this stage can lead to uneven surfaces, tile adhesion issues, and ultimately, a less-than-satisfactory outcome. Preparation involves several key steps, starting with removing the existing flooring and thoroughly cleaning the subfloor.
Removing the Existing Flooring: Begin by removing all fixtures from the bathroom, including the toilet, vanity, and any wall-mounted accessories that might interfere with the tiling process. Disconnect the toilet's water supply and carefully remove the toilet, plugging the drain opening to prevent sewer gases from escaping. Next, remove the existing flooring. The method used will depend on the type of flooring present. Vinyl or linoleum flooring might peel off easily, while ceramic or porcelain tiles might require a hammer and chisel. Exercise caution to avoid damaging the subfloor during removal. Wear safety glasses and gloves to protect against flying debris and sharp edges.
Subfloor Inspection and Repair: Once the old flooring is removed, inspect the subfloor for any damage, such as cracks, rot, or unevenness. Repairing any existing structural issues is critical before proceeding. For plywood subfloors, replace any damaged sections with new plywood of the same thickness. For concrete subfloors, fill cracks with a concrete patching compound. Use a self-leveling compound to correct any unevenness in the subfloor, ensuring a smooth, level surface for the new tiles. The subfloor must be structurally sound and capable of supporting the weight of the tiles and the associated foot traffic.
Cleaning the Subfloor: After repairs, thoroughly clean the subfloor to remove any dust, debris, or adhesive residue. Sweep and vacuum the entire area, then scrub the surface with a mild detergent and water. Rinse thoroughly and allow the subfloor to dry completely before proceeding. A clean subfloor ensures proper adhesion of the tile adhesive.
Planning the Layout: Planning the tile layout is an essential part of the preparation process. It influences the visual appeal and can minimize tile cuts in awkward areas. Start by finding the center of the room. Measure the length and width of the bathroom and mark the halfway points on each wall. Using a chalk line, snap two lines that intersect at the center of the room, creating four quadrants. Consider the focal point of the bathroom, such as the doorway or a large window, and adjust the layout to ensure the tiles are symmetrically aligned around this feature.
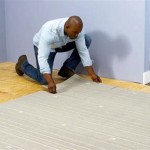
Dry Laying the Tiles: Before applying any adhesive, dry lay the tiles in each quadrant, starting from the center point and working outwards. Use tile spacers to maintain consistent grout lines. This allows for visualizing the final layout and identifying any areas that require cutting tiles. Adjust the layout as needed to minimize small tile cuts along the walls. If necessary, shift the starting point slightly to achieve a more balanced layout. Dry laying also provides an opportunity to assess the quantity of tiles needed and make any necessary adjustments to the tile order.
Applying Adhesive and Setting Tiles
Once the preparation is complete, the next step is to apply the adhesive and set the tiles. Selecting the correct adhesive and applying it properly are crucial for ensuring a strong and durable bond between the tiles and the subfloor.
Selecting the Right Adhesive: Choose a tile adhesive specifically designed for bathroom floor tiles. Thin-set mortar is a common choice for ceramic, porcelain, and natural stone tiles. Consider the type of tile being used, the type of subfloor, and the moisture levels in the bathroom when selecting the adhesive. Some adhesives are specifically formulated for use in wet areas and offer superior water resistance. Read the manufacturer's instructions carefully to ensure the adhesive is compatible with the chosen tile and subfloor.
Mixing the Adhesive: Follow the manufacturer's instructions for mixing the adhesive. Typically, thin-set mortar is mixed with water or a latex additive to achieve a smooth, creamy consistency. Use a mixing drill with a paddle attachment to thoroughly combine the ingredients. Avoid adding too much water, as this can weaken the adhesive. Let the mixture slake for the recommended time before using it. This allows the chemicals to fully activate and ensures proper bonding.
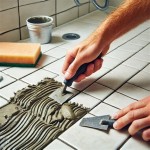
Applying the Adhesive: Using a notched trowel, apply the adhesive to the subfloor in small sections, typically about 2-3 square feet at a time. Hold the trowel at a 45-degree angle and spread the adhesive evenly, creating ridges. The size of the trowel notch will depend on the size and type of tile being used. Refer to the adhesive manufacturer's recommendations for the appropriate trowel size. Avoid applying adhesive to a larger area than can be tiled within the adhesive's open time, which is the time it remains workable. If the adhesive starts to skin over, scrape it up and apply a fresh coat.
Setting the Tiles: Carefully place the tiles onto the adhesive, aligning them with the layout lines. Use tile spacers to maintain consistent grout lines. Press each tile firmly into the adhesive, ensuring it is fully seated and level with the adjacent tiles. Use a rubber mallet to gently tap the tiles into place and eliminate any air pockets. Periodically check the level of the installed tiles with a level to ensure a flat and even surface. If any tiles are not level, adjust them immediately before the adhesive sets.
Cutting Tiles: Cutting tiles is often necessary to fit around walls, fixtures, and corners. Use a wet saw for cutting ceramic, porcelain, and stone tiles. This provides clean, precise cuts and minimizes dust. Mark the cut line on the tile with a pencil and carefully guide the tile through the wet saw blade. For small, intricate cuts, use tile nippers. Wear safety glasses and gloves when cutting tiles to protect against sharp edges and flying debris.
Grouting and Finishing
After the adhesive has cured (typically 24-48 hours), the next step is to grout the tiles. Grouting fills the spaces between the tiles, creating a waterproof seal and enhancing the overall appearance of the floor. Proper grouting techniques are essential for a durable and aesthetically pleasing finish.
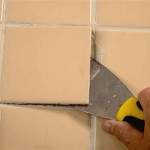
Removing Tile Spacers: Before grouting, remove all the tile spacers from between the tiles. Use pliers or a utility knife to carefully remove the spacers without damaging the tiles or the adhesive. Inspect the grout lines and remove any excess adhesive that may have squeezed up between the tiles. Clean the tile surface with a damp sponge to remove any dust or debris.
Selecting the Right Grout: Choose a grout that is suitable for bathroom floor tiles. Cement-based grout is a common choice for most tile types. Consider the color of the tiles and the overall aesthetic of the bathroom when selecting the grout color. Epoxy grout is more water-resistant and stain-resistant than cement-based grout, making it a good choice for high-moisture areas like bathrooms. However, epoxy grout is more difficult to work with and requires more experience to install properly.
Mixing the Grout: Follow the manufacturer's instructions for mixing the grout. Add water to the grout powder gradually, mixing with a grout float or a mixing drill with a paddle attachment until a smooth, creamy consistency is achieved. Avoid adding too much water, as this can weaken the grout. Allow the grout to slake for the recommended time before using it.
Applying the Grout: Using a grout float, apply the grout to the tile surface at a 45-degree angle, pressing it firmly into the grout lines. Work in small sections, ensuring all the grout lines are completely filled. Remove excess grout from the tile surface with the edge of the grout float, holding it at a 90-degree angle. Work diagonally across the tiles to avoid pulling grout out of the grout lines.
Cleaning the Grout Haze: After the grout has set slightly (typically 15-30 minutes), use a damp sponge to remove the excess grout from the tile surface. Rinse the sponge frequently in clean water and wring it out thoroughly. Work diagonally across the tiles, wiping away the grout haze. Be careful not to remove too much grout from the grout lines. After the initial cleaning, allow the grout to dry for a few hours, then use a clean, dry cloth to buff the tile surface and remove any remaining grout haze. Repeat as necessary until the tile surface is clean and clear.
Sealing the Grout: After the grout has fully cured (typically 72 hours), apply a grout sealer to protect it from water damage, stains, and mildew. Use a grout brush or a foam applicator to apply the sealer to the grout lines. Allow the sealer to penetrate for the recommended time, then wipe away any excess with a clean cloth. Sealing the grout will help to prolong its lifespan and keep it looking its best.
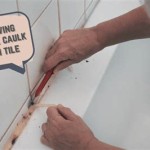
Reinstalling Fixtures: Once the grout is sealed and dry, reinstall the toilet, vanity, and any other fixtures that were removed during the preparation phase. Ensure all connections are properly sealed to prevent leaks. Caulk around the base of the toilet and vanity with a waterproof sealant to prevent water from seeping behind them.
By following this comprehensive guide, homeowners can successfully install bathroom floor tiles and achieve a professional-looking result. The key to a successful installation lies in careful planning, thorough preparation, and precise execution.

Laying Floor Tiles In A Small Bathroom Houseful Of Handmade

Laying Floor Tiles In A Small Bathroom Houseful Of Handmade

How To Lay Bathroom Tile 5 Easy Steps Rubi Blog Usa

How To Lay A Tile Floor

Bathroom Floor Tile Layout In 5 Easy Steps Diytileguy

How To Tile A Bathroom Floor In 5 Steps Domino

Subfloor For Tile Installation Everything You Need To Know

How To Lay A Tile Floor

How To Install An Adhesive Vinyl Bathroom Tile Floor Merrypad

How To Tile A Bathroom Floor Ceramic Tiles Installation
Related Posts