How To Install Ceramic Tile On a Kitchen Floor
Installing ceramic tile on a kitchen floor is a significant home improvement project that can dramatically enhance the aesthetic appeal and functionality of the space. While it requires careful planning, preparation, and execution, a successful installation can result in a durable and visually pleasing surface that will last for years to come. This article provides a comprehensive guide to the process, outlining the necessary steps and considerations for a professional-quality result.
Before embarking on the installation, it is crucial to assess the existing floor and ensure it is suitable for tiling. Factors to consider include the floor's structural integrity, flatness, and cleanliness. Any existing flooring material, such as vinyl or linoleum, must be completely removed to expose the subfloor. The subfloor itself should be inspected for damage, rot, or unevenness. Addressing these issues before proceeding will prevent problems down the line and ensure a stable foundation for the tile.
Preparing the Subfloor
The subfloor is the foundation upon which the ceramic tile will be installed. A properly prepared subfloor is essential for a successful and long-lasting tile installation. If the existing subfloor is damaged or uneven, it may be necessary to install a new layer of plywood or cement backer board. Plywood should be at least ¾ inch thick and exterior grade to withstand moisture. Cement backer board, such as Durock or HardieBacker, is a more durable and water-resistant option, particularly recommended for kitchens due to the potential for spills and moisture exposure.
To install plywood, ensure it is securely fastened to the joists with screws every 6 inches along the edges and every 8 inches in the field. Stagger the seams to distribute weight and prevent weakness. For cement backer board, apply a thin layer of thin-set mortar to the subfloor before placing the board. This creates a better bond and prevents voids underneath. Screw the backer board to the subfloor with backer board screws, spacing them according to the manufacturer's instructions, typically every 6-8 inches. Tape and mortar the seams between the boards with fiberglass mesh tape and thin-set mortar to create a seamless surface.
Once the subfloor is properly installed, it is important to ensure it is level. Use a long level or laser level to identify any high or low spots. Low spots can be filled with self-leveling compound, which is a pourable mixture that spreads and hardens to create a smooth, even surface. Follow the manufacturer's instructions for mixing and application. Allow the self-leveling compound to dry completely before proceeding.
Finally, clean the subfloor thoroughly to remove any dust, debris, or contaminants that could interfere with the adhesion of the thin-set mortar. Vacuum the entire surface and then wipe it down with a damp sponge. Allow the subfloor to dry completely before proceeding to the next step.
Planning the Tile Layout
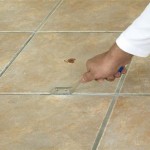
Careful planning of the tile layout is critical for achieving a visually appealing and professional-looking result. Before applying any mortar, dry-lay the tiles to determine the best arrangement. This involves placing the tiles on the floor without adhesive to visualize the final appearance and make any necessary adjustments. Start by finding the center of the room and drawing intersecting lines that divide the room into four quadrants. These lines will serve as guidelines for laying the tiles.
Consider the placement of full tiles and cut tiles. Aim for larger pieces near the entrance and along prominent walls, as these areas are more visible. Avoid small slivers of tile along the edges, as they can look unprofessional and be difficult to cut accurately. If necessary, adjust the starting point to minimize the size of the cut tiles. Use tile spacers to maintain consistent grout lines between the tiles. These spacers ensure uniform spacing and contribute to a clean, professional appearance.
Pay attention to any obstacles in the room, such as cabinets, appliances, or doorways. Plan how the tiles will be cut around these obstacles to maintain a consistent and aesthetically pleasing pattern. Use a tile saw or wet saw to make precise cuts. Practice cutting scrap tiles first to get a feel for the saw and avoid damaging the good tiles.
Once you are satisfied with the layout, mark the position of the tiles with a pencil or marker. This will serve as a guide when you begin applying the mortar. Take photographs of the dry-laid tiles to refer to during the installation process. This will help you maintain the planned layout and avoid mistakes.
Applying Mortar and Setting Tile
With the subfloor prepared and the tile layout planned, the next step is to apply the thin-set mortar and set the tiles. Thin-set mortar is a cement-based adhesive specifically designed for bonding tile to a substrate. Choose a high-quality thin-set mortar that is appropriate for the type of tile you are using and the subfloor material. Follow the manufacturer's instructions for mixing the mortar. Typically, this involves adding water to the dry mortar mix and stirring until it reaches a smooth, creamy consistency.
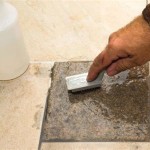
Apply the mortar to the subfloor using a notched trowel. The size of the notch on the trowel will depend on the size of the tile. A larger tile requires a larger notch. Hold the trowel at a 45-degree angle and spread the mortar evenly over a small area, typically 2-3 square feet at a time. Comb the mortar with the notched trowel to create ridges. These ridges will help the tile adhere to the mortar.
Place the tile firmly onto the mortar, aligning it with the layout lines and using tile spacers to maintain consistent grout lines. Press down on the tile to ensure it is fully embedded in the mortar. Use a rubber mallet to gently tap the tile and ensure it is level with the surrounding tiles. Work in small sections, applying mortar and setting tiles as you go. Do not apply mortar to a large area at once, as it can dry out before you have a chance to set the tiles.
After setting the tiles, allow the mortar to dry completely, typically for 24-48 hours, before proceeding to the next step. Avoid walking on the tiles during this time. After the mortar has dried, remove the tile spacers and inspect the installation for any imperfections. If any tiles are loose or uneven, carefully remove them and reinstall them with fresh mortar.
Once the mortar is fully cured, the tiles are ready for grouting. Grouting fills the gaps between the tiles, providing a water-resistant seal and enhancing the overall appearance. Choose a grout color that complements the tile and the overall design of the kitchen. Follow the manufacturer's instructions for mixing the grout. Apply the grout to the tile using a grout float, spreading it diagonally across the tiles to fill the grout lines completely. Remove excess grout from the tile surface with the grout float. Use a damp sponge to clean the tile surface, rinsing frequently.
Allow the grout to dry slightly, then use a clean, dry cloth to buff the tile surface and remove any remaining grout residue. Allow the grout to cure completely, typically for 72 hours, before sealing it with a grout sealer. The grout sealer will protect the grout from stains and moisture damage. Apply the sealer according to the manufacturer's instructions.
Once the grout is sealed, the installation is complete. You can now clean the floor thoroughly and enjoy your newly tiled kitchen.

How To Tile A Floor Part 1 Preparation

How To Tile A Kitchen Floor Step By Guide For Beginners

Tips For Installing A Kitchen Vinyl Tile Floor Merrypad

How To Install A Tile Floor The Home Depot

Complete Guide On How To Install Ceramic Floor Tiles Rubi Blog Usa

Complete Guide On How To Install Ceramic Floor Tiles Rubi Blog Usa

How To Install A Tile Floor The Home Depot

Re Tiling Of A Kitchen Floor

Workers Construct And Install Ceramic Tiles For Kitchen Floors Professionally Accurately

How To Lay Tile Diy Floor Installation Lowe S
Related Posts