How To Install Ceramic Tile On Floor
Installing ceramic tile on a floor is a home improvement project that can significantly enhance the aesthetic appeal and durability of a room. While it requires careful planning and execution, this process can be successfully undertaken by a homeowner with reasonable DIY skills. This article provides a comprehensive guide to installing ceramic tile flooring, covering all the necessary steps from preparation to finishing.
Planning and Preparation
Proper planning and preparation are crucial for a successful tile installation. This phase involves assessing the existing floor, calculating material requirements, and gathering the necessary tools and materials.
Assessment of the Existing Floor: The first step is to evaluate the condition of the subfloor. The subfloor must be structurally sound, level, and clean. Any imperfections, such as cracks, loose boards, or uneven surfaces, must be addressed before proceeding. Concrete subfloors should be free of debris, paint, and sealants. Wood subfloors should be checked for signs of rot or water damage. If the subfloor exhibits instability, it may be necessary to reinforce it with an additional layer of plywood or cement backer board.
Material Calculation: Accurately calculating the amount of tile, mortar, grout, and other materials is essential to avoid shortages or excessive waste. Measure the length and width of the room to determine the total square footage. Add an extra 10-15% to the total square footage to account for cuts, breakage, and potential errors during installation. Use the square footage to estimate the amount of thin-set mortar and grout needed, consulting the product packaging for coverage rates.
Tool and Material Gathering: Assemble all the necessary tools and materials before starting the project to ensure a smooth workflow. Essential tools include a tile saw (wet saw preferred for ceramic), a notched trowel (size determined by tile size), a rubber grout float, a sponge, a measuring tape, a level, a pencil, safety glasses, gloves, and knee pads. Essential materials include ceramic tiles, thin-set mortar, grout, sealant, and possibly cement backer board if the subfloor requires additional support.
Acclimation of Materials: Allow the ceramic tiles to acclimate to the room's temperature for at least 24-48 hours before installation. This helps to minimize expansion and contraction issues after installation.
Installation Process
The installation process involves laying the tiles using thin-set mortar, ensuring proper spacing and alignment, and allowing the mortar to cure properly.
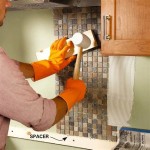
Applying Thin-Set Mortar: Begin by mixing the thin-set mortar according to the manufacturer's instructions. Use a notched trowel to apply a thin, even layer of mortar to a small section of the subfloor (approximately 2-3 square feet). The notch size of the trowel should be appropriate for the size of the tile being used. Hold the trowel at a 45-degree angle and create ridges in the mortar to ensure proper adhesion.
Laying the Tiles: Carefully place the first tile onto the mortar bed, pressing down firmly and twisting slightly to ensure good contact. Use tile spacers to maintain consistent spacing between tiles. Continue laying tiles, working in small sections and frequently checking for levelness with a level. Adjust the tiles as needed to ensure they are properly aligned and flush with each other.
Cutting Tiles: Use a wet saw to cut tiles to fit around walls, corners, and other obstacles. Measure accurately and mark the cut lines on the tiles. When cutting, wear safety glasses to protect your eyes from flying debris. For small, intricate cuts, a tile nipper can be used.
Setting Time: Allow the thin-set mortar to cure completely according to the manufacturer's instructions, typically 24-48 hours, before proceeding to the next step. Avoid walking on the newly laid tiles during this time.
Grouting and Finishing
Grouting fills the spaces between the tiles, providing a waterproof and aesthetically pleasing finish. Sealing the grout helps to protect it from stains and moisture.
Applying Grout: Remove tile spacers after the thin-set mortar has cured. Mix the grout according to the manufacturer's instructions. Apply the grout to the tile surface using a rubber grout float, working it into the joints at a 45-degree angle. Ensure that all the joints are completely filled with grout.
Cleaning the Tile Surface: After applying the grout, use a damp sponge to remove excess grout from the tile surface. Rinse the sponge frequently in clean water. Be careful not to remove grout from the joints. Allow the grout to haze over (as specified by the grout manufacturer’s instructions) before wiping again with a clean, damp (not wet) sponge.
Final Cleaning and Polishing: After the grout has dried completely (typically 24-48 hours), use a clean, dry cloth to polish the tile surface and remove any remaining grout haze. This will leave a clean, shiny finish.
Sealing the Grout: Apply a grout sealant to protect the grout from stains and moisture. Follow the manufacturer's instructions for application. Allow the sealant to dry completely before exposing the floor to water or heavy traffic.
Caulking: Apply caulk where the tile meets walls, tubs, showers, and other fixtures. This will provide a waterproof seal and prevent water damage.
Addressing Common Challenges
Installing ceramic tile can present various challenges, including uneven subfloors, cracked tiles, and grout discoloration. Understanding how to address these issues can ensure a successful installation.
Uneven Subfloors: An uneven subfloor can lead to cracked tiles and uneven grout lines. To address this, use a self-leveling compound to create a smooth, even surface before installing the tile. This will provide a stable base for the tiles and prevent future problems.
Cracked Tiles: Cracked tiles can occur due to improper installation, inadequate subfloor preparation, or excessive weight. Replace any cracked tiles immediately to prevent further damage. Ensure that the subfloor is properly prepared and that the tiles are installed according to the manufacturer's instructions.
Grout Discoloration: Grout discoloration can occur due to staining, mildew, or improper cleaning. To prevent grout discoloration, seal the grout regularly and clean it with a mild detergent and water. For stubborn stains, use a grout cleaner specifically designed for the type of grout used.
Tile Lippage: Tile lippage, or uneven tile edges, can be caused by using tiles of varying thickness, inadequate mortar coverage, or variations in the subfloor. To minimize lippage, use tiles of consistent thickness and ensure that the mortar is evenly applied. Lippage can be minimized with the use of tile leveling systems which consist of clips and wedges that hold the tiles level during the mortar drying period.
Using Heated Flooring Systems: When combined with ceramic tile, heated flooring systems can provide unparalleled comfort. Proper planning is crucial. Select a system designed for use with tile and ensure that the subfloor is properly prepared to accommodate the heating elements. Follow the manufacturer's instructions carefully when installing both the heating system and the tile.
Working with Large Format Tiles: Large format tiles require extra care during installation. Due to their size, they are more prone to cracking and lippage. Use a larger notched trowel to ensure adequate mortar coverage and consider using a two-part epoxy mortar for added strength and durability. It is also recommended to use a tile leveling system to ensure a flat, even surface.
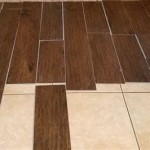
Patterned Tile Installation: Installing patterned tiles requires careful planning and precision. Dry-lay the tiles to ensure the pattern is consistent and visually appealing. Use a laser level to maintain straight lines and proper alignment. Start from the center of the room and work your way outwards to minimize cuts and waste.
By following these steps and addressing potential challenges, homeowners can successfully install ceramic tile flooring and enjoy a beautiful, durable surface for years to come.

Installing Tile Floor For The First Time How To Lay Crafted Work

Complete Guide On How To Install Ceramic Floor Tiles Rubi Blog Usa

How To Lay Tile Install A Ceramic Floor In The Bathroom Diy

Installing Tile Floor For The First Time How To Lay

Installing Tile Floor For The First Time How To Lay Crafted Work

Materials Needed To Lay Tile Floor The Best Tools Rubi Blog Usa

Installing Tile Floor For The First Time How To Lay

How To Lay Tile Diy Floor Installation Lowe S

Installing Tile Floor For The First Time How To Lay Crafted Work

Best Method For Installing Floor Tiles Techniques Tile Installation Pma Imperio
Related Posts