How to Install Ceramic Tile on a Bathroom Wall
Installing ceramic tile on a bathroom wall is a popular home improvement project that can significantly enhance the aesthetics and functionality of the space. Ceramic tile offers water resistance, durability, and a wide range of design options, making it an ideal choice for bathrooms. This article provides a comprehensive guide to the process, covering preparation, tile layout, installation, and finishing.
Preparing the Wall Surface
Proper wall preparation is crucial for a successful tile installation. The surface must be clean, level, and structurally sound. Begin by removing any existing wallpaper, paint, or adhesive residues. A scraper, putty knife, and appropriate solvent can be used for this purpose. Ensure adequate ventilation when using solvents and follow the manufacturer's safety instructions.
Inspect the wall for any signs of damage, such as cracks or water damage. Repair any imperfections using patching compound or drywall mud. Apply the compound in thin layers, allowing each layer to dry completely before applying the next. Sand the patched areas smooth to blend them seamlessly with the surrounding wall surface.
Assess the wall for plumbness and levelness. Use a level to check for any deviations from vertical and horizontal. If the wall is significantly out of plumb or level, it may be necessary to shim the studs or apply a leveling compound. Minor imperfections can often be addressed with adjustments during the tile installation process.
Clean the wall thoroughly to remove any dust, dirt, or debris. Use a damp sponge or cloth and a mild detergent solution. Rinse the wall with clean water and allow it to dry completely. This step is essential to ensure proper adhesion of the tile adhesive.
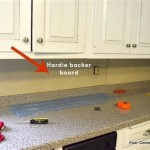
Apply a waterproof membrane to the wall surface. This membrane will protect the wall from moisture penetration and prevent water damage. There are several types of waterproof membranes available, including liquid-applied membranes and sheet membranes. Follow the manufacturer's instructions for application.
For liquid-applied membranes, apply the membrane in thin, even coats using a brush, roller, or trowel. Allow each coat to dry completely before applying the next. Pay particular attention to corners and seams, ensuring that they are thoroughly sealed.
For sheet membranes, apply the membrane to the wall using a thin-set mortar. Use a notched trowel to spread the mortar evenly over the wall surface. Press the membrane firmly into the mortar, ensuring that there are no air pockets or wrinkles. Overlap the seams of the membrane by at least 2 inches.
Planning the Tile Layout
Before beginning the tile installation, it is important to plan the tile layout. This will help to ensure that the tiles are properly aligned and that the finished result is aesthetically pleasing. Consider the size and shape of the tiles, as well as the overall design of the bathroom.
Establish a focal point for the tile installation. This could be a window, a doorway, or a decorative element. Begin the tile layout from this focal point, working outward to the edges of the wall. This will help to ensure that the tiles are centered and that the layout is symmetrical.
Determine the size and placement of the grout lines. Grout lines are the spaces between the tiles that are filled with grout. The width of the grout lines will affect the overall appearance of the tile installation.
Use tile spacers to maintain consistent grout lines. Tile spacers are small plastic pieces that are inserted between the tiles during installation. They are available in a variety of sizes to accommodate different grout line widths.
Consider the placement of any trim pieces, such as bullnose or corner pieces. These pieces are used to finish the edges of the tile installation and create a clean, professional look. Plan the placement of these pieces carefully to ensure that they are properly aligned and that they blend seamlessly with the surrounding tiles.
Dry-lay the tiles on the floor to visualize the layout before applying mortar. This allows for adjustments and helps to identify any potential problems. This step is crucial for ensuring a satisfactory final product.
Installing the Ceramic Tile
Once the wall is prepared and the tile layout is planned, the next step is to install the ceramic tile. This involves applying the tile adhesive, setting the tiles, and allowing the adhesive to cure.
Mix the tile adhesive according to the manufacturer's instructions. Use a notched trowel to apply the adhesive to the wall surface. The size of the notch on the trowel will depend on the size and type of tile being used. Consult the tile adhesive manufacturer's recommendations for guidance.
Apply the adhesive in small sections, working one area at a time. This will prevent the adhesive from drying out before the tiles are set. Use a consistent pressure to spread the adhesive evenly over the wall surface.
Set the tiles into the adhesive, pressing them firmly into place. Use tile spacers to maintain consistent grout lines. Check the tiles for levelness and plumbness using a level. Make any necessary adjustments while the adhesive is still wet.
Cut the tiles to fit around obstacles, such as pipes or electrical outlets. Use a tile cutter or a wet saw to make the cuts. Wear safety glasses and gloves when cutting tiles to protect yourself from injury.
Remove any excess adhesive from the tile surfaces using a damp sponge. This will prevent the adhesive from hardening on the tile and making it difficult to clean later.
Allow the tile adhesive to cure according to the manufacturer's instructions. This typically takes 24 to 48 hours. Avoid walking on the tiles or disturbing them during this time. Premature disturbance can compromise the bond between the tile and the substrate.
Remove the tile spacers once the adhesive has cured. This will prepare the installation for grouting.Grouting and Sealing the Tile
Grouting is the process of filling the spaces between the tiles with grout. This step is essential to protect the tiles from moisture penetration and to create a clean, finished look. Sealing the grout will further protect it from stains and mildew.
Mix the grout according to the manufacturer's instructions. Use a rubber grout float to apply the grout to the tile surface. Work the grout into the grout lines, ensuring that they are completely filled. Hold the float at a 45-degree angle and use diagonal strokes across the tiles.
Remove any excess grout from the tile surfaces using a damp sponge. Rinse the sponge frequently to remove the grout residue. Use a circular motion to clean the tiles thoroughly.
Allow the grout to dry according to the manufacturer's instructions. This typically takes 24 to 48 hours. During this time, avoid exposing the grout to water or excessive humidity.
Buff the tile surfaces with a dry cloth to remove any remaining grout haze. This will leave the tiles clean and shiny.
Apply a grout sealer to the grout lines. This will protect the grout from stains and mildew. Follow the manufacturer's instructions for application. Reapply the sealer periodically to maintain its effectiveness.
Clean the tiles with a mild detergent solution and a soft cloth. Avoid using abrasive cleaners or scouring pads, as these can damage the tile surface.
Inspect the finished tile installation for any imperfections. Make any necessary repairs or adjustments to ensure that the installation is aesthetically pleasing and functionally sound.

How To Install A Ceramic Tile Wall

How To Install A Shower Tile Wall Bathroom

How To Tile A Bathroom Wall Granada Cement Blog Ideas Tips And More

How To Install Wall Tile Howtospecialist Build Step By Diy Plans

How To Tile A Bathroom Shower Walls Floor Materials 100 Pics Pro Tips

How To Tile Your Bathroom Budget Dumpster

How To Tile A Bathroom Shower Walls Floor Materials 100 Pics Pro Tips

A Guide To Installing Ceramic Wall Tiles Homeadvisor

How To Install Tile In A Bathroom Shower

Tiling Your Bathroom How Much Types Of Tiles You Will Need
Related Posts