How To Install Ceramic Tile in a Bathroom
Installing ceramic tile in a bathroom is a significant home improvement project that can dramatically enhance the aesthetic appeal and functionality of the space. While it requires careful planning, preparation, and execution, the result is a durable, water-resistant surface that adds value to the property. This article provides a comprehensive guide to installing ceramic tile in a bathroom, covering essential steps from planning and preparation to the final grouting and sealing.
Planning and Preparation
The initial phase of any successful tile installation involves meticulous planning and preparation. This stage lays the groundwork for a smooth and efficient installation process, minimizing errors and ensuring a professional-looking outcome. Key considerations include measuring the bathroom, selecting the appropriate tile and materials, and preparing the subfloor.
Measuring the Bathroom: Prior to purchasing tile, a precise measurement of the bathroom floor and walls is crucial. Measure the length and width of the floor at its widest points and multiply these figures to determine the total square footage. Add an extra 10% to 15% to account for cuts, waste, and potential breakage. For wall tiling, measure the height and width of each wall section to be tiled and calculate the total area. Remember to factor in window and door openings when calculating the total area to be covered.
Selecting Tile and Materials: Choosing the right tile is a critical decision. Ceramic tile is available in a wide range of sizes, shapes, colors, patterns, and textures. Consider the overall design aesthetic of the bathroom, the intended use of the space (e.g., shower floor, wall tile), and the characteristics of different tile types. For bathroom floors, choose tiles with a high coefficient of friction to prevent slipping. For walls, lighter and smaller tiles are generally easier to handle. In addition to the tile itself, gather all the necessary materials, including thin-set mortar, grout, sealant, a tile cutter (wet saw or snap cutter), notched trowels, spacers, a rubber grout float, sponges, buckets, measuring tools, and safety glasses.
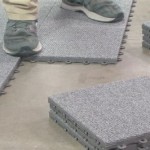
Preparing the Subfloor: A properly prepared subfloor is essential for a successful and long-lasting tile installation. The subfloor must be clean, level, and structurally sound. For wood subfloors, ensure that the existing plywood or OSB subfloor is at least 3/4 inch thick and securely fastened to the floor joists. Inspect the subfloor for any signs of water damage, rot, or mold, and repair or replace any damaged areas. For concrete subfloors, check for cracks, unevenness, and moisture. Fill any cracks with a concrete patching compound and level the surface using a self-leveling underlayment if necessary. Regardless of the subfloor material, clean the surface thoroughly to remove any dirt, dust, grease, or debris. A primer, such as an acrylic latex primer, may be necessary to enhance the adhesion of the thin-set mortar to the subfloor. For wet areas, apply a waterproofing membrane to protect the subfloor from moisture penetration. This can be a liquid membrane, sheet membrane, or a combination of both. Follow the manufacturer's instructions for application and curing.
Applying the Tile
After the planning and preparation phase, the next stage involves the actual application of the ceramic tile. This process requires precision and attention to detail to ensure proper alignment, spacing, and adhesion. Key steps include mixing the thin-set mortar, laying out the tile, applying the mortar, and setting the tile.
Mixing the Thin-Set Mortar: Thin-set mortar is the adhesive that bonds the tile to the subfloor. Mix the thin-set mortar according to the manufacturer's instructions, using a clean bucket and a mixing paddle attached to a drill. Add water gradually while mixing, until the mortar reaches a smooth, creamy consistency. Avoid adding too much water, as this can weaken the mortar's bonding strength. Let the mortar slake for 5 to 10 minutes, then remix briefly before use. Slaking allows the polymers in the mortar to fully hydrate, resulting in a stronger and more durable bond.
Laying Out the Tile: Before applying the mortar, dry-lay the tile to determine the best layout. Start by finding the room's center point by snapping chalk lines from the midpoint of each wall. Align the first row of tiles along these lines, leaving consistent grout lines between the tiles. Adjust the layout as needed to minimize cuts and ensure a balanced appearance. Pay particular attention to the areas where the tile meets walls or fixtures, as these areas often require cuts. Use tile spacers to maintain uniform grout lines. The dry-lay process allows for adjustments and corrections before the mortar is applied, preventing costly mistakes.
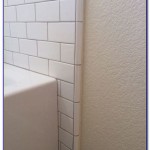
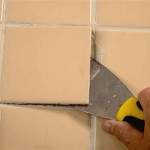
Applying the Mortar and Setting the Tile: Using a notched trowel, spread a thin, even layer of thin-set mortar onto a small section of the subfloor (approximately 2 to 3 square feet). The size of the notches on the trowel will depend on the size of the tile. Hold the trowel at a 45-degree angle and apply firm, even pressure to create ridges in the mortar. Place the first tile onto the mortar bed and press down firmly, using a slight twisting motion to ensure good contact. Continue setting the tiles, using spacers to maintain consistent grout lines. Check the tiles for levelness using a level or a straight edge and adjust as necessary. If any mortar squeezes up between the tiles, remove it immediately with a putty knife. Work in small sections, applying mortar and setting tiles until the entire area is covered. For wall tiling, start at the bottom row and work upwards, using ledger boards to support the first row of tiles. Allow the thin-set mortar to cure for the recommended time period (typically 24 to 48 hours) before proceeding to the grouting stage.
Grouting and Sealing
The final stage of the ceramic tile installation involves grouting the joints between the tiles and sealing the grout to protect it from moisture and staining. Grouting fills the gaps between the tiles, providing a finished look and preventing water from penetrating beneath the tile. Sealing the grout helps to maintain its appearance and prevent the growth of mold and mildew. Key steps include mixing the grout, applying the grout, cleaning the excess grout, and sealing the grout.
Mixing the Grout: Select a grout color that complements the tile and the overall design of the bathroom. Mix the grout according to the manufacturer's instructions, using a clean bucket and a mixing paddle. Add water gradually while mixing, until the grout reaches a smooth, consistent texture similar to that of peanut butter. Avoid adding too much water, as this can weaken the grout and cause it to crack. Let the grout slake for 5 to 10 minutes, then remix briefly before use.
Applying and Cleaning the Grout: Using a rubber grout float, spread the grout diagonally across the tile, forcing it into the grout lines. Apply firm pressure to ensure that the grout fills the joints completely. Remove any excess grout from the tile surface with the edge of the float. After allowing the grout to set for approximately 15 to 30 minutes, use a damp sponge to wipe the excess grout from the tile surface. Rinse the sponge frequently in clean water and wring it out thoroughly to avoid saturating the grout. Wipe the tile diagonally across the grout lines to avoid pulling the grout out of the joints. Repeat the process as necessary to remove all traces of grout from the tile surface. After the grout has dried for 24 to 48 hours, a haze may appear on the tile surface. This haze can be removed with a grout haze remover or a mild acid solution, following the manufacturer's instructions.
Sealing the Grout: Apply a grout sealer to protect the grout from moisture, stains, and mildew. Choose a high-quality grout sealer that is specifically designed for use in bathrooms. Apply the sealer using a small brush or a grout sealant applicator, following the manufacturer's instructions. Allow the sealer to penetrate the grout for the recommended time period, then wipe off any excess sealer from the tile surface. Reapply the sealer every year or two to maintain its protective properties. Proper grout sealing is crucial for preventing water damage and maintaining the aesthetic appeal of the tiled surface.

Laying Floor Tiles In A Small Bathroom Houseful Of Handmade

Laying Floor Tiles In A Small Bathroom Houseful Of Handmade

How To Tile A Bathroom Floor Ceramic Tiles Installation

How To Lay Bathroom Tile 5 Easy Steps Rubi Blog Usa

How To Tile A Bathroom Wall With Wickes

Step By Guide Tiling Floors Like A Pro

Tiling Your Bathroom How Much Types Of Tiles You Will Need

Complete Guide On How To Install Ceramic Floor Tiles Rubi Blog Usa

Subfloor For Tile Installation Everything You Need To Know

Bathroom Floor Tile Layout In 5 Easy Steps Diytileguy
Related Posts