How To Install Cement Board For Wall Tile
Cement board provides a stable, water-resistant substrate for tile installations in bathrooms, kitchens, and other areas exposed to moisture. Its durability and resistance to warping and rot make it a superior choice over drywall or plywood in these environments. This article outlines the necessary steps for properly installing cement board to ensure a successful and long-lasting tile project.
Planning and Preparation
Accurate measurements are crucial for minimizing waste and ensuring sufficient material. Measure the area to be tiled meticulously and calculate the required number of cement board sheets. Consider the layout to minimize cuts and seams. Gather all necessary tools and materials before beginning the installation process. This includes cement board, backer board screws, a utility knife with scoring tool, a tape measure, safety glasses, dust mask, gloves, a drill with a Phillips bit, a level, and thin-set mortar.
Surface preparation is essential for proper adhesion. The wall studs should be exposed and spaced according to the manufacturer’s recommendations for the chosen cement board thickness. Inspect the framing for any damage or irregularities. Address any plumbing or electrical work before installing the cement board.
Cutting and Fitting Cement Board
Cement board can be cut using a scoring method. Score the front face of the board along the measured cut line using a utility knife and a straight edge. Make multiple passes to ensure a deep score. Snap the board along the scored line by applying pressure to the back side. Clean up any rough edges with a rasp or sandpaper.
For intricate cuts around pipes or other obstacles, use a jigsaw equipped with a carbide-tipped blade specifically designed for cement board. Exercise caution and wear appropriate safety gear when using power tools. Dry fit each piece before applying mortar to ensure accurate placement and fit. Mark the location of studs on the cement board to facilitate screw placement during installation.
Attaching the Cement Board
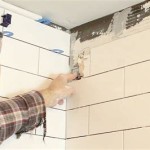
Apply a thin layer of thin-set mortar to the wall studs using a notched trowel. This layer creates a bond and fills any minor imperfections in the wall surface. Position the cut cement board against the wall, aligning it with the marked stud locations. Secure the board to the studs using backer board screws, spaced approximately 8 inches apart. Ensure the screw heads are slightly recessed below the surface of the board without damaging the face.
Leave a 1/8-inch gap between adjacent cement board sheets to allow for expansion and contraction. This gap will be filled with thin-set mortar during the tiling process. Similarly, maintain a 1/4-inch gap between the bottom edge of the cement board and the floor or tub/shower base to prevent wicking moisture. This gap can be filled with sealant after the tile is installed.
Taping and Finishing
Once all cement board is installed, apply fiberglass mesh tape over all seams and joints. Embed the tape in a layer of thin-set mortar using a putty knife, ensuring full coverage and a smooth surface. Allow the mortar to dry completely according to the manufacturer's instructions. This typically takes 24 hours. Inspect the installation for any loose screws or gaps. Address any issues before proceeding with tile installation.
Apply a thin coat of thin-set mortar over the screw heads to create a level surface and provide additional protection against moisture penetration. Once dry, the cement board is ready for tiling. Following these instructions will create a solid and stable foundation for a successful and long-lasting tile installation.
Waterproofing Considerations (Optional)
In wet areas such as showers, a waterproofing membrane is often required in addition to the cement board. This membrane provides an extra layer of protection against moisture intrusion and helps prevent mold and mildew growth. Apply the waterproofing membrane according to the manufacturer’s instructions, ensuring complete coverage of the cement board surface and all seams. Allow the membrane to dry completely before proceeding with tile installation. This added step is essential for creating a truly waterproof barrier in high-moisture environments.

How To Install Cement Board For Tile Projects Diy Family Handyman

How To Install Cement Board For Tile Projects Diy Family Handyman

How To Install Cement Board For Tile Projects Diy Family Handyman

Installing Cement Board In The Bathroom Angie S Roost

Step By Guide How To Install Cement Board For A Perfect Tile Backer

How To Install Cement Board For Tile Projects Diy Family Handyman

How To Install Cement Board On Walls At Improvements

How To Install Cement Board For Tile Bower Power

How To Hang Cement Backer Board For A Wall Full Of Tile Young House Love

How To Install And Waterproof Cement Board Tub Area
Related Posts