How to Install Cement Board for Tile
Cement board is a versatile and durable material often used as a substrate for tile installations. It provides a strong, flat, and moisture-resistant surface, making it ideal for areas prone to water exposure, such as bathrooms, kitchens, and showers. Installing cement board correctly is crucial for ensuring a successful and long-lasting tile installation. This article will guide you through the essential steps for installing cement board, equipping you with the necessary knowledge to achieve professional results.
Preparing the Substrate
Before installing cement board, it is imperative to prepare the substrate thoroughly. This involves ensuring a level, smooth, and clean surface that will provide a stable base for the cement board.
- Remove Existing Surfaces: If you are installing over existing tile, drywall, or other materials, it is necessary to remove them completely. This ensures a secure bond between the substrate and the cement board.
- Level the Substrate: Any irregularities or unevenness in the substrate must be addressed. This can be done with self-leveling compound or patching compound, which will create a smooth and level surface.
- Clean the Substrate: After leveling, thoroughly clean the substrate to remove debris, dust, and any residue from the leveling compound. This will ensure proper adhesion of the cement board.
Installing Cement Board
Once the substrate is prepared, you can begin installing the cement board. This involves attaching the board to the substrate using screws or adhesive.
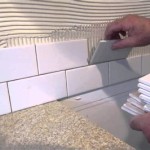
- Measure and Cut Cement Board Panels: Measure the area where you will be installing the cement board panels and cut them to size using a utility knife or a circular saw with a carbide-tipped blade. Make sure to wear safety glasses and gloves during this process.
- Apply Adhesive: If using adhesive, spread a thin layer of construction adhesive to the back of the cement board. Make sure to apply an even layer, leaving no gaps. Allow the adhesive to cure slightly before attaching the board.
- Screw Attachment: If using screws, use screws specifically designed for cement board, available at hardware stores. Choose screws that are long enough to penetrate the substrate by at least 1/2 inch. Screw the board securely to the substrate, keeping screws about 6 to 8 inches apart.
- Stagger Joints: When installing multiple panels of cement board, ensure that the joints between panels are staggered. This adds extra strength and prevents the board from cracking.
- Apply Tape to Joints: Once the cement board is installed, use cement board tape and thin-set mortar to reinforce the joints. This will create a strong and water-resistant seal.
Finishing Touches
After installing the cement board, there are some final steps to ensure proper finishing. This includes applying thin-set mortar and allowing it to cure before tiling.
- Apply Thin-set Mortar: Once the cement board tape and joints are dry, apply a thin layer of thin-set mortar to the entire surface of the cement board. This will provide a smooth and even surface for applying tiles.
- Allow for Curing: After applying the thin-set mortar, it is crucial to allow it to cure completely before installing tiles. This ensures that the mortar has set properly and provides a strong bond for the tiles.

How To Install Cement Board For Tile Projects Diy Family Handyman

How To Install Cement Board On A Floor Diy Family Handyman

Easily Install Cement Board To Prep For Tile Installation

How To Install Hardiebacker Cement Board On Floors James Hardie Pros

How To Install Cement Backer Board For Floor Tile Installation The Home Depot

How To Install Cement Board The Home Depot

How To Install Cement Board For Tile Bower Power

Cement Backerboard Floor Tile Installation Uncookie Cutter

How To Install A Cement Board For Tiling Beaumont Tiles

How To Install Cement Board The Home Depot
Related Posts