How to Install Bathroom Tile in a Shower
Installing bathroom tile in a shower is a project that can significantly enhance the look and feel of your bathroom. It is a task that requires careful planning, preparation, and execution. With the right tools, materials, and a bit of patience, you can achieve professional-looking results. This article will guide you through the steps of installing bathroom tile in a shower, providing insights into crucial aspects of the process.
Prepare the Shower Area
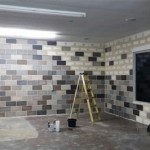
Before starting the tile installation, it is essential to prepare the shower area. This involves removing any existing fixtures, such as the showerhead, handles, and soap dishes. The shower walls and floor should be cleaned thoroughly to remove dirt, debris, and any existing sealant. If the shower surface is not smooth, it may need to be patched or resurfaced for a consistent tile application.
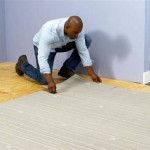
Next, install a waterproof membrane. This is a crucial step to prevent water damage and leaks. There are various options available, including plastic sheets, liquid membranes, and tile backer boards. Choose a membrane that is compatible with the type of tile you are using and that is suitable for the specific environment. Ensure that the membrane is properly installed and sealed to create a watertight barrier.
Finally, establish the layout for the tile. This involves measuring the shower area, determining the size and placement of the tiles, and marking the desired layout. Consider factors such as the size of the tiles, the pattern you want to create, and the location of any fixtures. It is always a good idea to create a mockup of the tile layout on paper or using a digital tool to visualize the final result.
Install the Tile
With the shower area prepared, the next step is to install the tiles. Begin by mixing the mortar according to the manufacturer's instructions and applying a thin layer to the shower wall or floor using a notched trowel. The size of the notches on the trowel determines the thickness of the mortar layer, which is crucial for proper tile adhesion.
Gently press each tile into the mortar, ensuring it is level and flush with the surrounding tiles. Use spacers to maintain consistent grout lines between the tiles. As you work, ensure that the tiles remain level and straight by using a level and a tile straight edge. Adjust the tile's position if necessary, as mortar is still wet.
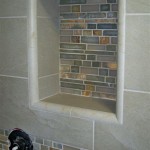
For corners, use special corner pieces or cut tiles to create a smooth and consistent finish. Remember to let the mortar set completely before moving on to the next step. This typically takes at least 24 hours. Once the mortar has dried, remove any excess mortar from the edges of the tiles using a damp cloth or sponge.
Apply Grout and Seal
After the mortar has dried, it's time to apply grout, the material that fills the gaps between the tiles. Mix the grout according to the manufacturer's instructions and apply it to the gaps between the tiles with a rubber float. Press the grout firmly into the gaps, ensuring complete coverage. Clean any excess grout from the surface of the tiles with a damp sponge, working in small sections to avoid leaving grout smudges.
Allow the grout to cure completely, usually for 24 hours, before sealing it. Grout sealant helps protect the grout from stains and moisture penetration. Apply the sealant using a sponge or a brush, following the instructions on the sealant product. Once the sealant is applied, allow it to dry completely before applying grout. Use a damp cloth to wipe any excess grout and polish the tiles to ensure a smooth finish.
Finally, install the shower fixtures. This includes the showerhead, handles, and any other fixtures such as soap dishes or shelves. Ensure that the fixtures are securely attached to the wall or floor and that they are properly sealed to prevent leaks.
Important Considerations
Several important considerations can affect the success of your tile installation project. Choosing the right tiles is crucial, as tiles come in various materials, sizes, and finishes. Choose tiles that are suitable for wet environments and that complement the style of your bathroom. Remember to account for the thickness of the grout lines when selecting tiles. Also, consider the design of your shower and the overall aesthetics of your bathroom.
Additionally, ensure that the tiles you select are of good quality and from a reputable manufacturer. Check for any defects or inconsistencies in the tile before installing them.
Finally, don't hesitate to seek professional help if needed. If you lack experience or feel uncomfortable undertaking the project by yourself, it is always advisable to consult with a professional tile installer. They can provide expert advice and ensure that the project is completed to professional standards.

Part 1 How To Install Tile On Shower Tub Wall Step By

The Complete Guide To Installing Tile On Shower Or Bathtub Walls

Shower Tile Installation Step By Four Generations One Roof

Diy Tutorial How To Install A Tiled Shower Surround The Grit And Polish

How To Tile Bathroom Shower Tub Surround And Niche A Z

How To Install A Marble Shower Art Tile Renovation

How To Install A Tile Shower Like Pro For Beginners Sunnyside Home

A Diy Shower Tile Step By

How To Install A Shower Tile Wall Bathroom

How To Install A Tiled Walk In Shower Our Handcrafted Life
Related Posts