How to Install Backer Board for Tile Shower Flooring
Installing tile in a shower demands careful consideration of the substrate. Unlike drywall or plywood, which are susceptible to moisture damage, backer board provides a stable and water-resistant foundation for tile. The installation process is crucial for ensuring a long-lasting and leak-free shower. This process encompasses preparation, cutting, fastening, and sealing, each requiring its own set of tools and techniques.
Backer board, typically made of cement or coated glass-mat, is designed to withstand the constant exposure to water in a shower environment. It does not rot, warp, or disintegrate like organic materials, making it ideal for tiled surfaces in wet areas. Proper installation of backer board not only protects the underlying structure from water damage but also provides a solid, level surface for tile adhesion. This article details the necessary steps to effectively install backer board onto a shower floor subfloor, ensuring a professional and durable result.
Key Point 1: Preparation and Planning
Before any materials are cut or fastened, thorough preparation is essential. This involves assessing the existing subfloor, gathering the necessary tools and materials, and planning the layout of the backer board. The goal is to create a clean, level, and properly prepared surface that will support the backer board and, ultimately, the tile.
The first step is to examine the subfloor. It should be structurally sound and free from rot, mold, or excessive flexing. If the subfloor is damaged, repairs or replacement will be necessary before proceeding. Any loose nails or screws should be re-set or replaced. Ensure the subfloor is level; any significant deviations will need to be addressed with shims or self-leveling compound to create a flat plane. Use a level and a straightedge to identify high and low spots.
Next, gather the required tools and materials. These typically include backer board (cement board or coated glass-mat), a utility knife, a scoring tool, a circular saw with a backer board blade, a drill or impact driver, backer board screws or nails (specifically designed for backer board), measuring tape, a level, a straightedge, safety glasses, a dust mask, thin-set mortar, seam tape, and a bucket or mixing container for the mortar. Having all the necessary tools readily available will streamline the installation process and minimize delays.
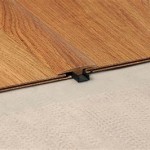
Finally, plan the layout of the backer board sheets. This involves measuring the shower floor and determining how the sheets will fit. Minimize the number of cuts needed and aim to stagger the seams to avoid continuous joints. Consider the location of the drain and any pre-sloped pans. Remember to leave a small gap (approximately 1/8 inch) between the backer board sheets and the surrounding walls to allow for expansion and contraction. A detailed layout will prevent mistakes and optimize material usage.
Key Point 2: Cutting and Fastening the Backer Board
With the preparation complete, the next phase involves cutting the backer board to size and securely fastening it to the subfloor. Accurate cutting and proper fastening are critical for ensuring a stable and waterproof foundation for the tile.
Backer board can be cut using several methods. For straight cuts, a utility knife and scoring tool can be used to score the surface of the board multiple times until it snaps along the score line. For more complex cuts or larger sheets, a circular saw with a backer board blade is recommended. When using a circular saw, always wear safety glasses and a dust mask to protect against dust and debris. Cut the backer board slightly smaller than the measured space to allow for the expansion gap. Double-check all measurements before cutting to avoid errors.
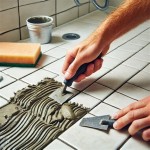
Once the backer board pieces are cut to size, apply a layer of thin-set mortar to the subfloor using a notched trowel. The type of thin-set mortar should be specifically designed for use with backer board. The mortar acts as a bonding agent, creating a strong and waterproof connection between the subfloor and the backer board. Apply enough mortar to ensure full coverage of the backer board, but avoid applying too much, which can create an uneven surface.
Carefully place the backer board sheets onto the mortar bed, aligning them with the layout plan. While the mortar is still wet, immediately fasten the backer board to the subfloor using backer board screws or nails. These fasteners are specifically designed to resist corrosion and provide a secure hold. Space the fasteners according to the manufacturer's recommendations, typically every 6-8 inches along the edges and every 8-12 inches in the field. Drive the fasteners flush with the surface of the backer board, but avoid over-tightening, which can damage the board. Inspect the surface for any protruding fasteners and adjust accordingly. Regularly check the level as you install each sheet and make minor adjustments as necessary.
Key Point 3: Sealing the Seams and Fastener Locations
The final step is to seal the seams between the backer board sheets and to cover the fastener locations. This process involves applying seam tape and thin-set mortar to create a continuous, waterproof surface.
Before applying the seam tape, ensure that the seams between the backer board sheets are clean and free from any debris. The small gap left between the sheets is essential for accommodating movement and preventing cracking. Apply a layer of thin-set mortar over the seams using a 4-inch taping knife. The mortar should be the same type used for bonding the backer board to the subfloor. Embed the seam tape into the wet mortar, pressing it firmly to ensure full contact. Use the taping knife to smooth out the tape and feather the edges, creating a seamless transition.
Apply a second layer of thin-set mortar over the seam tape, completely covering it. Again, smooth out the mortar with the taping knife, creating a flush surface. The goal is to create a smooth, even surface that will not interfere with the tile installation. Ensure that the mortar is properly cured according to the manufacturer's instructions before proceeding to the next step. Generally, this is at least 24 hours.
Similarly, apply thin-set mortar over each of the fastener locations. Use the taping knife to smooth out the mortar and create a flush surface. This covers the fasteners and prevents them from corroding or causing any issues with the tile installation. Inspect the entire surface of the backer board for any imperfections, such as cracks or uneven areas, and address them as needed with additional mortar. Once the mortar is fully cured, the backer board is ready for tile installation.
Once the setting materials you used for the seams and fastener holes have been allowed to fully cure, ensure the surface is completely clean and free of any debris. Following these steps carefully will result in a properly installed backer board shower floor ready for tiling.

How To Install Cement Backer Board For Floor Tile Installation The Home Depot

How To Install Cement Board The Home Depot

Here S How Install A New Shower Stall With Tile Floor

How To Install Cement Board On A Floor Diy Family Handyman

Easily Install Cement Board To Prep For Tile Installation

How To Install Cement Board The Home Depot

Tile Installation Backer Board Around A Bathtub Family Handyman

How To Install Hardiebacker Cement Board On Floors James Hardie Pros

How To Install Cement Board In 3 Easy Ways Q2 2024 Infographic

Proper Way To Set Wallboard For Shower
Related Posts