How to Install Backer Board for Floor Tile
Installing backer board is a crucial step in preparing your floor for tiling. It provides a stable and moisture-resistant base for the tiles, ensuring their longevity and preventing cracking or other issues. Here's a comprehensive guide to help you install backer board for floor tile:
Materials You'll Need:
- Backer board (cement board or gypsum board)
- Thin-set mortar
- Measuring tape
- Circular saw or utility knife
- Notched trowel
- Screws or backer board adhesive
- Drill or screwdriver
- Joint tape (for gypsum board)
- Joint compound (for gypsum board)
Step 1: Prepare the Floor
Remove any existing flooring or subflooring. Clean the surface thoroughly to remove dirt, debris, or any adhesive residue. For increased stability, install a layer of plywood (at least 1/2 inch thick) over the subfloor, perpendicular to the direction of the floor joists.
Step 2: Cut the Backer Board
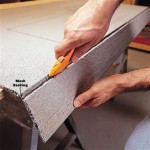
Measure and mark the backer board to fit your floor. Use a circular saw or utility knife to cut the board to size. Ensure the edges are straight and clean for proper alignment.
Step 3: Install the Backer Board
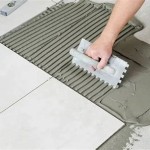
Apply thin-set mortar to the floor using a notched trowel. This will create a base for the backer board. Place the backer board onto the mortar, ensuring it's aligned properly. Use screws or backer board adhesive to secure the board to the floor and plywood. Space the screws every 6 inches along the edges and 12 inches in the field.
Step 4: For Gypsum Board Backer Board
If using gypsum board backer board, it's important to tape and mud the joints for added strength and moisture resistance. Apply joint tape to the seams where the boards meet. Mix and apply joint compound over the tape, smoothing it out with a putty knife.
Step 5: Install Transition Strips
If the backer board extends to different floor levels, such as thresholds or doorways, install transition strips to protect the edges and create a smooth transition.
Step 6: Check for Levelness
Once the backer board is installed, check for levelness using a spirit level or laser level. Any high or low spots should be adjusted with thin-set mortar or shims.
Step 7: Allow Drying Time
Allow the thin-set mortar and joint compound (for gypsum board) to dry completely before proceeding with tiling. Drying time can vary depending on the products you use and the environmental conditions.
Installing backer board for floor tile is not a difficult task but requires careful attention to detail and proper technique. By following these steps, you can ensure a solid and durable base for your tiles, improving their performance and extending their lifespan.

How To Install Hardie Backer Cement Board On Floors James Pros

How To Install Cement Board On A Floor Diy Family Handyman

How To Install Cement Backer Board For Floor Tile Installation The Home Depot

How To Install Cement Backer Board For Floor Tile Installation The Home Depot

Cement Backerboard Floor Tile Installation Uncookie Cutter

How To Install Cement Board In 3 Easy Ways Q4 2024 Infographic

Cement Backerboard Floor Tile Installation Uncookie Cutter

How To Install Cement Board For Tile Projects Diy Family Handyman

How To Install Hardie Board For Floor Tile

6mm Preprimed Tile Backing Boards Nomoreply
Related Posts


