How To Fix Tiles That Fell Off Shower Wall
The detachment of tiles from a shower wall is a common issue that homeowners encounter. This problem can arise due to a variety of factors, including water damage, improper installation, or the natural degradation of adhesive materials over time. Addressing this issue promptly is crucial not only for aesthetic reasons but also to prevent further water damage to the underlying wall structure, which can lead to more significant and costly repairs. This article provides a comprehensive guide on how to effectively fix tiles that have fallen off a shower wall, ensuring a durable and water-resistant repair.
Identifying the Cause of Tile Detachment
Before embarking on the repair process, it is essential to determine the underlying cause of the tile failure. This diagnosis will inform the repair strategy and help prevent future occurrences. Several factors can contribute to tiles falling off a shower wall:
Water Intrusion: The most common culprit is water seeping behind the tiles. This can happen due to a cracked grout line, damaged sealant, or a compromised waterproofing membrane behind the tiles. Water weakens the adhesive bond between the tile and the wall, eventually leading to detachment. Identifying the source of the water intrusion is paramount.
Improper Installation: The initial installation process plays a significant role in the longevity of the tile adhesion. Using the wrong type of mortar, applying too little mortar, or failing to properly clean the substrate before installation can all lead to premature tile failure. Additionally, inadequate surface preparation, such as failing to roughen a smooth surface or neglecting to prime a porous surface, can compromise the bond.
Substrate Movement: Movement in the wall substrate, such as natural settling of the house or expansion and contraction due to temperature fluctuations, can stress the tile adhesive and lead to cracks and detachment. This is especially prevalent in older homes or those with less stable foundations.
Grout Deterioration: Grout, the material filling the spaces between tiles, acts as a barrier against water penetration. Over time, grout can crack, crumble, or become porous, allowing water to seep behind the tiles. Regularly inspecting and maintaining grout is crucial for preventing water damage.
Inadequate Ventilation: Poor ventilation in the shower area can exacerbate moisture buildup, creating an environment conducive to mold growth and weakening the tile adhesive. Installing or improving ventilation systems can help mitigate this problem.
Preparing for the Repair
Once the cause of the tile failure has been identified and addressed, the next step is to prepare for the repair process. This involves gathering the necessary tools and materials and preparing the affected area.
Gathering Tools and Materials: The following tools and materials will be required for the repair:
- Replacement tiles (matching the existing tiles)
- Mortar (thin-set or epoxy mortar, depending on the application)
- Grout (matching the existing grout color)
- Grout saw or utility knife
- Notched trowel
- Rubber grout float
- Sponge
- Bucket
- Caulk (silicone or latex caulk, depending on the application)
- Caulk gun
- Putty knife or scraper
- Safety glasses
- Gloves
- Dust mask
- Small container or cup for mixing mortar
- Mixing stick
Preparing the Area: Before beginning the repair, the area needs to be properly prepared:
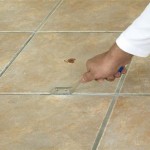
- Remove Loose Material: Carefully remove any loose or crumbling grout, mortar, or debris from the affected area. Use a grout saw or utility knife to score around the edges of the adjacent tiles to prevent chipping.
- Clean the Substrate: Thoroughly clean the exposed substrate (the wall behind the tiles) to remove any residual adhesive, mold, or mildew. A putty knife or scraper can be used to remove stubborn adhesive. A solution of bleach and water (diluted appropriately) can be used to kill mold and mildew. Ensure the area is completely dry before proceeding.
- Assess the Substrate: Inspect the substrate for any damage, such as cracks or crumbling plaster. If significant damage is present, it may be necessary to repair the substrate before installing the new tiles. This may involve patching holes with patching compound or applying a waterproofing membrane.
- Dry Fit the Tiles: Before applying mortar, dry fit the replacement tiles to ensure they fit properly and are aligned with the surrounding tiles. This will help avoid problems during the actual installation.
Installing the Replacement Tiles
With the area prepared, the next step is to install the replacement tiles. Proper installation is crucial for ensuring a durable and water-resistant repair.
Mixing the Mortar: Prepare the mortar according to the manufacturer's instructions. Mix only the amount of mortar that can be used within the working time specified by the manufacturer. Overmixing or adding too much water can weaken the mortar.
Applying the Mortar: Using a notched trowel, apply a layer of mortar to the back of the replacement tile, ensuring that the notches are oriented in the same direction. The size of the notches on the trowel will depend on the size of the tile. Consult the mortar manufacturer's recommendations for the appropriate trowel size.
Setting the Tiles: Press the tile firmly into place, aligning it with the surrounding tiles. Apply even pressure to ensure good contact between the tile and the mortar. If necessary, use tile spacers to maintain consistent grout lines.
Removing Excess Mortar: Remove any excess mortar that squeezes out from around the edges of the tile. Use a putty knife or scraper to carefully remove the excess, being careful not to disturb the surrounding tiles.
Allowing Mortar to Cure: Allow the mortar to cure for the amount of time specified by the manufacturer. This is typically 24-48 hours. During this time, avoid getting the area wet or disturbing the tiles.
Grouting and Sealing
Once the mortar has cured, the next step is to grout the tiles and seal the grout lines. Grouting fills the spaces between the tiles, providing a water-resistant barrier. Sealing the grout lines further enhances water resistance and prevents staining.
Mixing the Grout: Prepare the grout according to the manufacturer's instructions. As with mortar, mix only the amount of grout that can be used within the working time specified by the manufacturer.
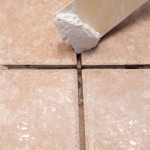
Applying the Grout: Using a rubber grout float, apply the grout to the tile surface, working it into the grout lines at a 45 degree angle. Ensure that the grout lines are completely filled.
Removing Excess Grout: After allowing the grout to set for the amount of time specified by the manufacturer (typically 15-30 minutes), use a damp sponge to wipe away the excess grout from the tile surface. Rinse the sponge frequently in clean water. Be careful not to remove too much grout from the grout lines.
Cleaning the Tiles: After the grout has cured for 24-48 hours, clean the tile surface with a grout haze remover. This will remove any remaining grout residue.
Sealing the Grout: Apply a grout sealer to the grout lines to protect them from water damage and staining. Follow the manufacturer's instructions for application. Typically, two coats of sealer are recommended.
Caulking the Edges: Apply a bead of caulk along the edges of the tiled area, where the tiles meet the shower surround or other surfaces. This will create a watertight seal. Use a caulk gun to apply the caulk in a smooth, even bead. Smooth the caulk with a wet finger or a caulk smoothing tool.
By following these steps, homeowners can effectively repair tiles that have fallen off a shower wall, ensuring a durable and water-resistant repair. Proper preparation, careful installation, and thorough grouting and sealing are essential for preventing future problems.

How To Fix Shower Tiles Falling Off Wall Diy

Repair Fallen Tile Reinstall Shower With Simple Fix Re Install Bath No Grout

How To Fix Loose Shower Tiles Renovator Secrets

How To Repair Tile Falls Off Shower Wall Ceramic D I Y

How To Repair Broken Tile Part One

Shower Wall Subway Tile Falling Off Before Grout

Advice Please Tiles Falling Off In The Shower Diynot Forums

Tips On How To Remove Old Shower Tile Ugly Duckling House

How To Replace A Broken Tile Soap Dish In Shower

How To Replace Shower Wall Tiles Art Tile Renovation
Related Posts