How to Fix Shower Floor Tile Grout
Shower floor tile grout is a porous material that, over time, is susceptible to deterioration due to constant exposure to moisture, soap scum, and mildew. Cracked, crumbling, or stained grout not only detracts from the aesthetic appeal of the shower but can also lead to water damage behind the tiles, potentially causing more significant and costly problems. Addressing grout issues promptly is essential for maintaining the integrity and longevity of the shower. This article outlines the steps involved in fixing shower floor tile grout, encompassing preparation, removal, and replacement techniques.
Assessing the Damage and Gathering Supplies
Before embarking on any repair work, it is crucial to thoroughly assess the extent of the grout damage. Examine the grout lines closely for cracks, missing pieces, discoloration, and areas where the grout has become soft or crumbly. This assessment will determine the scope of the repair and inform the necessary materials and tools. Mild stains or discoloration may only require cleaning, whereas significant damage necessitates removal and replacement.
Once the assessment is complete, gather the following supplies:
*Grout Removal Tool:
Several options are available, including manual grout saws, oscillating multi-tools with grout removal attachments, and triangular grout scrapers. The choice depends on the size of the area being repaired and personal preference. An oscillating multi-tool generally provides the most efficient grout removal, particularly for larger areas. *Utility Knife:
Useful for scoring along the edges of tiles before grout removal, helping to prevent chipping. *Shop Vacuum:
Essential for removing dust and debris generated during grout removal. *Grout Sponge:
For cleaning the tiles and applying the new grout. *Grout Float:
Used to press the new grout into the joints between the tiles. *Mixing Bucket:
For preparing the new grout. *Mixing Stick or Drill with Mixing Attachment:
To ensure the grout is thoroughly mixed. *New Grout:
Choose a grout type appropriate for shower floors. Epoxy grout is generally recommended due to its superior water resistance and durability compared to cement-based grout. Consider the color of the existing grout to ensure a seamless match. *Grout Sealer:
Applying a sealer after the new grout has cured will help protect it from moisture and stains. *Safety Glasses:
To protect eyes from dust and debris. *Dust Mask:
To prevent inhalation of dust particles. *Gloves:
To protect hands from grout and cleaning chemicals. *Clean Rags or Towels:
For wiping up spills and cleaning the tiles.Removing the Old Grout
Removing the old grout is a critical step in the repair process. Care must be taken to avoid damaging the tiles during removal. The chosen grout removal method will influence the specific technique, but the general principles remain the same.
Begin by thoroughly cleaning the shower floor to remove any soap scum, mildew, or loose debris. A strong cleaning solution specifically designed for tile and grout may be necessary. Allow the area to dry completely before proceeding.
If using a manual grout saw, position the saw along the grout line and carefully saw back and forth, applying gentle pressure. Avoid pressing too hard, as this can damage the tiles. Work in small sections and gradually remove the grout. If using an oscillating multi-tool, attach the grout removal blade and carefully guide it along the grout line. Maintain a steady hand and avoid tilting the tool, which can scratch the tiles. A utility knife can be used to score along the tile edges before using the oscillating tool to reduce the risk of chipping.
For particularly stubborn grout, a grout removal chemical solution can be applied. Follow the manufacturer's instructions carefully, ensuring adequate ventilation and wearing appropriate protective gear. The chemical solution can soften the grout, making it easier to remove with a manual tool or multi-tool.
As grout is removed, use a shop vacuum to remove dust and debris. This will improve visibility and prevent the dust from settling back into the grout lines. Continue removing the grout until it is completely gone, down to the level of the tile edges. Take extra care around corners and drains.
Once all the old grout has been removed, thoroughly vacuum the entire shower floor again. Use a damp sponge to wipe the tiles clean and remove any remaining dust or debris. Allow the shower floor to dry completely before proceeding to the next step.
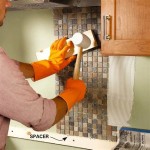
Applying the New Grout
After the old grout has been removed and the shower floor is clean and dry, the new grout can be applied. Proper mixing and application techniques are essential for achieving a durable and aesthetically pleasing result.
Following the manufacturer's instructions, mix the grout in a clean mixing bucket. Add water gradually while mixing with a mixing stick or drill with a mixing attachment. The consistency should be similar to that of peanut butter - smooth and workable, but not too runny. Avoid overmixing, as this can introduce air bubbles into the grout. Let the grout slake (rest) for the amount of time recommended by the manufacturer, typically 5-10 minutes. This allows the polymers in the grout to fully activate.
Using a grout float, apply the grout to the tile joints. Hold the float at a 45-degree angle and press firmly, working the grout into the joints. Apply the grout in a diagonal motion, ensuring that all the grout lines are completely filled. Work in small sections to prevent the grout from drying out. Remove any excess grout from the tile surfaces with the edge of the grout float.
After applying the grout to a section, use a damp grout sponge to wipe away excess grout from the tile surfaces. Rinse the sponge frequently in clean water and wring it out thoroughly. Avoid using too much water, as this can weaken the grout. Use a light touch to prevent removing grout from the joints. Continue wiping the tiles until they are relatively clean.
Allow the grout to set for the amount of time recommended by the manufacturer, typically 15-30 minutes. This allows the grout to firm up slightly, making it easier to clean. After the initial set, use a clean, damp sponge to perform a final cleaning of the tiles. Pay particular attention to removing any grout haze that may have formed on the tile surfaces. Rinse the sponge frequently and wring it out thoroughly.
The grout may require multiple cleanings with the damp sponge over the next 24-48 hours, until the tiles are completely clean and free of grout haze. Follow the manufacturer's instructions for curing time. Generally, grout needs at least 24-72 hours to fully cure before the shower can be used.
Sealing the Grout
After the grout has fully cured, applying a grout sealer is highly recommended. Sealing the grout helps to protect it from moisture, stains, and mildew, extending its lifespan and making it easier to clean.
Choose a high-quality grout sealer specifically designed for shower floors. Both penetrating sealers and surface sealers are available. Penetrating sealers are generally preferred for grout, as they penetrate the grout pores and provide protection from within. Surface sealers create a protective layer on top of the grout, which can wear away over time.
Follow the manufacturer's instructions carefully when applying the sealer. Typically, the sealer is applied with a brush or sponge applicator. Apply the sealer evenly to the grout lines, avoiding getting it on the tiles. If any sealer gets on the tiles, wipe it off immediately with a clean rag.
Allow the sealer to penetrate the grout for the amount of time recommended by the manufacturer, typically 5-10 minutes. After the penetration time, wipe away any excess sealer from the grout lines and tiles with a clean rag. Allow the sealer to dry completely before using the shower, as specified by the manufacturer. Some sealers may require multiple coats for optimal protection.
Regular cleaning and maintenance are essential for maintaining the grout and preventing future problems. Clean the shower floor regularly with a mild soap and water solution. Avoid using harsh chemicals or abrasive cleaners, as these can damage the grout and sealer. Promptly address any leaks or water damage to prevent grout deterioration. Reapply grout sealer every 6-12 months, or as needed, to maintain its protective properties.

How To Fix Holes In Shower Grout The Experts

How To Prevent Expensive Bathroom Shower Tile And Grout Repair Promaster Home Handyman

How To Fix A Shower Floor Slope Art Tile Renovation

How To Retile A Shower Floor Art Tile Renovation

How To Prevent Expensive Bathroom Shower Tile And Grout Repair Promaster Home Handyman

How To Repair Bathroom Grout Step By Diy Guide

Complete Tile Repair And Grout In Tucson Commercial Cleaning Restoration 520 214 4376

How To Fix Grout S Diy Nonprofit Home Inspections

How To Clean Floor Tile Grout In The Bathroom Clorox

How To Retile A Shower Floor Art Tile Renovation
Related Posts