How To Fix Broken Floor Tiles In Bathroom Sinks
Bathroom sink areas are prone to damage due to dropped objects, heavy foot traffic, and moisture exposure. One common issue is cracked or broken floor tiles. While a complete floor replacement might seem necessary, often, individual tile repairs suffice. This guide details the process of repairing broken floor tiles in bathroom sinks, enabling homeowners to restore their bathrooms effectively and economically.
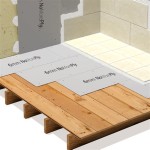
The first step involves gathering the necessary tools and materials. These include safety glasses, gloves, a chisel, a hammer, a grout saw or utility knife, a shop vacuum, thin-set mortar, a notched trowel, grout, a grout float, a sponge, and a bucket of clean water. Matching replacement tiles are also essential. If unavailable, consider salvaging tiles from less visible areas, like behind the toilet or under the sink cabinet. Selecting the appropriate thin-set and grout is crucial, ensuring compatibility with the existing materials. Consult with a hardware professional if uncertainties arise.
Before beginning the repair, the damaged area must be prepared. This begins with protecting surrounding surfaces by covering them with drop cloths or painter's tape. Next, remove the broken tile pieces carefully. Start by chipping away the grout surrounding the damaged tile using a grout saw or utility knife. Then, gently tap the center of the broken tile with a chisel and hammer to loosen and remove the pieces. Exercise caution to avoid damaging adjacent tiles. A shop vacuum effectively removes loose debris and dust, creating a clean surface for the new tile.
Once the broken tile is removed, the underlying surface requires preparation. Scrape away any remaining thin-set mortar using the chisel, ensuring a level and even surface for the replacement tile. Loose debris and dust are removed again with the shop vacuum, enhancing the adhesion of the new thin-set.
Applying the thin-set mortar is the next crucial step. Utilizing the notched trowel, spread a thin layer of mortar onto the back of the replacement tile, following the manufacturer's instructions. The notched edge creates ridges in the mortar, ensuring proper adhesion and allowing for air circulation. The prepared floor surface also receives a thin layer of mortar, creating a double bond for enhanced stability.
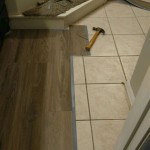
Carefully position the replacement tile onto the prepared floor area, ensuring it's level with the surrounding tiles. Apply gentle pressure to set the tile firmly into the mortar. Remove any excess mortar that squeezes out from the sides with a damp sponge. A level confirms proper tile placement and can identify any necessary adjustments before the mortar sets. Allow the thin-set mortar to dry thoroughly according to the manufacturer's instructions.
After the thin-set has cured, the grouting process begins. Mix the grout according to the manufacturer's instructions, achieving a smooth, paste-like consistency. Apply the grout to the spaces around the replacement tile using a grout float, pressing it firmly into the joints to fill them completely. Remove excess grout with the grout float, holding it at a 45-degree angle and diagonally across the tile.
Cleaning the newly grouted tile is vital for a professional finish. Using a damp sponge, gently wipe away any remaining grout haze from the tile surface. Rinse the sponge frequently in clean water to prevent spreading the grout. Allow the grout to dry completely according to the manufacturer's instructions. Avoid heavy traffic or moisture exposure during the curing period.
Sealing the grout protects it from staining and moisture damage. Once the grout has cured, apply a grout sealer following the manufacturer's instructions. This creates a barrier against water penetration, preserving the integrity of the grout and preventing mildew growth. Regularly sealing the grout extends the life of the repair and maintains the aesthetic appeal of the bathroom floor.
Regular maintenance helps prevent future tile damage. Avoid dropping heavy objects on the bathroom floor. Place mats or rugs in high-traffic areas to absorb impact and protect the tiles. Promptly address any leaks or spills to prevent water damage. Regularly sweeping and mopping the floor removes debris and grime that can contribute to tile wear and tear. Inspecting the grout periodically identifies any cracks or deterioration, enabling timely repairs and preventing further damage.
By following these steps meticulously and exercising patience, homeowners can effectively repair broken floor tiles in bathroom sink areas, restoring their functionality and appearance while avoiding costly professional interventions. Addressing tile damage promptly prevents further deterioration and maintains the overall integrity of the bathroom floor.

How To Fix Ed Tile From Hairline Fractures Major Fissures

How To Fix Ed Tile The Home Depot

How To Fix Ed Tile From Hairline Fractures Major Fissures

Tiling A Small Bathroom Laminate Floor Water Damage Repair

Temporary Fix For Leaking Ed Bathroom Tile Floor

How To Fix Tile Problems Chips Scratches And S Walls Floors

How To Repair Broken Tile Part One

Ed Bathroom Floor Tiles Is There A Way To Repair Hometalk

How To Fix Ed Tile Craving Some Creativity

How To Repair A Ed Tile Without Replacing Orientbell Tiles
Related Posts