How to Attach Tiles to a Wall: A Comprehensive Guide
Tiling a wall can enhance the aesthetics and functionality of any space. Whether you're a seasoned DIYer or a novice embarking on your first tiling project, understanding the essential steps involved is crucial for successful results.
Materials and Tools Required
Before starting, ensure you have the necessary materials and tools:
- Tiles
- Thin-set mortar
- Notched trowel
- Grout
- Grout float
- Tile spacers
- Level
- Tape measure
- Pencil
- Utility knife
- Bucket
- Sponge
Preparing the Wall Surface
A properly prepared wall surface is essential for secure tile adhesion. Begin by cleaning the wall thoroughly to remove any dirt, dust, or grease. If necessary, sand the surface to smooth any imperfections.
If the surface is uneven or porous, apply a layer of backer board or cement board. This will create a stable base for the tiles.
Laying Out the Tiles
Start by determining the center point of the wall. Snap a chalk line vertically and horizontally to establish a reference grid. This will guide you in laying out the tiles evenly.
Arrange the tiles on the floor in the desired pattern. Use tile spacers to maintain uniform spacing between them.
Mixing and Applying Thin-set Mortar
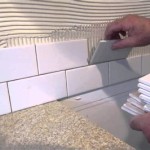
Prepare the thin-set mortar according to the manufacturer's instructions. Use a notched trowel to spread a thin layer of mortar onto the wall.
Hold the trowel at a 45-degree angle and press it firmly onto the surface while pulling it towards you. This will create small "ribs" in the mortar that help bond the tiles.
Attaching the Tiles
Take a tile and gently press it into the mortar, aligning it with the grid lines. Use a level to ensure it is flat and level. Tap the tile lightly with a rubber mallet to secure it in place.
Continue attaching tiles, working from the center point outward. Regularly check the level and spacing to maintain a consistent appearance.
Grouting and Sealing
Once the tiles are set, allow them to dry for 24 hours. Then, prepare the grout according to the instructions.
Use a grout float to apply the grout between the tiles. Press the grout firmly into the joints, removing any excess. Allow the grout to dry for another 24 hours.
Finally, seal the grout with a waterproof sealant to protect it from moisture and staining.
Tips for Success
- Use high-quality materials and tools for best results.
- Plan the tile layout carefully to avoid misalignments.
- Apply thin-set mortar evenly to ensure strong adhesion.
- Check the level and spacing of the tiles regularly.
- Allow ample time for the mortar and grout to dry before sealing.
By following these steps, you can achieve a professional-looking tiled wall that will enhance the beauty and functionality of your space for years to come.

How To Install Ceramic Wall Tile 13 Steps With Pictures

How To Install Wall Tile Howtospecialist Build Step By Diy Plans

How To Tile A Bathroom Wall With Wickes

How To Install Wall Tiles A Step By Guide

Installing Large Format Wall Tile Rogue Engineer

How To Install Bathroom Wall Tile The Rta

Part 1 How To Install Tile On Shower Tub Wall Step By

L And Stick Tile How To Install On A Wall Porch Daydreamer

Installing Large Format Wall Tile Rogue Engineer

How To Install Tiles On A Gypsum Wall Pma Imperio
Related Posts


