How to Remove Silicone from Tiles Without Damaging Paint
Silicone sealant is a common material used in bathrooms and kitchens to create a waterproof barrier between tiles and fixtures, preventing water damage and maintaining a clean appearance. However, over time, silicone can become discolored, cracked, or simply require replacement. Removing old silicone, especially when it’s adjacent to painted surfaces, presents a challenge. The goal is to effectively remove the silicone without chipping or peeling the paint, preserving the integrity of the surrounding area. This article will explore several methods for removing silicone from tiles while minimizing the risk of paint damage, focusing on techniques, tools, and preventative measures.
Understanding Silicone and its Bond
Silicone sealant is a polymer-based adhesive known for its flexibility, water resistance, and durability. It forms a strong bond with various surfaces, including tile, glass, and metal. This strong adhesion, while beneficial in many applications, makes removal a delicate task. The silicone's bond isn't merely superficial; it often penetrates the microscopic pores of the surface it adheres to. This is particularly true for porous tiles and surfaces with a textured finish. When removing silicone from tiles near painted surfaces, the risk lies in the adhesive strength of the silicone exceeding the bond between the paint and the underlying surface. Applying excessive force can cause the paint to lift or chip away along with the silicone.
The type of silicone also influences the removal process. Some silicones are formulated for easier removal than others. Those designed for specific applications, such as high-temperature environments or marine use, tend to have a stronger, more resilient bond. Identifying the type of silicone used can help in selecting the most effective removal method. However, unless the original packaging or documentation is available, this can be difficult to determine. In such cases, a cautious approach, starting with the gentlest methods, is always recommended.
The age of the silicone also plays a significant role. Newer silicone is typically more pliable and easier to cut through. As silicone ages, it tends to harden and become more brittle, making it more prone to tearing and leaving behind stubborn residue. Aged silicone may also have adhered more deeply to the tile and paint surfaces, increasing the likelihood of damage during removal.
Essential Tools and Preparation
Before attempting to remove silicone, gathering the necessary tools and preparing the work area is crucial. Having the right tools on hand will not only make the process more efficient but will also significantly reduce the risk of damaging the tiles and paint. Proper preparation will protect surrounding surfaces and ensure a clean working environment.
The following tools are generally required:
*Sharp Utility Knife or Razor Blade:
A sharp blade is essential for making clean cuts through the silicone. Retractable utility knives with replaceable blades are ideal. Ensure the blade is new and sharp to minimize the force required for cutting. *Silicone Removal Tool:
Specialized silicone removal tools are available in various shapes and sizes. These tools are designed with angled edges to effectively scrape away silicone without scratching the underlying surface. *Plastic Scraper or Putty Knife:
A plastic scraper is a safer alternative to a metal scraper, as it is less likely to scratch the tiles or damage the paint. *Heat Gun or Hair Dryer (Optional):
Applying heat can soften the silicone and make it easier to remove. However, caution is needed when using heat near painted surfaces, as excessive heat can cause the paint to blister or peel. *Solvent-Based Silicone Remover:
These chemical solutions are designed to break down the silicone's bond. Choose a product specifically formulated for silicone removal and ensure it is compatible with the tile and paint materials. Always test the remover on an inconspicuous area first. *Masking Tape:
Masking tape is used to protect the painted surface adjacent to the silicone being removed. Applying tape carefully along the paint line will help prevent accidental scratches or damage during the removal process. *Cleaning Supplies:
A clean cloth, mild detergent, and water are needed to clean the area after the silicone is removed. Isopropyl alcohol can be used to remove any remaining silicone residue. *Safety Glasses and Gloves:
Safety glasses are essential to protect the eyes from flying debris, and gloves will protect the hands from chemical irritants and sharp tools.Before starting the removal process, thoroughly clean the area around the silicone with a mild detergent and water. This will remove any dirt, grime, or mildew that may interfere with the removal process. Allow the area to dry completely before proceeding. Apply masking tape carefully along the edge of the painted surface to protect it from scratches and accidental damage.
Methods for Removing Silicone
Several methods can be used to remove silicone from tiles without damaging paint. The best method will depend on the type of silicone, its age, and the sensitivity of the surrounding paint. It's generally recommended to start with the gentlest method and gradually progress to more aggressive techniques if necessary.
Mechanical Removal
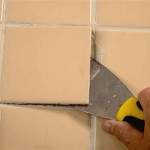
The mechanical removal method involves physically cutting and scraping away the silicone. This is often the first approach and can be effective for removing large sections of silicone. Using a sharp utility knife or razor blade, carefully score along both edges of the silicone bead, where it meets the tile and the painted surface. Make sure the knife is angled slightly away from the paint to avoid accidentally cutting into it. The goal is to weaken the bond between the silicone and the surfaces without damaging the paint or tiles.
Once the silicone has been scored, use a silicone removal tool or a plastic scraper to gently pry it away from the tile and paint. Work slowly and carefully, applying gentle pressure to avoid chipping the paint or scratching the tiles. If the silicone is particularly stubborn, try inserting the scraper underneath the silicone and gently rocking it back and forth to loosen the bond. Avoid using excessive force, as this can damage the underlying surfaces.
For thicker beads of silicone, it may be necessary to cut the silicone into smaller sections before attempting to remove it. This will make it easier to manage and reduce the risk of tearing the paint or tile. Continue to work slowly and carefully, removing small pieces of silicone at a time until all of the visible sealant has been removed.
Heat Application
Applying heat can soften the silicone and make it easier to remove. A heat gun or hair dryer can be used to warm the silicone, making it more pliable and less likely to crack or tear during removal. However, exercise extreme caution when using heat near painted surfaces. Excessive heat can cause the paint to blister, peel, or discolor.
To apply heat safely, start with a low heat setting and gradually increase the temperature until the silicone begins to soften. Hold the heat gun or hair dryer several inches away from the silicone and move it back and forth to distribute the heat evenly. Avoid concentrating the heat on one spot for too long, as this can damage the paint. As the silicone softens, use a silicone removal tool or plastic scraper to gently pry it away from the tile and paint. The softened silicone should be easier to remove with less force, reducing the risk of damage.
If the silicone remains stubborn, reapply heat and continue to scrape gently. Repeat this process until all of the visible silicone has been removed. Once the silicone is removed, allow the area to cool completely before cleaning and inspecting for any remaining residue.
Chemical Softeners
Solvent-based silicone removers can be effective for breaking down the silicone's bond and making it easier to remove. These removers typically contain chemicals that dissolve or weaken the silicone, allowing it to be scraped away more easily. However, it’s very important to choose a silicone remover that is compatible with the tile and paint materials. Some removers can damage or discolor certain types of tiles or paints.
Before applying a silicone remover, carefully read the manufacturer's instructions and safety precautions. Always test the remover on an inconspicuous area first to ensure it does not damage or discolor the tile or paint. Apply the remover liberally to the silicone and allow it to sit for the recommended amount of time. This will give the remover time to penetrate the silicone and weaken its bond.
After the remover has had time to work, use a silicone removal tool or plastic scraper to gently pry away the softened silicone. The silicone should be significantly easier to remove than it was before. If necessary, reapply the remover and allow it to sit for a longer period of time. Repeat this process until all of the visible silicone has been removed.
Once the silicone is removed, it's important to thoroughly clean the area with a mild detergent and water to remove any remaining remover residue. Isopropyl alcohol can be used to remove any lingering silicone residue. Ensure the area is completely dry before applying new sealant.
Preventative Measures and Aftercare
Preventing damage to the paint is crucial when removing silicone from tiles. Before beginning any removal process, it's essential to take preventative measures to protect the painted surface. Applying masking tape along the paint line is a simple but effective way to shield the paint from scratches and accidental damage during scraping and cutting.
Choose the right tools for the job. Using a plastic scraper instead of a metal one can significantly reduce the risk of scratching the tiles or paint. Similarly, using a sharp blade will require less force, minimizing the risk of chipping or peeling the paint. When using heat, apply it cautiously and evenly to avoid overheating the paint. When using chemical removers, ensure that the remover is compatible with the paint material to avoid discoloration or damage.
After the silicone has been removed, it's important to thoroughly clean the area to remove any remaining residue and prepare the surface for new sealant. Use a mild detergent and water to clean the tile and paint. Isopropyl alcohol can be used to remove any remaining silicone residue. Allow the area to dry completely before applying new sealant. If any paint has been damaged during the removal process, touch it up with matching paint to restore the appearance of the surface.

How To Remove Silicone From Tiles A Step By Guide

How To Remove Silicone Sealant Daqiq Chimie Co

How To Remove Silicone From Tiles A Step By Guide

How To Remove Silicone From Tiles Initial

How To Remove Silicone Sealant From Tile Glass Metal And Wood

How To Remove Silicone Sealant Checkatrade

How To Remove Silicone From Shower Bathroom Tiles Inspire Diy Kent Thomas

How To Remove Silicone Sealant Daqiq Chimie Co

How To Remove Silicone Sealant Toolstation

How To Remove Silicone Sealant From Tile Glass Metal And Wood
Related Posts