How Professionals Remove Ceramic Tile From Concrete Floor
Removing ceramic tile from a concrete floor is a task frequently encountered during renovations, repairs, or when updating the aesthetics of a space. Professionals often employ specialized techniques and tools to efficiently and effectively remove the tile while minimizing damage to the underlying concrete slab. This article details the methodologies professionals use to remove ceramic tile from concrete, highlighting the key steps and considerations involved.
Preparation and Assessment
Prior to commencing any tile removal, a thorough assessment of the project area is crucial. This assessment involves identifying the type of ceramic tile, the adhesive used, and the condition of the concrete floor beneath. Different types of tile and adhesives require varying removal techniques. For example, a thin-set mortar might be easier to remove than a mastic adhesive. Observing the existing tile installation can provide clues regarding potential challenges, such as uneven concrete surfaces or areas of poor adhesion.
Safety is paramount. Professionals always wear appropriate personal protective equipment (PPE), including safety glasses, gloves, and a dust mask or respirator. Eye protection is essential to prevent shards of tile or concrete debris from entering the eyes. Gloves protect hands from sharp edges and potential irritants in the adhesive. Respiratory protection is necessary to minimize inhalation of dust, which can contain harmful substances like silica. Ear protection may also be considered, especially when using power tools.
The work area needs to be properly prepared. This involves removing furniture, appliances, and any other obstructions from the area. Covering nearby surfaces with plastic sheeting can help to contain dust and debris. Adequate ventilation is also important to minimize dust accumulation and improve air quality. If possible, opening windows and doors or using a portable air purifier can be beneficial.
A test area should be selected to evaluate the effectiveness of the chosen removal technique. This involves attempting to remove a small section of tile to assess the bond strength and determine the amount of effort required. The test area also provides an opportunity to adjust the removal strategy and select the most appropriate tools for the job. This step is crucial for preventing excessive damage to the concrete floor and minimizing the overall time required for the project.
Tile Removal Techniques
Professionals employ a variety of techniques to remove ceramic tile from concrete, depending on the tile type, adhesive, and condition of the floor. Manual methods are often used for smaller areas or when attempting to minimize damage to the concrete slab. Power tools are typically employed for larger areas or when the tile is strongly bonded to the concrete.
One common manual technique involves using a chisel and hammer. The chisel is placed at the edge of a tile, and gentle hammer blows are used to separate the tile from the adhesive. This method requires patience and precision to avoid damaging the concrete. Variations of this technique involve using a flat pry bar instead of a chisel to lift the tile. The pry bar is inserted under the tile edge, and leverage is applied to break the bond. This method can be more efficient than using a chisel, but it also carries a higher risk of damaging the concrete if not performed carefully.
Power tools can significantly expedite the tile removal process. A demolition hammer (also known as a jackhammer) is a powerful tool that can quickly break up tile and adhesive. This tool is best suited for large areas where minimizing damage to the concrete is not a primary concern. A smaller, more maneuverable option is a rotary hammer with a chisel attachment. This tool provides a balance between power and control, allowing for more precise tile removal with less risk of damaging the concrete. When using these tools, professionals often use a sweeping motion along the grout lines to loosen the tiles. Another useful power tool is an oscillating multi-tool with a scraper blade. This tool can be used to remove both tile and adhesive, and its compact size makes it suitable for working in tight spaces.
Regardless of the technique used, it is important to be mindful of the angle and force applied. Applying excessive force can result in chunks of concrete being removed along with the tile, which will require additional repair work. Maintaining a shallow angle and using controlled movements can help to minimize damage.
Surface Preparation and Repair
Once the tiles have been removed, the concrete floor typically requires surface preparation and repair. This process involves removing residual adhesive, leveling the surface, and patching any cracks or imperfections.
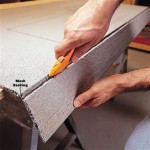
Removing residual adhesive is a critical step. Professionals often use mechanical methods, such as scraping with a floor scraper or grinding with a diamond grinding wheel, to remove the adhesive. Chemical adhesive removers can also be used, but it is important to select a product that is compatible with the type of adhesive used and to follow the manufacturer’s instructions carefully. Chemical strippers may require multiple applications and can generate fumes, so adequate ventilation is essential. After using a chemical stripper, the surface should be thoroughly cleaned to remove any residue.
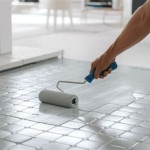
Leveling the surface is often necessary to ensure a smooth and even substrate for the new flooring. This can be achieved by applying a self-leveling compound. Self-leveling compounds are cement-based mixtures that are poured onto the floor and spread evenly. They flow into low spots and create a level surface as they dry. Before applying a self-leveling compound, the concrete floor should be properly primed to ensure good adhesion. The primer helps to prevent the compound from drying too quickly and cracking.
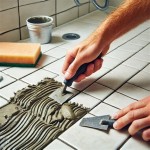
Any cracks or imperfections in the concrete floor should be repaired before installing new flooring. Small cracks can be filled with a concrete patching compound. Larger cracks may require more extensive repairs, such as using hydraulic cement or epoxy crack fillers. It is important to follow the manufacturer’s instructions for the chosen repair material and to allow it to cure completely before proceeding with the flooring installation. Ignoring cracks can lead to problems with the new flooring, such as cracking, unevenness, or moisture damage.
Finally, the concrete floor should be thoroughly cleaned to remove any dust, debris, or contaminants. This can be done by sweeping, vacuuming, and washing the floor with a mild detergent. A clean and dry surface is essential for ensuring proper adhesion of the new flooring. In some cases, it may be necessary to acid-etch the concrete floor to improve adhesion. Acid etching involves applying a mild acid solution to the surface to roughen it up and create a better bond. However, acid etching should be performed with caution, as it can be hazardous if not handled properly. It is important to wear appropriate PPE and to follow the manufacturer’s instructions carefully.
In summary, removing ceramic tile from a concrete floor is a multi-step process that requires careful planning, the use of appropriate tools and techniques, and attention to detail. Professionals prioritize safety, assess the project area, select the most effective removal method, and prepare the concrete surface for new flooring. By following these steps, they can efficiently and effectively remove tile while minimizing damage and ensuring a successful flooring installation.

How To Remove Floor Tiles From Concrete Our Guide

How To Remove Tile From A Concrete Floor

How To Remove Tile Flooring Yourself With Tips And Tricks All Things Thrifty

3 Easy Ways To Remove Ceramic Tile Wikihow

How To Remove Ceramic Tile And Thinset The Nifty Nester

How To Remove Tile Floor Sourgum Waste

Removing Tile And Thinset From Concrete Sawdust Girl

How To Remove Ceramic Tile And Thinset From Concrete Floors Easily

Avondale Az How To Remove Ceramic Tile From A Concrete Floor Flooring Professionals 602 821 0712

How To Remove Ceramic Tile From Concrete Floor Rubi Blog Usa
Related Posts