Essential Aspects of Effortlessly Cleaning Grout on Tile Floors
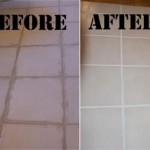
Maintaining the pristine condition of tile floors often requires addressing the accumulation of grime and discoloration in the grout lines. Cleaning grout can be daunting, but by understanding the essential aspects, you can effectively restore its original appearance and preserve the aesthetic appeal of your tile flooring.
1. Identifying Grout Type: Acid-Sensitive vs. Non-Acid Sensitive
Before initiating any cleaning process, it's crucial to determine the type of grout used in your tile installation. Acid-sensitive grouts, such as marble and limestone-based grouts, are vulnerable to damage from acidic cleaning solutions. Non-acid-sensitive grouts, including epoxy and urethane grouts, are more resistant to acids.
2. Selecting the Appropriate Cleaning Solution
Based on the grout type, select a suitable cleaning solution. For acid-sensitive grouts, use a pH-neutral cleaning solution or a specially formulated cleaner designed for these types of grout. For non-acid-sensitive grouts, you have more options, including acidic cleaning solutions like white vinegar or commercial grout cleaners.
3. Preparation: Protecting Adjacent Surfaces
Before applying any cleaning solution, protect adjacent surfaces such as carpeting or baseboards from potential spills or splashes. Cover these areas with plastic sheeting or towels.
4. Applying the Cleaning Solution
Apply the cleaning solution to the grout lines using a brush, sponge, or spray bottle. Allow the solution to sit for the recommended duration, typically 5-15 minutes. This dwell time allows the solution to penetrate the grout and break down the grime.
5. Agitation: Scrubbing or Steaming
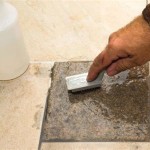
After the dwell time, use a stiff-bristled brush or a grout cleaning tool to gently scrub the grout lines, loosening the softened dirt and grime. Alternatively, you can use a steam cleaner to apply heat and moisture, which can also effectively dissolve the dirt particles.
6. Rinsing and Neutralization
Rinse the grout lines thoroughly with clean water to remove the cleaning solution and loosened dirt. If you used an acidic cleaning solution, neutralize the remaining acidity by wiping the grout lines with a solution of baking soda and water.
7. Drying
Allow the grout to dry completely before walking on the floor or performing any further cleaning. Adequate drying time prevents moisture buildup, which can lead to mold or mildew growth.
8. Regular Maintenance
Regular maintenance is essential to prevent the reappearance of grout discoloration. Use a neutral pH cleaner for routine mopping and avoid using harsh chemicals. Consider applying a grout sealer to protect the grout from future staining and make future cleaning easier.
Remember, if the grout lines are severely stained or damaged, it may be necessary to seek professional tile and grout cleaning services for a more comprehensive restoration.

How To Clean Grout Tile Cleaning Tips Simply Spotless

How To Clean Grout Tips For Natural Stone Flooring Granite Gold

How To Clean Grout Two Ingredient Diy Cleaner Lemons Lavender Laundry

Easy Floor Tile Grout Cleaner A Pretty Life In The Suburbs

How To Clean Floor Tile Grout Without Scrubbing Easy Guide

The Absolute Best Way To Clean Grout 4 Methods Tested 1 Clear Winner

How To Clean Grout And Scentsible

How To Deep Clean A Tile Floor Maid Sailors

How To Clean Grout Without Damaging It Method

3 Top Secret Tricks For Cleaning With Vinegar Making Lemonade
Related Posts


