Do I Need Cement Board For Wall Tile? Understanding Substrate Requirements
Tiling a wall, whether in a bathroom, kitchen, or any other area, is a significant undertaking that requires careful planning and the right materials. One crucial decision is selecting the appropriate substrate, the surface upon which the tiles will be installed. Cement board, also known as cement backer board, is a common choice, but is it always necessary? This article will explore the circumstances where cement board is required, the alternatives available, and the factors influencing the selection of the best substrate for wall tile applications.
The primary function of a substrate is to provide a stable, flat, and water-resistant surface for tile installation. Ceramic, porcelain, and stone tiles are inherently rigid materials, and their long-term performance depends heavily on the integrity of the substrate. If the substrate is unstable, prone to moisture damage, or improperly prepared, the tiles can crack, delaminate, or develop mold and mildew problems. Therefore, understanding the properties of different substrates and their suitability for various environments is paramount to a successful and durable tiling project.
Key Point 1: Moisture Resistance and Cement Board
One of the most compelling reasons to use cement board is its superior moisture resistance. Unlike gypsum-based drywall, which can degrade and crumble when exposed to water, cement board is manufactured to withstand constant moisture. It is composed of cement, reinforced with fibers, creating a rigid panel that resists warping, rotting, and swelling in wet environments.
Bathrooms and showers are particularly susceptible to moisture. The frequent use of water generates high humidity levels, and despite ventilation efforts, some moisture will inevitably penetrate the wall surfaces. In these areas, using cement board is strongly recommended, and often mandated by building codes, to prevent moisture-related problems. The cement board acts as a barrier, preventing water from reaching the underlying framing and insulation, thus protecting the structural integrity of the wall.
Kitchens, especially areas around sinks and backsplashes, also benefit from cement board's moisture resistance. While kitchens may not experience the same level of humidity as bathrooms, they are still prone to spills and splashes. Cement board provides an extra layer of protection against water damage, extending the lifespan of the tile installation and preventing costly repairs down the line.
Even in areas not directly exposed to water, cement board can be advantageous in regions with high humidity levels. The constant exposure to moisture in the air can gradually affect drywall, leading to mold growth and structural deterioration. Cement board offers a more durable and long-lasting solution in these environments, providing peace of mind and reducing the risk of moisture-related issues.
It's important to note that while cement board is highly water-resistant, it is not completely waterproof. Proper installation techniques, including sealing the seams and using a waterproof membrane, are crucial to ensure complete protection against water penetration. These measures prevent water from seeping behind the cement board and compromising the underlying structure.
Key Point 2: Alternative Substrates and Their Limitations
While cement board is often the preferred choice for wet areas, there are alternative substrates that can be used for wall tile installations in drier environments. However, it's crucial to understand the limitations of these alternatives and their suitability for specific applications.
Drywall, also known as gypsum board, is a common wall covering material and can be used as a substrate for tile in areas that are not exposed to excessive moisture. For example, a backsplash in a powder room or a decorative tile accent wall in a living room might be suitable for drywall as a substrate. However, it's crucial to use moisture-resistant drywall, often referred to as "green board," even in these areas, as it offers better protection against incidental moisture.
The primary limitation of drywall is its vulnerability to water damage. Regular drywall will quickly deteriorate when exposed to moisture, leading to tile failure and potential structural problems. Even moisture-resistant drywall is not as durable as cement board and should not be used in areas with frequent or prolonged exposure to water.
Another alternative is plywood. While plywood is stronger than drywall and offers better screw-holding capabilities, it is also susceptible to moisture damage. Plywood can warp, swell, and delaminate when exposed to water, making it an unsuitable substrate for tile in wet areas. Furthermore, the wood fibers in plywood can expand and contract with changes in humidity, potentially causing the tile to crack or delaminate.
Some specialized backer boards, such as glass-mat gypsum boards, offer improved moisture resistance compared to standard drywall but still fall short of cement board's performance in consistently wet environments. These products may be suitable for areas with occasional moisture exposure, but careful consideration should be given to their limitations before installation.
When considering alternative substrates, it's also crucial to assess their load-bearing capacity and dimensional stability. The substrate must be strong enough to support the weight of the tile and the adhesive, without flexing or deforming. Any movement in the substrate can cause the tile to crack or detach over time.
Key Point 3: Installation Considerations and Best Practices
Regardless of the chosen substrate, proper installation is essential for a successful and long-lasting tile installation. Following best practices and adhering to manufacturer's instructions will ensure that the substrate is properly prepared and that the tile is securely bonded to the surface.
Surface Preparation: Before installing cement board or any other substrate, the wall framing must be plumb, level, and structurally sound. Any imperfections or irregularities in the framing can transfer to the substrate, causing uneven tile surfaces. The framing should be inspected for any signs of rot or damage and repaired before proceeding with the installation.
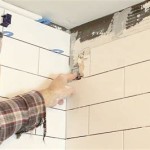
Cutting and Fastening: Cement board can be cut using a utility knife and scoring technique or with a circular saw equipped with a specialized fiber-cement blade. It's important to wear safety glasses and a dust mask when cutting cement board, as it produces fine particles that can irritate the eyes and respiratory system. The cement board should be fastened to the framing using corrosion-resistant screws designed specifically for cement board. The screws should be spaced according to the manufacturer's instructions to ensure proper attachment.
Seam Treatment: The seams between cement board panels should be treated to prevent water penetration. This can be done by applying a fiberglass mesh tape and a thin-set mortar specifically designed for cement board seams. The mortar should be applied in multiple coats, allowing each coat to dry before applying the next. Alternatively, a liquid-applied waterproofing membrane can be used to seal the seams and provide additional protection against moisture.
Waterproofing: In areas prone to frequent water exposure, such as showers and tub surrounds, a waterproof membrane should be applied over the cement board before tiling. This membrane acts as a barrier, preventing water from penetrating the substrate and damaging the underlying structure. Several types of waterproofing membranes are available, including liquid-applied membranes, sheet membranes, and self-adhesive membranes. The choice of membrane will depend on the specific application and the installer's preferences.
Thin-Set Mortar: The selection of the appropriate thin-set mortar is crucial for a successful tile installation. The mortar should be compatible with the type of tile being used and the substrate. Modified thin-set mortars, which contain polymers that enhance adhesion and flexibility, are generally recommended for tile installations over cement board. The mortar should be mixed according to the manufacturer's instructions and applied using a notched trowel, ensuring proper coverage and bond between the tile and the substrate.
Grouting: After the tile has been installed and the mortar has cured, the grout joints should be filled with grout. The grout should be selected to complement the tile and the overall design. Epoxy grouts are more resistant to stains and moisture than cement-based grouts and are often recommended for wet areas. After the grout has been applied, it should be sealed to protect it from stains and moisture.
By adhering to these installation considerations and best practices, you can ensure that your tile installation is durable, long-lasting, and resistant to moisture damage. Choosing the right substrate and installing it correctly is an investment in the longevity and aesthetics of your tiled wall.

How To Install Cement Board For Tile Projects Diy Family Handyman

How To Hang Cement Backer Board For A Wall Full Of Tile Young House Love

Tile Backer Board Breakdown Which One Is Best For Showers Diytileguy

Drywall And Cement Board For The Downstairs Bathroom Blog Homeandawaywithlisa

Installing Cement Board In The Bathroom Angie S Roost

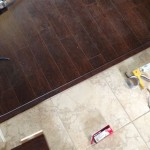
Setting The First Wall Tile In Bathroom Blog Homeandawaywithlisa

How To Install Cement Board For Tile Bower Power

Drywall And Cement Board For The Downstairs Bathroom Blog Homeandawaywithlisa

How To Hang Cement Backer Board For A Wall Full Of Tile Young House Love

Installing Cement Board In The Bathroom Angie S Roost
Related Posts