Do I Need Backer Board for Floor Tile? Understanding Substrate Preparation
Installing floor tile is a significant home improvement project that can dramatically enhance the aesthetic appeal and value of a property. However, the longevity and performance of a tiled floor heavily depend on proper substrate preparation. A crucial aspect of this preparation involves determining whether backer board is necessary. The decision to utilize backer board is not arbitrary; it is dictated by the existing subfloor material, its condition, and the specific requirements of the tile being installed.
The primary purpose of backer board is to provide a stable, durable, and moisture-resistant surface upon which to adhere the tile. Without an appropriate substrate, tile installations are prone to cracking, loosening, and eventual failure. This article will delve into the factors influencing the decision to use backer board, explore different types of backer board, and outline the best practices for their installation.
Key Point 1: Evaluating Your Existing Subfloor
The existing subfloor plays a pivotal role in determining the necessity of backer board. Common subfloor materials include plywood, oriented strand board (OSB), and concrete. Each material presents unique challenges and considerations for tile installation.
Plywood and OSB, while suitable for many flooring applications, are susceptible to moisture damage and expansion/contraction due to humidity changes. This movement can compromise the bond between the tile and the subfloor, leading to cracking. Furthermore, plywood and OSB lack the necessary rigidity to support the weight of tile, particularly in high-traffic areas or when using large-format tiles.
When considering plywood or OSB as a subfloor for tile, specific requirements must be met. The subfloor must be of a sufficient thickness, typically a minimum of 3/4 inch, and it must be securely fastened to the floor joists. Any signs of water damage, such as warping, staining, or delamination, render the subfloor unsuitable for tile installation without the addition of a backer board.
Concrete subfloors offer a more stable and rigid base for tile. However, concrete is porous and can transmit moisture, which can also affect the tile installation. Additionally, concrete surfaces may be uneven or contain cracks, requiring preparation before tiling. A self-leveling compound may be necessary to create a smooth, even surface. Even with these preperations, a backer board can provide an extra layer of protection against moisture and ensure a consistent surface for the tile to adhere to. It’s important to check the concrete subfloor for cracks, especially large ones, and repair them before installing any backer board.
If the existing subfloor exhibits any of the following characteristics, the installation of backer board is strongly recommended:
- Evidence of water damage
- Uneven or unstable surface
- Insufficient thickness (for wood subfloors)
- Excessive deflection or movement
Key Point 2: Types of Backer Board
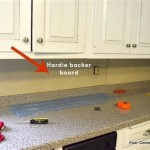
Several types of backer board are available, each with its own properties and suitability for different applications. The most common types include cement board, fiber cement board, and gypsum-based backer board.
Cement board, also known as cementitious backer unit (CBU), is composed of cement, aggregate, and reinforcing mesh. It is highly resistant to moisture, making it an excellent choice for wet areas such as bathrooms and kitchens. Cement board is also dimensionally stable, meaning it does not expand or contract significantly with changes in temperature or humidity. This stability helps prevent cracking and loosening of the tile.
Fiber cement board is similar to cement board but contains cellulose fibers for added strength and flexibility. It offers comparable moisture resistance and dimensional stability. Fiber cement board is often lighter and easier to cut than traditional cement board, making it a popular choice for DIY projects.
Gypsum-based backer board, also known as water-resistant drywall, is designed for areas with moderate moisture exposure. It consists of a gypsum core encased in a water-resistant paper facing. While it offers some level of moisture protection, gypsum-based backer board is not as resistant as cement board or fiber cement board and is generally not recommended for areas that are frequently exposed to water, such as showers or tub surrounds. It is more suitable for areas like living rooms or bedrooms when tiling over wood subfloors.
When selecting a backer board, it is essential to consider the specific requirements of the tile being installed and the environment in which it will be used. For wet areas, cement board or fiber cement board are the preferred choices. For dry areas, gypsum-based backer board may be suitable, but cement board or fiber cement board offer superior performance and longevity.
The thickness of the backer board is also an important consideration. Thicker backer boards provide greater rigidity and impact resistance, which can be beneficial for high-traffic areas or when using large-format tiles. Common thicknesses range from 1/4 inch to 1/2 inch.
Key Point 3: Installation Best Practices
Proper installation of backer board is critical to ensure the success of the tile installation. Following established best practices will help prevent problems such as cracking, loosening, and moisture damage.
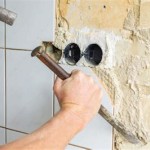
Before installing backer board, the existing subfloor must be clean, dry, and level. Remove any loose debris, dirt, or contaminants that could interfere with the bond between the backer board and the subfloor. Repair any damaged areas or uneven spots with a suitable patching compound or self-leveling compound.
Backer board should be cut to size using a scoring knife or a circular saw with a specialized blade designed for cutting cement board or fiber cement board. Exercise caution when cutting backer board, as the dust can be irritating to the eyes and respiratory system. Wear appropriate safety gear, such as safety glasses and a dust mask, when cutting.
Apply a thin-set mortar to the subfloor using a notched trowel before installing the backer board. The thin-set mortar helps to bond the backer board to the subfloor and provides a more stable base for the tile. Use the appropriate notch size trowel as recommended by the thin-set manufacturer.
Fasten the backer board to the subfloor using backer board screws. These screws are specifically designed for use with backer board and will not corrode or damage the board. Space the screws according to the manufacturer’s recommendations, typically every 6-8 inches along the edges and in the field of the board. Ensure that the screws are driven flush with the surface of the backer board, but do not over-tighten them, as this can damage the board.
Leave a small gap, approximately 1/8 inch, between the backer board sheets to allow for expansion and contraction. Fill these gaps with thin-set mortar and cover them with fiberglass mesh tape. This helps to prevent cracks from forming along the seams.
Allow the thin-set mortar to cure completely before beginning the tile installation. Follow the manufacturer’s instructions for curing time, which is typically 24-48 hours.
When tiling over backer board, use a high-quality thin-set mortar specifically designed for use with tile. Apply the mortar using a notched trowel and press the tile firmly into place. Use spacers to maintain consistent grout lines.
Grout the tile according to the manufacturer’s instructions. Apply a sealant to the grout lines to protect them from moisture and staining. Regularly clean and maintain the tiled floor to ensure its longevity and appearance.
In conclusion, deciding whether to use backer board for a floor tile installation hinges on the existing subfloor's characteristics and the specific environment. Properly evaluating the subfloor, selecting the appropriate type of backer board, and adhering to installation best practices will significantly increase the lifespan and aesthetic appeal of the tiled floor. Neglecting these considerations can lead to costly repairs and premature failure of the tile installation.
While the decision to use backer board might seem like an added expense and step, it is a crucial investment in the long-term performance and durability of the tiled floor. By providing a stable, moisture-resistant, and level surface, backer board helps to ensure that the tile installation will withstand the test of time.
Consulting with a qualified flooring professional can provide valuable insights and guidance throughout the process. They can assess the existing subfloor, recommend the appropriate type of backer board, and provide expert installation services. This can provide assurance that the tile installation will be performed correctly and will meet the specific needs of the project.

How To Install Cement Board On A Floor Diy Family Handyman

How To Install Hardie Backer Cement Board On Floors James Pros

Cement Backerboard Floor Tile Installation Uncookie Cutter

Cement Backerboard Floor Tile Installation Uncookie Cutter

Cement Board Installation On Floors 5 Mistakes To Avoid Diytileguy

How To Install Cement Board The Home Depot

Installing Cement Backerboard For Tile Flooring Hometips

Tile Backer Board Benefits Uses Insulation

Tiling On Wooden Floors Part 4 Overboarding Bathroom Guru

How To Install Cement Board Cbu For Floor Tile
Related Posts