Create A Unique Look With Glass Tile Backsplash Clearances Ideas
Glass tile backsplashes have become increasingly popular in modern kitchen and bathroom designs. They offer a sleek, contemporary aesthetic while also providing durability and ease of maintenance. The visual appeal of glass tile lies in its reflective qualities, which can brighten a space and create an illusion of greater depth. However, successfully incorporating a glass tile backsplash requires careful consideration of clearance requirements, design principles, and installation techniques to ensure a harmonious and functional outcome.
Clearance, in the context of backsplash design, refers to the physical space surrounding the backsplash and how it interacts with adjacent elements such as countertops, cabinets, appliances, and light fixtures. Adequate clearance is crucial for both aesthetic balance and practical functionality. Insufficient clearance can result in a cramped or visually jarring appearance, while excessive clearance might lead to a disjointed or incomplete design. Effective planning during the initial design phase is essential for achieving the desired look and optimizing the functionality of the space.
The specific clearance requirements for a glass tile backsplash will vary depending on the size and shape of the tile, the layout of the kitchen or bathroom, and the overall design style. For example, smaller mosaic tiles might require less vertical clearance above the countertop than larger, rectangular tiles. Similarly, the presence of upper cabinets or a range hood will influence the placement and height of the backsplash. It’s imperative to meticulously measure the available space and consider the proportions of the room before selecting the tile and determining the appropriate clearance.
Understanding Standard Backsplash Height and Depth
A foundational understanding of standard backsplash heights and depths provides a starting point for designing a glass tile backsplash. A common standard height for a backsplash between a countertop and upper cabinets is approximately 18 inches. This allows for sufficient space to protect the wall from splashes and spills while maintaining a visually balanced proportion with the cabinets above. However, this dimension can be adjusted based on individual preferences and the specific configuration of the kitchen. For example, if the upper cabinets are unusually high, the backsplash might be extended further up the wall to create a more cohesive look.
The depth, or thickness, of the backsplash is another important consideration. Glass tiles typically range in thickness from 1/8 inch to 3/8 inch. The chosen thickness will impact the overall profile of the backsplash and how it integrates with the surrounding surfaces. Thicker tiles can create a more substantial and luxurious feel, while thinner tiles offer a sleeker and more minimalist appearance. It's crucial to account for the thickness of the tile, as well as the thin-set mortar used to adhere it to the wall, when calculating the total depth of the backsplash and ensuring it does not interfere with cabinet doors or other fixtures.
In situations where there are no upper cabinets, the backsplash can extend higher up the wall, potentially even reaching the ceiling. This approach is often employed to create a dramatic focal point or to protect a larger area of the wall from moisture and stains. When extending the backsplash to the ceiling, it is essential to ensure that the tile is properly aligned and that the edges are finished neatly to create a polished and professional look. The choice of edge trim can significantly impact the overall aesthetic, with options ranging from simple bullnose tiles to more elaborate metal or stone trims.
The area behind the stove or cooktop often requires special attention. It is generally recommended that the backsplash in this area extend higher than the standard 18 inches to provide adequate protection from splatters and heat. Many designers opt to create a focal point behind the stove by using a different tile pattern, color, or material. This area can also be accentuated with decorative accents, such as a mosaic panel or a custom-designed inset.
Optimizing Clearance Around Appliances and Fixtures
Clearance around appliances and fixtures is paramount for both functionality and aesthetics. The backsplash must be carefully planned to accommodate the dimensions of appliances such as refrigerators, ovens, dishwashers, and microwaves. Insufficient clearance can result in difficulties opening doors and drawers, as well as potential damage to the appliances or the backsplash itself. Detailed measurements of the appliances, including their depth and door swing, are essential for accurate planning.
When designing the backsplash around a sink, it is crucial to consider the height of the faucet and the location of any soap dispensers or other accessories. The backsplash should extend high enough to protect the wall from splashes and spills, while also complementing the style of the sink and faucet. The area behind the sink is often prone to moisture, so it is particularly important to use a waterproof grout and sealant to prevent water damage.
Light fixtures, such as under-cabinet lighting and pendant lights, also influence the design and clearance of the backsplash. Under-cabinet lighting is commonly used to illuminate the countertop and backsplash, and the backsplash should be designed to maximize the effectiveness of the lighting. Pendant lights, on the other hand, can serve as a decorative element and should be positioned in a way that complements the backsplash and the overall kitchen design. Consider the height and placement of the lighting fixtures to avoid any interference with the backsplash and to ensure that the lighting is both functional and aesthetically pleasing.
Electrical outlets and switches represent another important consideration. The backsplash must be cut to accommodate these fixtures, and the cutouts should be precise and clean to avoid any unsightly gaps or exposed edges. It is generally recommended to use a wet saw with a diamond blade for cutting glass tile to ensure clean, accurate cuts. The use of decorative switch plates and outlet covers can further enhance the overall aesthetic of the backsplash and coordinate with the tile design.
Creative Design Ideas for Glass Tile Backsplash Clearance
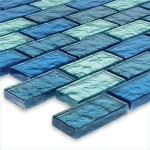
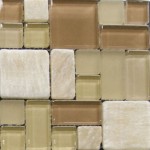
Beyond meeting functional requirements, glass tile backsplashes offer ample opportunities for creative design expressions. One such idea is to use varying tile sizes and shapes to create visual interest. For example, a combination of large rectangular tiles and small mosaic tiles can add depth and dimension to the backsplash. Varying the orientation of the tiles, such as installing them horizontally or vertically, can also create different visual effects.
Color is another powerful tool for creating a unique glass tile backsplash. The choice of color can significantly impact the mood and ambiance of the kitchen or bathroom. Light-colored tiles can brighten a space and make it feel larger, while dark-colored tiles can add drama and sophistication. A monochromatic color scheme can create a clean and minimalist look, while a multi-colored design can add vibrancy and personality. Consider the existing color palette of the room and choose a tile color that complements and enhances the overall design aesthetic.
Texture also plays a crucial role in the visual appeal of a glass tile backsplash. Some glass tiles have a smooth, glossy surface, while others have a textured or frosted finish. Textured tiles can add depth and dimension to the backsplash, while also providing a non-slip surface. Mixing different textures can create a visually interesting and tactile experience. Experiment with different textures to find the perfect balance for the space.
The use of decorative accents can further enhance the design of a glass tile backsplash. Decorative accents can range from simple glass borders to elaborate mosaic panels. These accents can be used to create focal points, add personality to the backsplash, and tie together the overall design of the kitchen or bathroom. Consider incorporating decorative accents that reflect your personal style and complement the overall design aesthetic.
Finally, consider the grout color when designing a glass tile backsplash. Grout color can significantly impact the overall look of the backsplash. A contrasting grout color can highlight the individual tiles and create a more defined pattern, while a matching grout color can create a seamless and subtle look. Choose a grout color that complements the tile and enhances the overall design aesthetic. Epoxy grout is often recommended for glass tile backsplashes due to its stain resistance and durability.
Achieving a truly unique look with a glass tile backsplash involves not just adhering to clearance guidelines but also embracing creative design possibilities. By carefully considering tile size, shape, color, texture, and grout, and by incorporating decorative elements intentionally, it is possible to transform a mundane space into a stunning focal point.

20 Modern Glass Backsplash Ideas Elegant Tiles
12 Modern Glass Tile Backsplash Sleek Designs

Glass Backsplashes A Sleek Modern Option For Contemporary Kitchens

12 Modern Glass Tile Backsplash Sleek Designs

13 S Backsplash Ideas Natural Beauty Tiles

13 Modern Kitchen Backsplash Ideas That Will Add Freshness

13 Modern Kitchen Backsplash Ideas That Will Add Freshness

20 Beautiful Kitchen Backsplash Ideas For Every Approach

13 S Backsplash Ideas Natural Beauty Tiles

39 Backsplash Ideas For Every Budget Stylish
Related Posts