Can You Tile Over a Concrete Porch? A Comprehensive Guide
Tiling over a concrete porch is a common undertaking, offering an aesthetic upgrade and potentially increasing the lifespan of the underlying concrete structure. However, the success of this project hinges on several critical factors, primarily related to the condition of the existing concrete, the selection of appropriate tiling materials and methods, and the proper preparation of the substrate. This article provides a detailed exploration of these factors, offering guidance on how to determine if tiling is a viable option and how to execute the project successfully.
Before embarking on a tiling project, a thorough assessment of the concrete porch is essential. This evaluation will determine if the existing surface is suitable for tiling and what preparatory steps are necessary. Ignoring this step can lead to premature tile failure, resulting in costly repairs and wasted time.
The suitability of a concrete porch for tiling is influenced by its structural integrity, surface condition, and drainage characteristics. Addressing any pre-existing problems is paramount to ensuring a durable and long-lasting tile installation.
Assessing the Concrete Porch's Condition
The first step in determining the feasibility of tiling over a concrete porch is a comprehensive inspection. This inspection should focus on identifying any cracks, spalling, or other signs of deterioration. The presence of these issues suggests underlying problems that must be addressed before tiling can commence.
Cracks in the concrete can be indicative of structural problems or simply the result of normal expansion and contraction due to temperature fluctuations. Small, hairline cracks (less than 1/8 inch wide) are often superficial and may not pose a significant threat to the tile installation. However, larger cracks, particularly those that are actively widening or shifting, require professional evaluation and repair.
Spalling, the flaking or crumbling of the concrete surface, is a more serious concern. It indicates that the concrete has been compromised by water infiltration, freeze-thaw cycles, or the presence of salts. Tiling over spalled concrete will inevitably lead to tile failure as the loose material beneath the tiles continues to deteriorate.
In addition to visual inspection, it's crucial to check the concrete for soundness. This can be done by tapping the surface with a hammer or other solid object. A hollow sound indicates that the concrete is delaminated or otherwise compromised and needs repair or replacement.
Another important aspect to consider is the slope of the porch. Ideally, a concrete porch should have a slight slope away from the house to facilitate water runoff. If the porch is flat or slopes towards the house, water can pool on the surface, leading to moisture problems and potential damage to the tiling and the underlying structure. Correcting any drainage issues is crucial before tiling.
Finally, the presence of any existing coatings or sealers on the concrete surface must be evaluated. Some coatings can interfere with the adhesion of the tile mortar, leading to bond failure. It may be necessary to remove these coatings before tiling, using methods such as grinding or chemical stripping.
Once the assessment is complete, a decision can be made regarding the necessary repairs and preparations. In some cases, minor repairs such as filling small cracks may be sufficient. In other cases, more extensive repairs or even concrete replacement may be required.
Selecting Appropriate Tiling Materials and Methods
Choosing the right tiling materials is crucial for the success of any tiling project, especially when tiling over concrete porches that are exposed to the elements. The type of tile, mortar, and grout must be carefully selected to withstand the stresses of outdoor use, including temperature fluctuations, moisture exposure, and foot traffic.
For outdoor applications, porcelain tiles are generally the preferred choice due to their durability, water resistance, and frost resistance. Porcelain tiles are denser and less porous than ceramic tiles, making them less susceptible to water damage and cracking in freeze-thaw conditions. Natural stone tiles such as slate or granite can also be used, but they may require more maintenance and sealing to protect them from the elements.
The size of the tile is another factor to consider. Larger tiles can be more difficult to install on an uneven surface and may be more prone to cracking due to differential expansion and contraction. Smaller tiles, on the other hand, provide more grout joints, which can improve traction and accommodate movement in the concrete.
The mortar used to adhere the tiles to the concrete is also critical. A high-quality, polymer-modified mortar specifically designed for outdoor use is essential. These mortars provide superior bond strength, flexibility, and water resistance. It's important to follow the manufacturer's instructions carefully when mixing and applying the mortar.
The grout used to fill the joints between the tiles should also be selected for its durability and water resistance. Epoxy grout is an excellent choice for outdoor applications because it is non-porous, stain-resistant, and resistant to cracking. Cement-based grout can also be used, but it should be sealed regularly to protect it from moisture penetration.
In addition to the tile, mortar, and grout, other materials may be needed, such as a crack isolation membrane. This membrane is applied to the concrete surface before tiling to help prevent cracks in the concrete from transferring to the tiles. Underlayment materials, such as cement backer board, can create a more even surface, enhance the lifespan of the tile finish and improve the adherence of the tile to the substrate.
Proper installation techniques are just as important as the selection of materials. The concrete surface must be clean, dry, and free of any loose debris before tiling. The mortar should be applied evenly and the tiles should be firmly pressed into place to ensure good adhesion. The grout should be applied carefully and excess grout should be removed promptly to prevent staining.
Preparing the Concrete Surface for Tiling
The preparation of the concrete surface is perhaps the most critical step in the tiling process. Proper preparation ensures that the tiles will adhere securely to the concrete and that the finished installation will be durable and long-lasting. Inadequate preparation can result in tile failure, regardless of the quality of the materials used.
The first step in preparing the concrete surface is to clean it thoroughly. This involves removing any dirt, dust, grease, oil, or other contaminants that could interfere with the adhesion of the mortar. A pressure washer can be used to clean the surface, but it's important to avoid using excessive pressure that could damage the concrete. A degreaser or other cleaning solution may be necessary to remove stubborn stains or grease.
After cleaning, the concrete surface should be inspected for any imperfections, such as cracks or spalling. Small cracks can be filled with a concrete patching compound, while larger cracks may require more extensive repairs. Spalled areas should be repaired by removing the loose concrete and applying a concrete resurfacing compound.
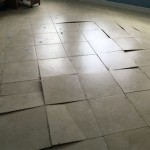
If the concrete surface is uneven, it may be necessary to level it before tiling. This can be done by applying a self-leveling compound or a cement-based underlayment. The leveling compound should be applied according to the manufacturer's instructions to ensure a smooth and even surface.
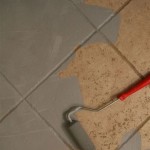
Once the concrete surface is clean, repaired, and leveled, it should be primed with a concrete primer. The primer helps to improve the adhesion of the mortar and to prevent moisture from migrating from the concrete into the tile. The primer should be applied evenly and allowed to dry completely before tiling.
In some cases, it may be necessary to apply a crack isolation membrane to the concrete surface before tiling. This membrane helps to prevent cracks in the concrete from transferring to the tiles, reducing the risk of tile failure. The membrane should be applied according to the manufacturer's instructions.
Finally, before tiling, it's important to ensure that the concrete surface is dry. Moisture can interfere with the adhesion of the mortar and can lead to mold and mildew growth. The concrete surface should be allowed to dry for at least 24 hours before tiling.
By following these steps, the concrete surface can be properly prepared for tiling, ensuring a durable and long-lasting installation.
In summary, tiling over a concrete porch is a feasible option if the concrete is structurally sound, the surface is properly prepared, and appropriate tiling materials and methods are used. A thorough assessment of the concrete's condition is the first step, followed by the selection of durable, weather-resistant materials and meticulous surface preparation. By paying close attention to these details, a successful and aesthetically pleasing tiled porch can be achieved.

How To Install Tile Over An Existing Concrete Patio The Rta

Concrete Patio Transformation 7 Steps To Diy A New Outdoor Oasis

How To Lay Outdoor Tile On Concrete In New Jersey Standard

How To Install Deck Tiles Over Concrete Materials Costs More

Leveling And Dry Fitting Tile In An Outdoor Area Young House Love

Concrete Patio Transformation 7 Steps To Diy A New Outdoor Oasis

Diy Laying Porcelain Tile On A Concrete Porch

Outdoor Tile Over Concrete Unique

Covering Concrete Slab Installation Dektektile Luxury Tile Decking Material

Outdoor Tile Over Concrete Unique
Related Posts