Can You Tile Over Concrete Outside? A Comprehensive Guide
Tiling over concrete outdoors is a popular method for enhancing the aesthetic appeal and functionality of patios, walkways, decks, and other exterior surfaces. Concrete, known for its durability and ability to provide a stable subfloor, serves as a suitable base for various types of outdoor tiles. However, successfully tiling over concrete outdoors requires careful planning, proper preparation, and the selection of appropriate materials. Factors such as climate, drainage, and expected usage play crucial roles in determining the long-term success of the tiling project. This article provides a detailed exploration of the essential considerations and steps involved in tiling over concrete outside, addressing potential challenges and outlining best practices for achieving a durable and visually appealing result.
The longevity and performance of outdoor tiling installations are highly dependent on the preparation of the concrete substrate. A clean, level, and structurally sound concrete surface provides the necessary foundation for tile adhesion and prevents premature failure. This preparation process involves several critical steps, including thorough cleaning, addressing cracks and imperfections, and ensuring proper drainage. Failing to address these preliminary concerns can lead to a compromised installation, resulting in cracked tiles, water damage, and the need for costly repairs.
Key Point 1: Assessing the Concrete Slab and Addressing Underlying Issues
The initial step in any outdoor tiling project involves a comprehensive assessment of the existing concrete slab. This assessment aims to identify any structural issues, surface imperfections, or drainage problems that could compromise the integrity of the tiled surface. A visual inspection should be conducted to identify cracks, spalling, efflorescence, or other signs of damage. The size, location, and severity of any cracks should be carefully documented. Minor hairline cracks may be addressed with crack isolation membranes, while larger, structural cracks require professional attention to determine the underlying cause and implement appropriate repair strategies.
In addition to visual inspection, it's important to assess the levelness of the concrete surface. Undulations or variations in height can lead to uneven tile installation and potential tripping hazards. A long spirit level or laser level can be used to identify any significant deviations from a flat plane. Localized low spots can be filled with a self-leveling compound, while larger areas may require grinding or patching to achieve a uniform surface. Addressing concrete slab issues before tiling is crucial for ensuring a long-lasting and aesthetically pleasing result.
Efflorescence, a white, powdery deposit that appears on the surface of concrete, is another common issue that needs to be addressed. It's caused by the migration of soluble salts to the surface, where they react with carbon dioxide in the air. While efflorescence itself is not necessarily a structural problem, it indicates the presence of moisture within the concrete, which can lead to more serious issues over time. The efflorescence should be thoroughly cleaned with a suitable cleaning solution designed for concrete. Consider applying a concrete sealer to prevent future moisture intrusion when the efflorescence returns.
Key Point 2: Selecting the Right Tile and Adhesives for Outdoor Use
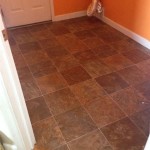
Choosing the right tile is paramount for achieving a durable and weather-resistant outdoor installation. Not all tiles are suitable for outdoor use. Factors such as freeze-thaw resistance, slip resistance, and water absorption need to be carefully considered. Porcelain and certain types of natural stone tiles are generally recommended for outdoor applications due to their low water absorption rates and inherent durability. These materials are less susceptible to cracking and degradation from repeated freezing and thawing cycles.
The Porcelain Tile Certification Agency (PTCA) provides certification for porcelain tiles that meet strict performance standards. Tiles certified as "impervious" by the PTCA have a water absorption rate of 0.5% or less, making them highly resistant to water damage. The American Society for Testing and Materials (ASTM) has standards for slip resistance (ASTM C1028 and D2047), and coefficient of friction (COF) is the measurement for slip resistance. For outdoor applications, tiles with a Dynamic Coefficient of Friction (DCOF) rating of 0.6 or higher are generally recommended to provide adequate traction, especially when wet.
In addition to the tile itself, the selection of appropriate adhesives and grout is equally critical. Polymer-modified thin-set mortars are designed specifically for outdoor use. These mortars offer superior bond strength, flexibility, and water resistance compared to traditional mortars. Choose a thin-set mortar that is rated for exterior use and follow the manufacturer's instructions carefully when mixing and applying the product. Epoxy grouts are another excellent option for outdoor installations due to their exceptional durability, stain resistance, and waterproof properties. Epoxy grouts are more expensive than cement-based grouts, but they offer superior performance in harsh environments. Cement-based grouts, should be sealed properly. When choosing grout, consider the size of the grout joints and the anticipated level of foot traffic. Wider grout joints may require a more robust grout formulation.
Key Point 3: Proper Installation Techniques and Drainage Considerations
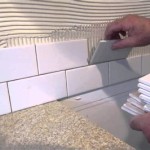
Even with the most carefully selected materials, a successful outdoor tiling project relies on proper installation techniques. The concrete surface should be clean, dry, and free of any loose debris before applying the thin-set mortar. Using a notched trowel of the appropriate size, spread an even layer of thin-set mortar over the concrete surface, working in small sections. The size of the notch on the trowel will depend on the size and type of tile being used.
Press each tile firmly into the mortar bed, ensuring full contact and proper alignment. Use tile spacers to maintain consistent grout joint widths. Periodically check the levelness of the tiles with a spirit level and make adjustments as needed. After the thin-set mortar has cured, apply the grout according to the manufacturer's instructions. Remove any excess grout from the tile surface with a damp sponge. Some tiles, or specific grout types may require sealing after the grout has cured. Follow the sealant manufacturer instructions for correct application.
Adequate drainage is essential for preventing water from pooling on the tiled surface, which can lead to freeze-thaw damage and other issues. Ensure that the concrete slab has a slight slope away from any buildings or structures to facilitate water runoff. If the existing concrete slab is not properly sloped, consider using a self-leveling compound to create the necessary drainage gradient. Installing a drainage system, such as a French drain or surface drain, can further enhance water management and protect the tiled surface. Properly managing the drainage for a tile installation can prevent countless issues later.
Expansion joints are another critical consideration for outdoor tiling installations. These joints allow for the natural expansion and contraction of the concrete and tile due to temperature fluctuations. Expansion joints should be placed at regular intervals, typically every 8 to 12 feet, and along any changes in plane or direction. Use a flexible sealant to fill the expansion joints, allowing for movement without cracking the tiles. Ignoring expansion joints can result in significant damage to the tiled surface over time.
Finally, regular maintenance is essential for preserving the life of an outdoor tiled surface. Sweep or hose down the tiles regularly to remove dirt, debris, and stains. Periodically inspect the grout lines for cracks or damage and make repairs as needed. Sealing the grout lines can help prevent staining and water penetration. Re-sealing the grout lines periodically can extend the life and performance of the outdoor tiling installation.

How To Lay Outdoor Tile On Concrete In New Jersey Standard

How To Install Tile Over An Existing Concrete Patio The Rta

How To Install Tile Over Concrete Greenbuildingadvisor

Concrete Patio Transformation 7 Steps To Diy A New Outdoor Oasis

Leveling And Dry Fitting Tile In An Outdoor Area Young House Love

Outdoor Tile Over Concrete Unique

Outdoor Tile Over Concrete Unique

How To Install Deck Tiles Over Concrete Materials Costs More

Covering Concrete Slab Installation Dektektile Luxury Tile Decking Material

Concrete Patio Transformation 7 Steps To Diy A New Outdoor Oasis
Related Posts